Browsing Category

GF, Vegan & Raw

GF, Vegan & Raw/ Healthy Eating/ Meals/ RECIPES/ Sides

A Quick Lunch Salad & How To Keep Your Salads Interesting

Sometimes reaching my goal of getting leafy greens into my body everyday can get boring.  Especially in a salad form!  I have made it my mission to find ways to motivate myself to keep up the salads and buy ingredients to take them from boring to delicious!  
Here are 2 key ways I do this:
1. I use a mandolin to slice my veggies, then store them in mason jars.  Cut em’ once, store them for the week.  
2. Splurge on ingredients that make compliment greens and make them delicious. A couple ways I do this with seasoned/ glazed nuts & sesame sticks.  I have even been known to crush wheat crackers and sprinkle on top for a little bit of crunch.  I also like to do it with fruit, from dried cranberries to sliced apples & clementines.
Sliced colorful veggies including tomatoes, peppers, cucumbers and carrots
A mandolin is the best and fastest way I have found to slice veggies.

Sliced colorful veggies

Add beans for protein…or hard-boiled eggs.

Sweet and spicy pecans from Trader Joes
Splurge on the extras.  These Sweet & Spicy Pecans from Trader Joes are amazing, and I also love their sesame sticks. It may add a few extra calories, but to me it is so worth it when I think of all those flavonoids, anti-oxidants & vitamins I am getting from the veggies.
Coming soon—>How to make your own salad dressing using no oils, only the natural oils from nuts!
More Ways To Get Your Greens From New Nostalgia:
Salads/Salad Dressings:
Cooked Greens
Smoothies & Juices

GF, Vegan & Raw/ Healthy Eating/ RECIPES/ Sides

Sauteed Green Beans With Honey Almonds

Sautee green beans with honey almonds
 

Anytime I can get all 3 of my girls to happily eat a green vegetable is a very exciting time for me.  I know you Moms know what I mean.  Just getting them to eat vegetables is hard, but GREEN vegetables?  AND a green vegetable they all 3 like?  Impossible.  
Until…
I discovered their love of fresh green beans.  They don’t like soggy canned beans…and I don’t blame them!  They are ok with frozen.  But they all LOVE fresh and eat them like a snack.  
This recipe is very simple.  It just uses beans, garlic, butter (I use Earth Balance), salt, pepper & sliced honey roasted almonds from Trader Joes.  These almonds are a dream in this recipe and add just a hint of sweetness.  I’ve even cooked up a batch and put a big bowl out on the table as an after school snack.  
Enjoy!
Sauteed Green Beans With Honey Almonds 
1 lb. fresh green beans, ends popped or sliced off
2 tsp butter (or olive oil, or Earth Balance for vegans)
1-2 garlic cloves, minced
1/2 cup sliced almonds, honey roasted preferably
salt and pepper to taste
Heat a sauce pan or skillet on medium heat with olive oil or butter. Add garlic and cook for 60 seconds. Add green beans and cook for 5-7 minutes, or until crisp tender.  Do not overcook! Add almonds. Season with salt & pepper.

Health benefits of Green beans (source)

  • Fresh green beans are very low in calories (31 kcal per 100 g of raw beans) and contain no saturated fat. Nevertheless, the lean vegetables are a very good source of vitamins, minerals, and plant derived micronutrients.
  • They are very rich source of dietary fiber (9% per100g RDA) which acts as a bulk laxative that helps to protect the mucous membrane of the colon by decreasing its exposure time to toxic substances as well as by binding to cancer-causing chemicals in the colon. Adequate amount of fiber has also been shown to reduce blood cholesterol levels by decreasing reabsorption of cholesterol-binding bile acids in the colon.
  • Green beans contain excellent levels of vitamin A, and health promoting flavonoid poly phenolic antioxidants such as lutein, zea-xanthin and ß-carotene in good amounts. These compounds help act as protective scavengers against oxygen-derived free radicals and reactive oxygen species (ROS) that play a role in aging and various disease processes.
  • Zea-xanthin, an important dietary carotenoid in the beans, selectively absorbed into the retinal macula lutea in the eyes where it thought to provide antioxidant and protective UV light filtering functions. It is, therefore, green beans offer some protection in preventing age-related macular disease (ARMD) in the elderly.
  • Snap beans are a good source of folates. 100 g fresh beans provide 37 µg or 9% of folates. Folate along with vitamin B-12 is one of the essential components of DNA synthesis and cell division. Good folate diet when given during preconception periods and during pregnancy helps prevent neural-tube defects among the offspring.
  • They also contain good amounts of vitamin-B6 (pyridoxine), thiamin (vitamin B-1), and vitamin-C. Consumption of foods rich in vitamin C helps the body develop resistance against infectious agents and scavenge harmful oxygen-free radicals.
  • In addition, beans contain healthy amounts of minerals like iron, calcium, magnesium, manganese, and potassium, which are very essential for body metabolism. Manganese is a co-factor for the antioxidant enzyme, superoxide dismutase, which is a very powerful free radical scavenger. Potassium is an important component of cell and body fluids that helps controlling heart rate and blood pressure.

GF, Vegan & Raw/ RECIPES/ Sweets

Raw Chocolate Hedgehog Balls

Raw chocolate hedgehog balls
 

 These delicious little balls of goodness not only taste great they are fast and super easy to make.

Its one of those recipes I often throw together at the last minute for unexpected visitors or to take to a friends
house.
All you need is a food processor and a few whole food ingredients.

Ingredient list for raw chocolate hedgehog balls
Raw Chocolate Hedgehog Balls
4 Fresh dates
1 teaspoon raw honey
Pinch of pink salt
1/3 cup each of macadamia nuts, walnuts & sunflower seeds
1 heaped teaspoon of peanut butter (home made is better) just straight peanuts
1 teaspoon of raw cacao powder
1 heaped teaspoon of crunchy buckwheat
Throw your dates in the blender first and blend with the other dry ingredients. Then add the wet ingredients, nuts and seeds.
I like to keep the nuts and seeds still quite chunky in these hedgehog balls. I love the crunchy texture. So do not over blend if you have a 
powerful food processor. Mine is very old and not the best chopper and dicer so it works in my favour for this recipe. 
The mix should come together and be easy to roll into small balls. Add some water if the mix is not coming together for you.
Store in the fridge. They won’t last long.

Teniel Moore writer of Raw Foods
Raw Foods Contributor

You can follow her here:

More posts by Teniel:

GF, Vegan & Raw/ RECIPES/ Sweets

Peanut Butter Cream Filled Cupcakes With Fudgy Frosting {Gluten Free}

Peanut butter cream filled cupcakes with fudgy frosting
 

Don’t these cupcakes look scrumptious?  They were.  I can’t take credit for them, that goes to my amazing sister-in-law, Wendy.  She had us over for dessert and I knew she would come up with something delicious…she always does.  She has a son with Celiac disease and her desserts are always gluten free.  I have found I am a big fan of gluten free desserts.  They can tend to be a bit more dense than gluten desserts, and my palate LOVES that denseness and can never get enough of Wendy’s recipes.

These peanut butter filled cupcakes with fudgy frosting are actually a gluten-free cake mix, but the cream and frosting are both homemade.  Wendy’s presentation was so beautiful and a major wow factor, and much easier than trying to get cream into each cupcake and perfectly frosting the tops.  I thought they were just beautiful.
Peanut butter cupcakes

Are you drooling yet?  Nothing like a cupcake that you must eat with a fork!

Isn’t her home and presentation of her desserts so pretty?  I always tell her that when I come to her home, I could sit and stay forever.  There are many reasons for this. Her home is beautiful, but never does one feel intimidated being in it.  That is because Wendy is a beautiful person and just has a way of making those around her feel loved, cared for & wanted.  She is a gift to me.

Angel food cake and peanut butter cupcakes

She also served angel food cake, with simple sliced strawberries and whipped cream.  If you eat gluten free or have friends who need to eat gluten free, this is a great dessert to quick pick up at the market, slice some strawberries, sprinkle berries with a bit of sugar, and serve with cream.  Easy!

Large bowl of strawberries on a kitchen counter
Back to the cupcakes, they do not have to be gluten free if you do not have a gluten sensitivity.  Any chocolate cake mix will do…but…when I make them, I will use a gluten free mix, just because the denseness really made me happy and stood up to the cream and frosting.  
PEANUT BUTTER CREAM

2 cups creamy peanut butter
1/4 cup (1/2 stick) butter, softened
3-3 3/4 cups (16-oz. box) powdered sugar


Beat peanut butter and butter until combined.  Add powdered sugar until desired consistency. 

………………..

PERFECTLY CHOCOLATE” CHOCOLATE FROSTING

1/2 cup (1 stick) butter or margarine
2/3 cup HERSHEY’S Cocoa
3 cups powdered sugar
1/3 cup milk
1 teaspoon vanilla extract

Melt butter. Stir in cocoa. Alternately add powdered sugar and milk, beating to spreading consistency.
Add small amount additional milk, if needed. Stir in vanilla. About 2 cups frosting.

GF, Vegan & Raw/ RECIPES/ Sweets

Creamy Chocolate Vegan Ice Cream

Creamy vegan chocolate ice cream.
Do you love indulging in ice cream but always feel guilty afterwards?
 
I never do when I make this ice cream. It satisfies every desire for that rich creamy chocolate experience.
 
I’ve eaten it for breakfast or just as a snack. Give it a go and guarantee your kids will love it also.
 
Best part about it, it’s so easy to make.
YOU WILL NEED:
 
Ice cream maker ( I use a cheap one I got for $30 ) 
Container to store the ice cream in
High speed blender ( I use vitamix )
1/2 small frozen avocado- does not need to be frozen.
1 can of  BPA free organic coconut cream 
pinch of good quality salt (never use table salt)
small capful of vanilla
1 heaped tbs of raw cacao powder ( add more if you prefer a stronger taste )
2 tbs of raw honey (this can be replaced with coconut nectar or maple syrup if you prefer and will make it vegan)


You will need to plan ahead when making this by freezing your ice cream bowl overnight. Unless you have a fancy ice cream machine that does not require this step. Also pop your peeled 1/2 avocado in the freezer to freeze.
 
MAKE IT:
 
Pop all your ingredients into a high speed blender and mix till creamy and all incorporated. 
Have a taste and adjust the sweetness to your liking. Try not to eat it all now because it is delicious just like this!
 
Liquid chocolate mix
 
Then simply pour your liquid chocolate mix into the ice cream maker as per your ice cream maker instructions and turn on. Mine takes 20 minutes. It then can be eaten straight away or if you prefer pop it into the freezer to firm up even more.
Making vegan ice cream
Creamy chocolate vegan ice cream
 
 
CHANGE IT UP AND ADD THINGS LIKE:
 
Nut butter
Pecans
Almonds
Macadamia nuts
Frozen banana
Ginger 
——————–
Raw Foods Contributor
 
You can follow her here:
 
More posts by Teniel:
GF, Vegan & Raw/ RECIPES/ Sponsored/ Sweets

Dreamy Coconut Bites

Dreamy coconut bites
 

Once a month, the first Sunday of every month, my in laws have the whole family over for what we call “Pizza Sunday.”  There are usually at least 6 adult couples, who all have at least 3 children whose ages range from 3-21.  It is a day my family looks forward to every month.  The family fellowship is sweet and my in-laws have made their home an absolute haven for the grand kids.  They have a pool, basket ball hoops, tether ball, volleyball, a play set & a nice big yard.  Inside they have a pool table, pinball machine, arcade game, video games and a play room.  My kids never want to leave Grandma’s house!
The adults sit around and have great conversation while we eat.  We then enjoy watching the kids play and swim, sit around and relax with magazines, chatting in between pages.  It is so awesome. I can’t tell you how blessed I feel to truly love and enjoy all of my in-laws.
My Mother-in-Law orders a bunch of pizzas, makes a big healthy salad, and puts out some fruit and a few appetizers.  She usually has a couple different desserts, and sometimes asks us if we would mind bringing desserts. This last pizza Sunday she asked a few of us to bring a dessert to share.  I know she is a huge fan of coconut, so I searched my pinboards for something sweet with coconut in it.  I found the perfect recipe.
The recipe is originally called Coconut Crack Bars via Chocolate Covered Katie.  I can see why…they are addicting.  But I decided to name them something a little less harsh, especially since they are made with pretty wholesome ingredients.  I also took the liberty to add chocolate chips to the recipe.  Yum!
These are no-bake and take just minutes to whip up in your food processor.  They are vegan, but were very well- received by both vegans and non-vegans in the family.  If you are a coconut lover, you must try them! I will be making this recipe again and again. 
Enjoy!
Dreamy Coconut Bites
  • 1 cup shredded coconut (unsweetened) (80g)
  • 1/4 cup honey (or agave nectar if want to keep vegan)
  • 2 tbsp virgin coconut oil 
  • 1/2 tsp pure vanilla extract
  • 1/8 tsp salt
  • 1/4 cup mini chocolate chips (my fav vegan brand, dairy, nut and soy free – click here)
Combine all ingredients in a food processor. (Perhaps you can mix by hand if you don’t have a food processor, but I haven’t tried.) Squish into any small container (I used a 7×5) and fridge for an hour before trying to cut. (Or freeze for 15 minutes.) Can be stored in the fridge or freezer, for at least a few weeks.

Dreamy coconut bites and chocolate chips
 

_____________
Are you a coconut lover?  Here are a few more recipes from NN with coconut in them!

GF, Vegan & Raw/ Healthy Eating/ How-Tos/ RECIPES

Do You Sprout?

Sprouted lentils

Sprouting is one of the cheapest, simplest and most nutritious foods you can eat. My favourite things to sprout are lentils, buckwheat, quinoa & mung beans. These have never failed me.
 
I know lots of people that do not sprout nuts and seeds simply because they think its too hard and don’t know where to start.
 
Well why sprout you may ask? 
 
Soaking softens the skin and begins the sprouting process, also soaking makes it so much easier for your body to digest the grains or seeds. Gas causing enzymes in legumes are released into the soaked water. (make sure to discard the soaking water)
 
When you sprout it truly increases the amount of nutrients in the food compared to the dried grain/nut/legume. When you sprout the vitamins minerals and protein increase.
And also the calories and carbohydrate content decrease. So its a win win all around. 
 
So now I’ve told you how super nutrient dense and good for you sprouting is, let’s find out how to do it.
 
What you will need:
 
~ Organic grain or legume of choice
~ A sterile large glass bottle with some fine mesh cloth to cover, or nut milk bag or sprouting jar
~Filtered water for soaking
 
So lets get started.
 
Soak your grain or legume in a large glass bowl or jar with heaps of filtered water. Cover and let sit on bench overnight. If you remember, its best to change thesoaked water at least once or twice. But this is not crucial.
 
The next morning you will need to drain the grains or legumes and rinse well. Drain the water away. Place them into your sprouting jar you have chosen to use pop a breathable cover over the top. You can use an elastic band to hold in place and set up on an angle to make sure all the water strains away. If you buy a  proper sprouting jar it will have an attachment that lets the jar sit up on an angle. 
 
These are mung bean sprouts soaked then rinsed and ready to sprout.
 
Bean sprouts
Now all you need to do is repeat the rinsing every 8 hours making sure to drain well each time. 
 
What I usually do is this:
 
 ~First rinse in the morning, then do another that night. 
~Repeat again in the morning and again at night. 
 
On the second or third day of doing this you will see gorgeous little sprouts growing. You can keep doing this process until you get the sprouts the length you like. It should take no longer than a few days. Once done do a final rinse and very good drain and store in the fridge. They will last around 3 days in the fridge.
 
These are mung bean sprouts after 3 days ready to eat or you could leave them another day if you like.
 
Mung bean sprouts
Here is some sprouted buckwheat. So easy to do and they grow the cutest little tails. I then dehydrate the buckwheat  till it goes crunchy and add it raw cereals.
 
Its great to add texture and crunch to the top of a smoothie. I also make my own buckwheat flour by grinding the buckwheat  up in coffee grinder. Then I have wonderful sprouted buckwheat flour ready to use in cooking.
 
Lentils and mung bean sprouts
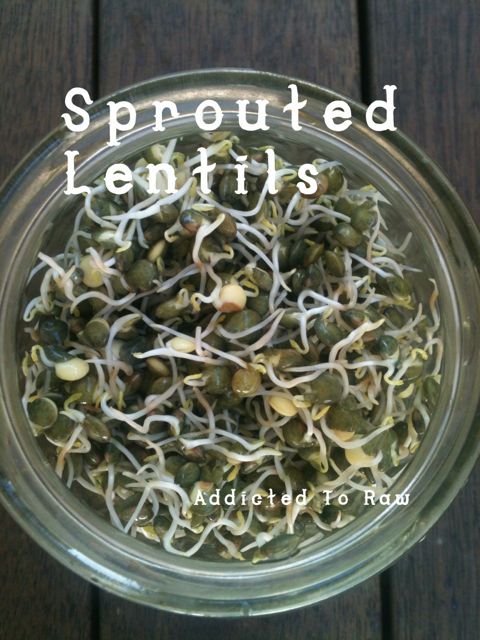
Lentils and mung bean sprouts are great to snack they are crunchy and delicious. Throw them in salads on top of raw crackers and even in a green smoothie!
 
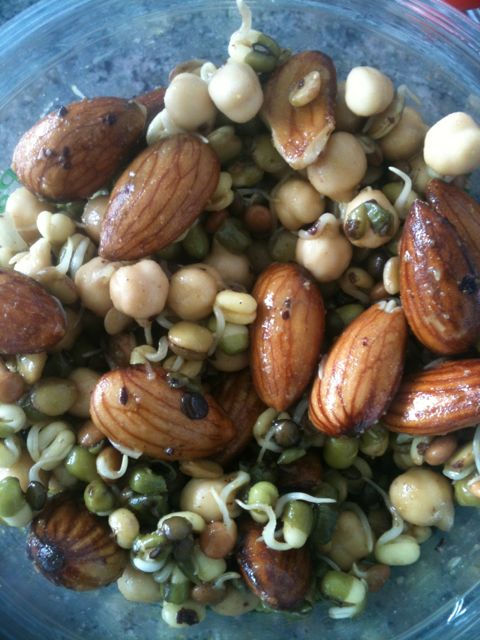
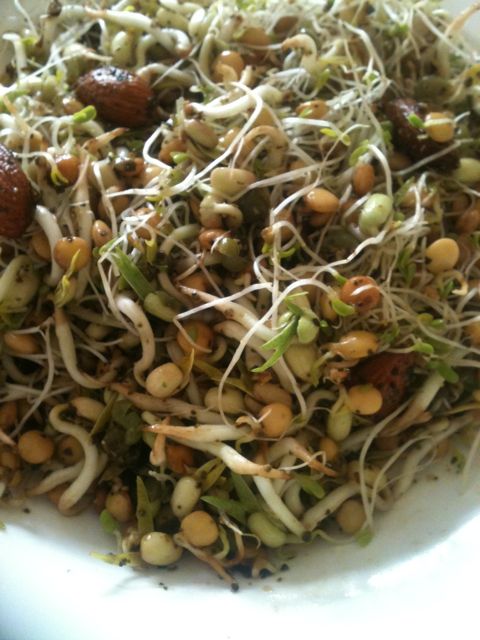
Mixed sprouted salad.
 
Mixed sprouted salad with almonds
 
Mixed sprouted salad
Mixed sprouted salad recipe
 
A selection of mixed sprouts and legumes
Mix in some  crunchy almonds (soaked and dehydrated if you can)
A generous drizzle of organic olive oil or organic flax seed oil
Pinch of Himalayan salt
Cracked pepper
Generous sprinkle of cumin powder
Generous sprinkle of cinnamon
Generous sprinkle of garlic powder
Generous drizzle of coconut nectar or maple syrup for sweetness
Generous sprinkle of kelp seasoning granules (optional)
Squeeze of lemon juice
Mix well and enjoy. Best eaten straight away.


Raw Foods Contributor

You can follow her here:
 
More posts by Teniel:
 
Top