Browsing Category

Sides

Healthy Eating/ How-Tos/ RECIPES/ Sides

How to Make Perfectly Sweet Caramelized Onions

caramelized onions on a white platter

I am smitten with caramelized onions, and this is coming from a girl who despises raw onion.

One of my earliest childhood memories is requesting that my raw onions would be scraped from my fast-food burger. I would watch my Dad sacrifice a perfectly good french fry and use it as a scraper to get those raw onions off!

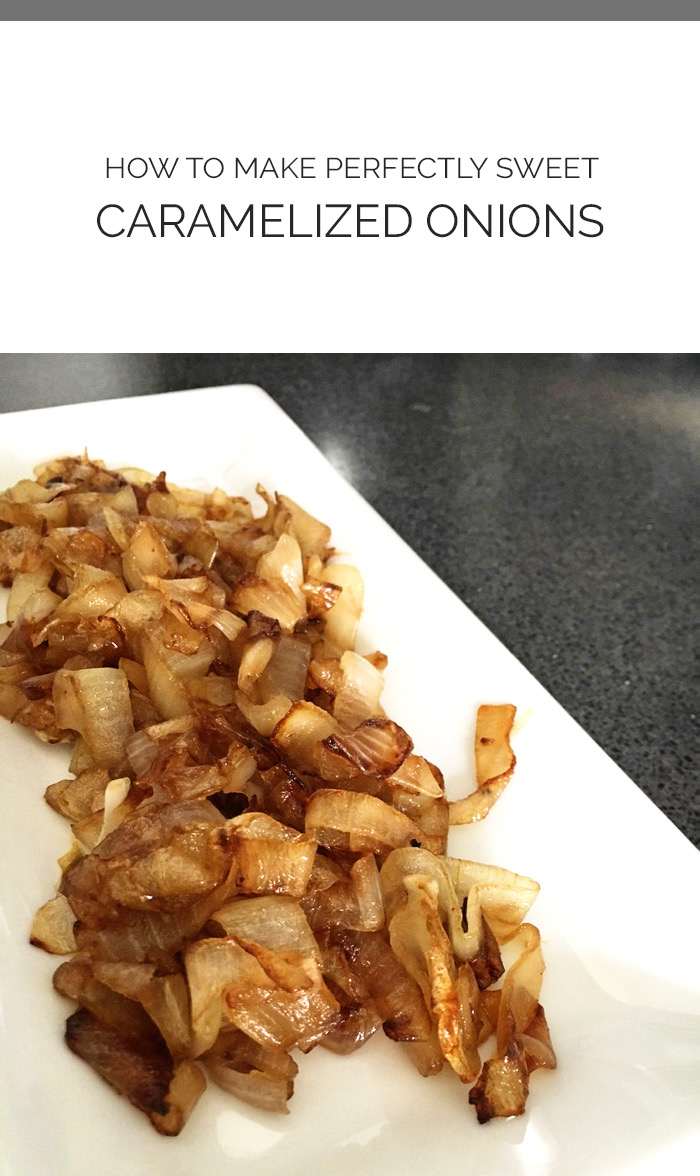
Caramelized onions are a whole different food from raw onion. They are soft and oh so sweet!

They add amazing flavor to many dishes and are great for topping sandwiches, burgers, and salads.

They are so popular in our home that they rarely get past the skillet without fingers in them…my Teagan has been known to make a whole pan disappear.


Why You Need Sweet Caramelized Onions

I am not only smitten because of how delicious caramelized onions are but also because they are one of the most healthful foods you can eat!

Research has shown that people with the highest consumption of onions (and other alliums) have a lower risk of several types of cancer, as onions contain several anti-cancer compounds. {referrence}

Quercetin is one of these compounds which has been found to decrease cancer tumor formation and inhibit the growth of cancer cells.

Onions are antibacterial, antifungal, contain antioxidants and have anti-inflammatory properties–so don’t be anti-onion–at least until you try them caramelized.

They help maintain gastrointestinal health by creating and sustaining beneficial bacteria.

They reduce symptoms associated with diabetes, improve the absorption of minerals (like calcium and my favorite calming mineral – magnesium) due to the fructans they contain.

With my cancer history and my Todd using a healthy diet to keep blood sugar levels down, getting onions in on a daily basis is a priority to both of us.

I use chopped onions as a foundation of just about every recipe I make, and also am just as happy making them caramelized as a yummy vegetable side to any dish.


skillet of caramelized onions

What I Do To Make My Onions Perfectly Sweet

The key to making caramelized onions perfectly sweet is patience and a wide, flat-bottomed high sided heavy pan. A well-seasoned cast iron pan is my favorite pan to use.

The caramelization process takes a little patience, and as you will see in the video I share below, they soften and sweeten in stages.

For caramelization, it can take 15-20 minutes of cooking time.

This usually is not a big deal for me, as I just get them going at the beginning of my meal-making, and they cook away and are done by the time the rest of the meal our meal is cooked, and only need a little attention with just a bit of stirring.

There are several different ways to make caramelized onions, and many cooks will just use oil, salt and pepper.

Some swear by adding a bit of sugar at the end to help speed up the process, but I believe we get quite enough sugar in the typical American diet and don’t need to be adding it to our healthy onions!

I let the onions sweeten themselves, and sometimes add a splash or two of balsamic vinegar at the end for even more darkened sweetness. Delish!


dish of caramelized onions

Perfectly Sweet Caramelized Onions

Caramelized Onions
Prep Time
5 mins
Cook Time
20 mins
Total Time
25 mins
 

There is nothing like a perfectly sweet caramelized onion! Even if you are not an onion lover, you may just become one after trying them cooked in this way. 

Recipe Type: Side Dish
Cuisine: American
Keyword: onions
Servings: 4 people
Ingredients
  • 2 large onions
  • 2 tbsp oil or butter (avocado oil, coconut oil or grass-fed butter)
  • pinch salt
  • pinch pepper
  • water (or chicken broth)
  • 1-2 tbsp balsamic vinegar (optional)
Instructions
Prep onions & pan
  1. Peel and halve onions through root end and slice into 1/4" - 1/8" thick slices, using the onions natural grain to make strips for you.

  2. Heat 2 Tbsp. butter or oil in a large flat-bottomed heavy pan on medium heat. 

    Note: The video in the post shows a saucepan, but a larger, heavy pan is much preferred. Using a wide base gives water room to evaporate, allowing onions to caramelize rather than steam.

Cook onions
  1. Add onions to the pan and stir. Then season with a pinch of salt and pepper. Let the onions begin to soften and turn translucent.

Reduce heat, stir & add liquid if necessary
  1. Reduce heat to medium-low and continue to cook onions, stirring often to prevent them from getting too much color in one place or sticking.

     If onions stick or get too brown in one place, reduce heat.

Add cooking liquid if necessary
  1. If you see bare, browned spots in the pan, add a bit of cooking liquid and stir. The liquid will help scrape the cooked-on bits and will season the onions. 

Keep and eye and keep stirring
  1. Once the onions began to take on a caramel color, keep a close eye on them. For extra-dark onions, this is when you add balsamic. 

  2. This is the point when your onions need constant attention. Keep stirring until they are the desired color. I like mine a caramel color with a few dark edges.

Let cool & store
  1. Let onions cool, then transfer to an airtight container OR you can do what I do and eat them right from the pan! 

  2. Chill any leftover onions. They will keep up to one week and can be eaten warmed or chilled right from the refrigerator. They also freeze well!


Have you over caramelized onions? Do you have your own tried and true method?

If you have not, and even if you are not a big onion fan, making them this way may just change your mind.


Watch this video on The Scene.

{the video uses a saucepan, but I prefer a wide, heavy-bottomed cast iron skillet!}


Grab a bag of onions next time you are at the grocery store and get those health-filled onions into you and your loved ones!

Make sure to comment below and let me know if you do, and what your favorite process toward caramelization is.

GF, Vegan & Raw/ HEALTH/ Nutrition/ RECIPES/ Sides

Eat All Week Chopped Vegetable Detox Salad

bowl of finely chopped vegetables and a bowl of vegetable salad


This Chopped Detox Salad is a recipe you can make once and eat all week! It makes a BIG salad, and will put you well on your way to getting your 7 plant servings a day!

It is full of amazing nutrition, is easy to make, and had been well received by my family. It is one of those recipes that brings health and wellness, and I know I will make it for many years to come.

It’s been awhile since I have been THIS excited about a recipe. It reminds me of the excitement I felt when I discovered Chia Oats. A healthy, staple, ‘make-once-and-eat-for-days’ recipe.


Finely chopped vegetables in a bowl


Detox Salad = Lots of Nutrients

Not only are you getting your vegetable servings in, but they are ALL the colors which is so important. More colors mean more diverse nutrients! I’m always striving to eat the rainbow, and this detox salad is a great way to do it.


Head of cut cauliflower and a head of purple cabbage


2 Secrets to the Success of Detox Salad

There are 2 secrets to the success of this salad:

  1. All veggies are chopped fine with a food processor. So fine that you could eat it with a spoon– almost like a veggie couscous! Using a food processor keeps you from having to take the time to chop, chop, chop; and makes certain vegetables that can be tough and hard to chew a breeze to eat.
  2. The dressing is so fresh and delicious and was the KEY to getting my family to eat this salad.

ATTENTION: My Essential Oil Recipe Blend Recipe Cards is part of the Herbs and Essential Oils Bundle! It is a super short sale so hurry! So much is included… 38 eBooks, eCourses, printables, and a membership site designed to help you use easy and effective natural remedies.

97% off! Click here to purchase and watch a short video all about it!

Find healing with natural remedies


Detox Salad Dressing

We have eaten this salad with store bought dressing when we were short on time and ran out of the homemade version, but I have to tell you, it is not the same!

The dressing in this recipe has such a beautiful fresh lemony taste.

There is something about mixing lemon with ginger and balancing the tang and zest with a bit of honey. Garlic and dijon round it out.

Did you notice that even the dressing contains super healthy ingredients? Lemon is full of vitamin c, ginger is cleansing is garlic and honey both have their own very specific health benefits.

I use avocado oil, as it is a healthy oil and will not harden when refrigerated, so I can make the dressing and store it separately from the salad for my family to help themselves to all week.

You can old use olive oil, but it is not great for refrigerating for later use because it will harden.


Take Your Salad To Go

My girls have been helping themselves to this salad, and even have been packing it up and taking to school in their lunches.

It is safe to say that we are addicted. There is so much flavor, so much texture and it is BEAUTIFUL served in a glass bowl.

This salad is great for sharing with a group. It is a show stopper to look at and tastes amazing. I took this to our large family Easter dinner gathering and it was well received, even by those who were a bit skeptical of that many veggies in one salad!


food processor bowl with finely chopped vegetable bits in it


Micronutrients in Detox Salad

Detox salad is full of micronutrients. Todd and I are on a HUGE micronutrient kick, thanks to Dr. Joel Fuhrman and his amazing books we have been reading together. We love the idea of a high nutrient diet and are pursuing it actively.

From Dr. Joel Fuhrman:

What makes my dietary advice unique is that it is focused on quality, not quantity. It focuses on the type of foods you eat. Its most important nutritional concept is:

H=N/C
Health = Nutrients/Calories

For excellent health and life expectancy, concentrate on consuming foods that contain a lot of micronutrients and fewer calories.

Micronutrients are vitamins, minerals, and phytochemicals; they do not contain calories, but they have vital functions in the body. Calories come from fat, protein, and carbohydrates.

You want to take in the foods that contain the most micronutrients per calorie. You want to get the most nutrient bang for each caloric buck. When you eat this way, calorie-counting no longer matters.

High micronutrient foods come straight from nature; whole plant foods, such as vegetables, fruit, seeds, nuts, and beans, should be the basis of a healthy, anti-cancer diet.

Without adequate micronutrients, food cravings, discomfort, and the demand to over-consume calories can be overwhelming and derail any effort to lose weight or eat healthfully.

It is nice to not be consumed with counting calories and focused on macronutrients like protein, fats, and carbs. I like just simply looking at my food and asking myself if it is nutrient dense food. A simple question and a simple way of eating.

As a 2-time cancer survivor, I want my body to function well and want to supply it with all of the micronutrients it needs. This salad is such an easy way to do that!


finely chopped vegetables in a glass bowl


Eat All Week Chopped Detox Salad Recipe

5 from 2 votes
finely chopped vegetables in a bowl
Chopped Detox Salad Recipe
Prep Time
20 mins
Total Time
20 mins
 

This Chopped Detox Salad is a recipe you can make once and eat all week! It makes a big salad and will put you well on your way to getting your 7 veggie servings a day. 

Recipe Type: Salad
Ingredients
Salad
  • 1 bunch of broccoli about 2 cups chopped
  • 1/3 large head of cauliflower about 2 cups chopped
  • 1/2 small head red cabbage about 2 cups chopped
  • 4 kale leaves stems (about 2 cups chopped)
  • 3 carrots peeled (about 1 cup chopped)
  • 1/2 cup parsley
  • 1/3 cup almonds roughly chopped
  • 1/4 cup dried cranberries or any dried fruit roughly chopped
  • 2 tbsp. sunflower seeds
Dressing
  • 2 cloves crushed garlic
  • 1 tbsp. grated ginger about 1 inch
  • 1/2 cup lemon juice
  • 1 tsp. dijon mustard
  • 1 tsp. honey
  • 1/4 cup oil I use avocado, can use extra-virgin olive oil
  • Salt and pepper to taste
Instructions
  1. Roughly chop all the veggies into bite-size pieces. This can be a fast process, let the food processor do most of the work for you!


  2. Place each veggie into the food processor and pulse until you have chopped the veggies, fine and crumbly. Do this in batches. Finely chop the parsley as well.
  3. Add the veggies into a big bowl, then add the almonds, sunflower seeds, and dried cranberries.
Dressing
  1. In a separate jar combine the garlic, ginger, lemon juice, dijon mustard, honey, extra virgin olive oil, salt, and pepper. Put the lid on and shake, or mix in a bowl and whisk until combined.
  2. Drizzle the dressing over the salad and toss everything together, or store separately if want the salad to last all week. It will last 2-3 days in the refrigerator with dressing added, 4-6 days in the refrigerator without. Ours has always lasted at least 6 days.
Serve and enjoy!
Makes 4-6 Servings


finely chopped vegetables in a bowl


Tips:

  • Key for the salad to last all week? Don’t add the dressing until ready to eat. Use an oil that won’t harden in the refrigerator…olive oil and coconut oil both do, so my choice is avocado oil.
  • This salad will last 4-6 days without dressing, 2-3 days with.
  • A good food processor makes this quick work. I got the Breville Sou Chef for Christmas and it is a dream to use!

Add- in ideas:

  • This recipe is so good just how it is, that I’m hesitant to suggest any add-ins, but I must as it is such a versatile salad and can be used as a base for so many other add-in flavors.
  • Top the salad with sliced hard-boiled egg.
  • Add a can of beans for more protein.
  • Could roll up in a tortilla, rice paper, or raw collard green leaf and use dressing as a dip.
  • Garnish with feta.
  • Add olives or green onions, pepperoncini peppers, or artichoke hearts.
  • Pump up the fiber by adding bulger.
  • Make your leafy lettuce salad even more healthy, sprinkle on this detox salad (pre-dressing) as a chopped veggie topping.

Dinner suggestions:

  • Serve with a piece of grilled salmon or some shredded rotisserie chicken mixed in for a quick dinner salad.
  • Could chop less fine and keep on hand to use for quick stir-frys. I often have leftover cabbage, cauliflower, and carrots, so I chop them up while I have the food processor out, but make them less fine and use in stir-frys.
  • I’ve even justified a pizza dinner by serving this salad as a side. Ha!


What about you? Are you wanting to consume more nutrient-dense foods?

Do you think you and your family would like this salad?

Did you make this recipe? Snap a picture and tag @Amy_NewNostalgia on Instagram or share it using #amynewnostalgia –I LOVE seeing your NN creations!~

Healthy Eating/ RECIPES/ Sides

Oven Roasted Sweet Potato Fries

Oven Roasted Sweet Potato Fries

I cannot get enough oven roasted sweet potato fries lately. I made this pan and ate over half of them in minutes! Sweet potato fries satisfy my love for all things salty/sweet. The starch and fiber in them keep me nice and satiated.

If any do remain on the pan after my ‘straight from the oven’ snacking, I will use them in wraps (they pair well with black beans), top my salad or lunch bowls (they are great eaten cold), will tuck them away in an omelette, or on top of my avocado toast.

Oven Roasted Sweet Potato Fries


These are nice and crispy when they come out of the oven, but after being in the refrigerator they soften up…there is just no way around that.

I enjoy eating them soft and cold, and have even been known to grab a jar from the refrigerator and throw it in my bag for on-the-go snacking! I really like having them on hand, and they are becoming a staple part of my food week and have been added to my weekly food prep list.

My local health food co-op deli always has these sweet potatoes sitting inside their case–roasted, seasoned and ready to eat. I ordered them so often that I just knew I had to learn how to make them myself! My co-op always add a sprinkling of curry and I  love the flavor, so I have been doing the same.


Vegetarian Lunch Bowl Sweet Potato Fries


In the above lunch bowl, I have 3 foods that I have been prepping at the beginning of each week—-quinoa, ‘refried’ beans (without the refry!) and roasted sweet potato fries. This makes it really easy to make a quick and healthy lunch.

The salad above is greens topped with beans and quinoa for protein, sweet potato fries for a healthy starch, gluten-free chips (from Aldi!) for crunch, salsa in place of salad dressing and seeds sprinkled on top. Gotta get those daily seeds in! This salad bowl would be awesome topped with avocado for a nice healthy fat or even a poached egg for a breakfast salad!


Oven Roasted Sweet Potato Fries


You could take these ingredients and roll up in a wrap. Delish! Today I made the above bowl but without the greens–I topped quinoa (you could use brown rice or riced cauliflower if desired) with all of the ingredients in the picture and added guacamole. I then had my Everyday Green Smoothie later for a snack, so I still got my leafy greens in!

Roasted sweet potatoes fries are a great staple to have on hand! These are packed full of vitamin A and are a great way to add an orange food to your plate to achieve the goal of eating the rainbow throughout your day!


Vegetarian Lunch Bowl Sweet Potato Fries

Oven Roasted Sweet Potato Fries
Prep Time
5 mins
Cook Time
25 mins
Total Time
30 mins
 
Recipe Type: sides
Ingredients
  • 1 sweet potato organic since you will be eating the skin
  • 2-3 tbsp avocado oil  a healthful oil that has a nice high smoking point, could use coconut oil
  • salt & pepper to taste
  • pinch of curry powder optional
Instructions
  1. Preheat oven to 400 degrees.
  2. Wash, scrub and dry your sweet potato. Do not peel. There are great nutrients in the skin!
  3. Place potatoes in a bowl and drizzle with avocado oil to cover.
  4. Sprinkle with salt and pepper. Toss until coated evenly and thoroughly.
  5. Lay them out onto a baking tray so that none of them are touching. This will help them caramelize and allow them to get that deep, delicious, golden-brown color.
  6. Roast for 25 minutes or until golden brown. Don't be afraid to get some color on them...that will give them crispiness and flavor. Flip them over halfway through cooking.
  7. Sprinkle with a pinch of curry powder to taste.
Recipe Notes

If you want the fries crispy again after storing in the refrigerator, you can lightly fry them in a cast iron skillet with avocado oil before eating.

RECIPES/ Sides

Rotisserie Chicken Bone Broth Plain & Simple


_MG_5653

I’ve made bone broth a few different ways, and there really isn’t a right way, but using a rotisserie chicken is by far the easiest way! I simply use the rotisserie chicken meat for a meal, but instead of getting rid of the chicken carcass, I keep it and use it to make a wonderfully good-for-you bone broth. Sometimes I use the meat to add right back into the broth once it is finished which makes the tastiest chicken soup, and sometimes I make another recipe that calls for shredded chicken and freeze the bone broth once it is finished.

_MG_5638

_MG_5640

_MG_5657

Bone broth is all the rage right now, with bone broth cafe’s popping up in bigger cities like New York. Why? Because of bone broth’s amazing health benefits. It has been called better than botox broth because of the many benefits it contains for skin, hair and nails. Homemade bone broth contains collagen and gelatin that makes your skin plump up & hair shine! It not only makes your outsides glow, but it does amazing things for your inside, too! It heals your gut by coating your intestines and also cushions your joints and relieves inflammation.

IMG_5821

I started making bone broth on a regular basis specifically for brain health.  I love learning what I can do with food to make our guts healthy which in turn makes our brains healthy too! The minerals from bones are wonderful, and this method of making bone broth extracts calcium, potassium & the calming mineral, magnesium, right into the broth.

Why not just use store-bought stock? Sometimes I do if it is organic from a brand I trust, and I need convenience. Most of the stocks you can buy at the store do contain gelatin, but is thinned down with water so the gelatin content is very low.  Cheaper brands have to make up the flavor somehow, so they use additives: salt, yeast extracts and MSG. Even the most expensive, organic brands have super high salt content and you have to pay a pretty penny for them.

Any chef will tell you the key to a delicious soup is a nice, hearty, rich, homemade broth. I am known for my delicious homemade soups and the reason why they are so good is because of bone broth. You now know my soup secret! Making your own is so easy, it will make your home smell wonderful & is cost efficient way to give great boosts to your health through food.

Benefits of Drinking Bone Broth

~it is one of the most nutrient dense, whole foods that you can make

~it is super hydrating

~gives steady energy throughout the day if you drink it in the morning. A cup for lunch gives energy during the afternoon energy slump.

~it is rich in amino acids & trace minerals

~research shows that chicken broth boosts immune function

IMG_4056

Tips For Making Bone Broth:

~Do not boil. Boiling can destroy collagen molecules. A slow simmer is best.

~Use vinegar when possible to pull out the trace minerals & collagen from the bones.

~Use an organic chicken, one with no hormones & no antibiotics. Whole Foods has organic rotisserie chickens.

~Celebrate if you see that the broth become gelatinous when refrigerated. That is a great sign that you extracted all the good stuff from the bones. That is liquid gold!

~Want to pull even more health benefits from the bones? Soak the bones in cold water with the vinegar & vegetables for 15 minutes to an hour before turning on the heat.

~Oftentimes, there will be wonderful gelatin left in the bottom of the rotisserie container if you have refrigerated the chicken before preparing the broth. Don’t let that go to waste! Dump it right into your broth or save it with your chicken to add later to the soup or whatever dish you are making. You can see it in the picture below.

IMG_5820

~Make your own rotisserie chicken in the slow cooker with a Trader Joes Organic whole chicken. {instructions here}

~Bone Broth keeps fresh in refrigerator for up to 5 days.

~Can freeze in mason jars or ice-cube trays.

~Not ready to make bone broth but have leftover bones? Freeze them in a ziplock.

~Not gonna be home for hours? Use a slow cooker instead of the stove. Instructions below.

IMG_5813


Bone Broth Plain & Simple


Recipe Type: sides
Ingredients
  • Rotisserie Chicken bones & skin
  • 2 tbsp apple cider vinegar
  • 3 organic carrots halved
  • 3 stalks organic celery halved
  • 1 organic onion halved
  • 6-10 cups water
  • Kosher salt & pepper
Instructions
  1. Take all meat off a rotisserie chicken. Save the meat and set aside.
  2. Place the carcass & skin in large pan.
  3. Cut up 2 organic carrots, add to the pan.
  4. Cut up 2 organic celery stalks, add to the pan.
  5. Cut an organic onion in half, add to the pan. If organic, can leave skin on.
  6. Add water to the pan, until it comes a few inches above the chicken bones. I never measure the water. It all depends on the size of your pan and the amount of bones you have.
  7. Add the vinegar & pepper.
  8. Optional: Let all soak for 15-1 hour to bring even more gelatin out of the bones.
  9. Bring to a simmer and remove any scum that rises to the top. Remove the scum, but keep the fat.
  10. Reduce the heat to the lowest setting and let simmer for 12-24 hours.
  11. Remove bones from the broth using a slotted spoon, & strain the rest using a mesh strainer until to remove any bone fragments.
  12. Let broth cool, strain, add salt to taste, & store in mason jars. Freezes beautifully!


_MG_5657


Bone Broth (Slow Cooker)
Recipe Type: sides
Ingredients
  • Rotisserie Chicken Bones & Skin
  • 2 tbsp apple cider vinegar
  • 3 organic carrots halved
  • 3 stalks organic celery halved
  • 1 organic onion halved
  • 6-10 cups water or enough to cover chicken bones & vegetables by a couple of inches
  • Kosher salt & Pepper
Instructions
  1. Combine all ingredients in your slow cooker. Cook on low for 15 hours. (I do overnight.)
  2. Let broth cool, strain, add salt to taste, & store in mason jars. Freezes beautifully!

………

What do you think? Do you make your own broth? Do you want to make bone broth after reading how simple it is and all of the health benefits it brings?

ROTISSERIE-CHICKEN-BONE-BROTH

{For Your Pinning Pleasure}

RECIPES/ Sides/ Sponsored

8 Simple and Delicious Sandwich Thin Snack Recipes

SANDWICH-THIN=RECIPES

It can be tricky to keep calories low when the urge to snack hits. I am a carb lover, and can easily over-do it when it comes to consuming too much when I’m hungry and need a snack. I’ve found that staying mindful while consuming is key to snacking in a more healthful way.

I was recently asked by Weight Watchers® to share that their products can be found at Walmart & how they have made mindful, low-calorie snacking so much easier with a variety of products. They have popcorn, string cheese and more!  My new fav?  Fiber-filled Oroweat® Sandwich Thins!

_MG_7692

I picked up a couple of packages of Oroweat® Sandwich Thins from Walmart, knowing that they are Weight Watchers® endorsed and just 100 calories made me eager to get creative with them. 100 calories each means that half of one is just 50 calories! That is way lower calorie & fewer SmartPoints® than regular bread. With this sort of portion control and low calories, I feel free to top them with all kinds of goodness which makes a satisfying and hearty snack.

Keep reading for fun ways to top your sandwich thins & for a list of specific Weight Watchers® products that you can find at Walmart.

8 Simple & Delicious Sandwich Thin Snack Recipes

8 Simple Sandwich Thin Recipes -Black Berry Cream Cheese Round

CREAM CHEESE & BERRIES SANDWICH THIN

Toast your sandwich thin. Spread with cream cheese. Top with your choice of berries & dust lightly with powdered sugar.

Blackberry Cream Cheese Sandwich Thin Round

Cinnamon Sugar Sandwich Thin Round

CINNAMON-SUGAR SANDWICH THIN ROUND

Toast sandwich thin. Spread with butter. Sprinkle with a cinnamon-sugar mixture. I’ve read that the perfect ratio of cinnamon to sugar is 1/4 cup cinnamon to 1 Tablespoon of Cinnamon.

Peanut Butter Marshmallow Cloud Sandwich Thins Recipe

PEANUT BUTTER CLOUD SANDWICH THIN ROUND

This one is delicious! Toast the sandwich round, spread with peanut butter, top with marshmallows. Pop under the broiler for just a minute, until the marshmallows puff and brown to your liking. Be careful…they burn easily!

Herbed Cheese & Tomato Sandwich Thin Round Appetizer Recipe

GARLIC HERB TOMATO SANDWICH THIN APPETIZER

Spread toasted or non-toasted (I liked non-toasted for this one) sandwich thin with a prepared garlic-herbed cheese spread. Cut into triangles & top with a halved grape tomato. So delicious and makes a pretty appetizer platter!

Sandwich Thin Round Appetizer Recipe

Sandwich Thins Garlic Bread Recipe

GARLIC BREAD SANDWICH THIN ROUNDS

I made spaghetti for dinner tonight and served these garlic sandwich rounds along with it. Much healthier for you than a big hunk of french bread. Did you know these Oroweat® Sandwich Thins have 5 grams of fiber and no high-fructose corn syrup? That makes me happy.

Sandwich Thin Round Pizza

PIZZA SANDWICH THIN ROUNDS

My teen girls gobbled these up as an after-school snack. Toast the sandwich thin, top with pizza sauce (I just used spaghetti sauce), sprinkle with cheese & stick under the broiler until the cheese melts. Top with a chiffonade of basil.

Simple Sandwich Thin Recipes - Grilled Cheese

INSIDE-OUT GRILLED CHEESE SANDWICH THIN

This was so gooey and satisfying! Spread the inside of the sandwich thin with butter. Place buttered side down on a pan over medium heat. Sprinkle with cheese and top with the other buttered half. Flip when browned on one side, and cook until the cheese is melted.

_MG_7696

I plan on using these easy snack recipes during our late afternoon snacking sessions. My kitchen is full of teenage girls every day after school who are all looking for a hearty snack, so I will keep these sandwich thins around so they can get creative themselves.

………………..

Want more after school snack ideas?

You can find the below Weight Watchers® products available at Walmart. There is even an iBotta offer up to $4.00. 

-Weight Watchers® Endorsed Jolly Time Healthy Pop microwave and pre-popped Popcorn
-Weight Watchers® Ice Cream Novelties
-Weight Watchers® Sweet Baked Goods
-Weight Watchers® String Cheese

& of course

 -Weight Watchers® Endorsed Sandwich Thins (Arnold®, Orowheat®, and Brownberry®)

Sandwich-Thins-Recipe-Collage

{Pin It}

A few other ideas for Oroweat® Sandwich thins:

Peanut Butter Banana Chia:

~Toast & spread with peanut butter. Topped with sliced bananas & a sprinkle of chia seeds.

Breakfast Thin Sandwich

~Make a breakfast sandwich–sandwich thins are great for breakfast, lunch, dinner or snack! Fry an egg within the confines of a round mason jar lid ring to make it into a round shape. Top the egg with cheese, place within a toasted sandwich thin and enjoy!

Bruschetta Thins

~Dice some tomatoes, add a bit of olive oil and a splash of balsamic vinegar. Sprinkle with a bit of garlic salt. Mix. Place on toasted sandwich thins & sprinkle with a bit of pepper.

Parmesan Pesto Thins

~Toast a sandwich thin. Spread with prepared pesto. Top with a few shavings of parmesan cheese.

………………..

Follow Weight Watchers® On Facebook for more snack ideas!

This is a sponsored conversation written by me on behalf of Weight Watchers®. The opinions and texts are all mine.

Featured/ RECIPES/ Sides

Kale & Lentil Salad With Cranberries & Coconut Bacon

Follow New Nostalgia

Kale-lentil-coconut-bacon-salad-pinterest

It is amazing how excited I can get about a kale salad. This Kale & Lentil Salad with Cranberries & Coconut Bacon is really delicious & reminds me of something you could order at an upscale vegetarian restaurant.

This kale salad is full of beautiful.  It has gorgeous color from the cranberries & the kale itself. The texture is great with curly kale, chewy dried cranberries & crunchy coconut bacon. The cranberries are a nice sweet touch while the coconut bacon adds amazing smokey & salty flavor.

Chopped Kale

Kale Tip

Kale is different from other salad greens as it is not as delicate.  I love this about kale because you can dress it and put it in the refrigerator to eat the next day, as the leaves will not get soggy like typical salad leaves.

I like kale chopped up small like in this salad, with the dressing “massaged” into the leaves to help soften them a bit. It is best to do this before adding the other toppings to your salad.

Lentil Kale Salad

Kale Nutrition

This salad is full of protein & fiber, phytonutrients & antioxidants. You can read more about the amazing nutrition of kale here. It is filling and can be a meal in itself or  makes a great side dish, too. It is a great recipe for potlucks, and can be enjoyed all year but is especially festive looking at Christmastime.

Coconut-Bacon-640px

Coconut Bacon

Did you read the post I wrote about coconut bacon? It is SO DELICIOUS & very easy to make. Most regular bacon has nitrates in it that are cancer causing and harmful to your health. This coconut bacon has a nice smokey flavor from smoked paprika & has a great salty flavor like bacon, thanks to the addition of soy sauce. The oven crisps the coconut flakes up just right for the perfect crunchy texture to top salads and soups.  Coconut bacon is great sprinkled on top of lentil soup or even just eaten straight from a jar!

Lentils

I use precooked lentils that you can get at Trader Joes in the refrigerator section.  If you don’t have a Trader Joes near you, lentils are super easy to make, or you can get canned lentils.  Want more ideas of what to make with lentils from New Nostalgia? Try Easy Taco Seasoned Lentils or Sloppy Joe Lentils.  Both make great Meatless Monday/ Vegetarian meals.

Coconut Bacon Kale Lentil Salad With Cranberries

This salad has a simple homemade dressing made with apple cider vinegar which gives it great flavor.  It is the perfect dressing for an amazing salad!

Kale & Lentil Salad with Cranberries & Coconut Bacon

{Serves: 6 small or 4 large servings}

1 medium head curly kale, stems removed, washed, dried and chopped (about 7-8 ounces after preparation)

1/2 cup dried cranberries

1 1/2 cups cooked lentils (or one can of cooked lentils, rinsed & drained)

1 cup coconut bacon

1 1/2 tablespoons apple cider vinegar

2 1/2 tablespoons olive oil

1 tsp maple syrup

1/2 tsp salt

Black pepper to taste

2 tablespoons chopped shallots

Instructions:

Whisk together the olive oil, vinegar,maple syrup, salt, pepper, and shallots.  Set them aside.

Place the kale in a large mixing bowl.  Toss the dressing over it and massage thoroughly with your hands, until all of the leaves are coated with the dressing.  Add the cranberries, lentils, and coconut bacon, and toss everything to combine.  Pile the salad into serving bowls & serve.

Note: Leftover salad will keep in an airtight container in the fridge for up to two days.  I love storing it in smaller mason jars for a quick, grab & go lunch.

FUN/DIY/ Holidays/Parties/ Meals/ RECIPES/ Sides/ Thanksgiving

Fabulous Turkey Cranberry Stuffing Sliders

FABULOUS TURKEY CRANBERRY STUFFING SLIDERS

Oh how I love Thanksgiving and all the wonderful flavors of this tasty holiday! These fabulous Turkey, Stuffing & Cranberry Sliders recipe taste just like Thanksgiving- in-a- sammy and makes me very, very happy!

I got the inspiration for this sandwich from Starbucks.  They serve a panini sandwich this time of year that has turkey, stuffing & dried cranberries in it.  I thought I could take the recipe to another level by making my Hall Of Fame Cranberry Sauce, taking a sandwich recipe that is already to die for, and switching the sandwich fillings up a bit.

The result was so very yummy.  I am going to make these little sliders for our family’s Thanksgiving Day Brunch.  They are a great way to get the traditional flavors into a non-traditional meal.

To make this recipe, you simply make your favorite stuffing recipe (mine happens to be the 5- minute- type from a box) and this Hall Of Fame Cranberry Sauce recipe, have some white turkey breast, swiss cheese, & Hawaiian Rolls on hand, and whip up a zesty butter sauce to brush on top of the sandwiches.  You than assemble the sandwiches by slicing the rolls open, adding turkey, stuffing, cheese & cranberry sauce as the filling, adding the top roll, then brushing it with the butter sauce.  After just a few minutes in the oven, you have soft,oowy gooey cheesy rolls with a bit of a crispy bottom, as some of the butter sauce drips down the sandwiches and makes the most amazing crust.  The sandwiches are soft on top and filled with the savory stuffing, and the sweet but tart surprise of the cranberry sauce is what makes these sandwiches shine.  I can’t tell you how wonderful this recipe is! I can’t wait to make them for my guests.

turkey cranberry stuffing sliders

Fabulous Turkey Cranberry Stuffing Sliders

2 packages of King Hawaiian Rolls (12 count each)

2 -7 oz packages sliced turkey breast (about 24 slices) OR (about 2 cups shredded, cooked turkey)

6 slices swiss cheese (cut in 1/4’s)

2 cups stuffing (one box of stuffing usually makes about 3 cups)

1 cup cranberry sauce (I used my Hall Of Fame Cranberry Sauce (recipe below–make ahead and cool to let flavors meld))

1 tablespoon Dijon mustard

1/4 cup Butter melted

1/2 tablespoon Onion Powder

1/2 teaspoon Worcestershire sauce


Step 1
Brush 9×13 baking dish with a bit of the butter mixture. Slice rolls in half (keeping them attached to each other while cutting all at once is much easier than slicing each individually) and place bottom of rolls in buttered pan.  Place a slice or two of turkey (or layer shredded turkey over rolls evenly) and top with stuffing, layering it evenly over the turkey. Drop small spoonfuls of the cranberry sauce evenly over the stuffing, then add a slice of swiss cheese on top of each roll. Replace the top of the rolls and bunch them closely together into the buttered baking dish.

Step 2
In a medium bowl, whisk together Dijon mustard, melted butter, onion powder and Worcestershire sauce.

Step 3
Brush the rest of the sauce over tops of the rolls. Cover with foil.

Step 4
Bake at 350 degrees for 10 minutes or until cheese is melted and the bottom of sandwiches are slightly crisp. Watch closely and avoid over-browning. Serve warm.

HALL-OF-FAME-CRANBERRY-SAUCE-2

HALL OF FAME CRANBERRY SAUCE

1 1/4 cups brown sugar (original recipe calls for white sugar. I was out so I used brown, and it was so delicious that I will always use brown!)

3/4 cup water

1/4 teaspoon ground cloves

1/4 teaspoon ground allspice

1/2 teaspoon ground cinnamon

1 (12 ounce) bag fresh cranberries

Zest of 1 orange (orange part only)


~In a large saucepan, add sugar, water and spices.  Cook, stirring often, until sugar dissolves and syrup comes to a rolling boil, about 3 minutes.

~In a colander, rinse and pick over the cranberries to remove any mushy ones.

~Add cranberries to boiling syrup and continue cooking, uncovered, just until they begin to pop, about 2-3 minutes (set the timer). Be careful not to cook them to long of they will get mushy.  I allowed mine to pop quite a bit, as I wanted the syrup to ooze into the cracks to infiltrate the cranberries.

~Remove from heat, stir in the orange zest.

Note: Syrup will thicken and turn a beautiful cranberry color once cooled and refrigerated.

Optional: mash some of the berries, keeping some of them whole. How much to mash? This depends on the consistency you personally like. I like half of them mashed, and half left whole.

~Cool to room temperature, uncovered.

~Ladle into clean jars and refrigerate until serving time.

Makes about 2 1/2 cups of sauce, enough to serve 6-8 people.

…………

What are your Thanksgiving Day Plans?  What is a favorite recipe that you are making or look forward to each year?

Top