Browsing Tag:

peanut butter

RECIPES/ Sweets

No Bake Clean Eating Peanut Butter Chocolate Crispy Bars

No Bake Clean Eating Peanut Butter Chocolate Crispy Bars

These No Bake Clean Eating Peanut Butter Chocolate Crispy Bars are a play off one of the most popular recipe posts on New Nostalgia. That post is called Best Recipe I’ve Ever Messed Up has been viewed hundreds of thousands of times.

I’m feeling like a proud peacock because I took the base of that recipe and came up with another delicious recipe that you are going to LOVE! These bars are to die for!

Continue Reading…

GF, Vegan & Raw/ RECIPES/ Sweets

Sugar Free No Bake Peanut Butter Cookies

NO BAKE PEANUT BUTTER COOKIES 2

{A recipe from our Raw Foods Contributing Author, Teniel Moore.}

If you have been following along for a while now, you will know I’m into easy, healthy, but still  DELICIOUS food.

It does not get much easier than a no bake cookie. Even better when it contains peanut butter.  One of my all time favourite spreads.


No Sugar No Bake Peanut Butter Cookies

Ingredients:

1 cup of oat bran (available in health food stores)

1 cup of finely shredded coconut

1-2 tbs natural peanut butter

1 tbs tahini

1 tbs coconut oil

2 tbs water

Pinch salt

stevia to taste


How To:

Blend all the ingredients in your food processor and roll into around 12 balls. Flatten with a fork and pop in the fridge to firm up a little before you devour them.

 If you prefer them rolled into balls you can do that also. I like the cookie shape better.

Tip:

If you have a high speed blender you can whip up your very own natural peanut butter in minutes.
 If buying peanut butter from the store, read the labels. It should not contain anything other than peanuts. Organic is always a better option if available. 

…………

Meals/ RECIPES/ Sides

Peanut Butter Banana Honey Fold-Overs


photo 3

These Peanut Butter Banana Honey Fold-Overs are a new favorite at the Bowman household.  My 3 girls have simply HAD IT with peanut butter and jelly sandwiches, and were delighted to find something different in their lunch box.  I love that I found something just as easy to make as a sandwich, tastes amazing & is healthy to boot!

photo 1

I’ve made peanut butter honey chia rollups before, but these fold-overs have gone over much better with my kids.  They are easier to make, too.  Instead of chia being sprinkled inside, these tortillas have chia AND flax in them — thank you Trader Joes!  It is so hard to find a store – bought tortilla that does not have hydrogenated oils or tons of preservatives in them.  I have searched high and low with little luck, until shopping at Trader Joes.  These stay quite soft and chewy which my girls love.

photo 2

I just recently started homeschooling my middle girl, 13-year-old Colsie, so now I am down to making just 2 lunches a day.  To make 2 of these Peanut Butter Banana Fold-Overs, I use one banana, sliced.

photo 5

I simply spread a couple of tablespoons of peanut butter in the middle, then use raw honey on the sides which serves perfectly as the ‘glue’ to hold these fold-overs together.  I slice 1/2 a banana, arrange the slices in the middle to fit on top of the peanut butter, the fold the two honeyed sides into the middle.  The banana stays nice and secure in the middle, and does not turn all icky and brown.

If sliced in half, they fit perfectly in our favorite Sistema lunch cube.  If you have never seen these cubes you are missing out.  They have made packing lunches almost fun…almost…packing lunches is never my favorite chore. Read more about the lunch cubes in my Best Way To Pack A Lunch Post.

Don’t limit these to just lunches!  They make a great breakfast or after-school snack.

PEANUT BUTTER BANANA FOLDOVERS COLLAGE

{A Photo To Pin If So Desired}

Peanut Butter Banana Honey Fold-Overs

2 Tortillas of your choice

4 Tbsp Peanut Butter, divided

4 Tbsp Honey, divided

1 Banana, sliced & divided

Spread both tortillas with 2 Tbsp of honey and peanut butter, with the peanut butter in the middle and the honey on the outer two sides, as shown in the above pictures.  Divide the banana slices between the two tortillas and arrange in a single layer.  Fold over, using the honey as a ‘glue’.

RECIPES/ Sponsored/ Sweets

Salted Caramel Reese’s Peanut Butter Chocolate Dribble & Drizzle Mix

This is a Sponsored post written by me on behalf of REESE’S® Brand for SocialSpark. All opinions are 100% mine.

REESES
College basketball is a pretty big deal around our house.  It is a great excuse to hang out, get loud and eat sweets, like this amazing Salted Caramel Reese’s Peanut Butter Chocolate Dribble & Drizzel Mix.  How’s THAT for a name?
For most of our home games, my Todd is gifted with tickets to the game from his Dad.  Todd has been going to home games most of his life.  He now takes our oldest daughter, Teagan, who has also become quite the college basketball fan.  For many of the games they meet up with Grandpa and uncles and cousins to eat out before the game, then go to the game as a family.
For away games that are shown on TV, I can always count on having our basement come alive with sports fans– my husband being the biggest one.  He is one of the quietest, most introverted people you will ever meet, but when a college basketball game comes on, boy…he is LOUD!  I am usually upstairs chuckling to myself whenever I hear him hooting’ and hollering.  I love hearing my quiet man come alive.
I  also love using our home for game viewing, as it gives me an excuse to get in the kitchen and make something sweet.  Todd’s all-time favorite flavors are chocolate and peanut butter, so most of the desserts I make when I am stepping away from more healthful desserts, have that perfect combination of chocolate and peanut butter.
My all time favorite flavors are salted caramel and chocolate, so this Salted Caramel Reese’s Peanut Butter Chocolate Dribble & Drizzle hit the spot for both Todd and I. It is sinfully delicious.  It will be my go-to snack mix, as it is a real crowd pleaser, easy to make, and makes a lot.
It was so very good that I am entering it in the REESE’S® Baking Bracket Challenge and I am asking YOU to vote for me!  I was asked to compete with 32 other amazing Game Day Recipes. These recipes were put together with Mom’s in mind, to help create some chocolate peanut butter family fun on game day!
 
If you vote for me, your name will be entered in a daily $100 Walmart gift card drawing.  Winner of the REESE’S® Baking Bracket Challenge receives $2,500!  That my friends, would go a long way in helping us pay off a few medical bills, so please vote for me!!
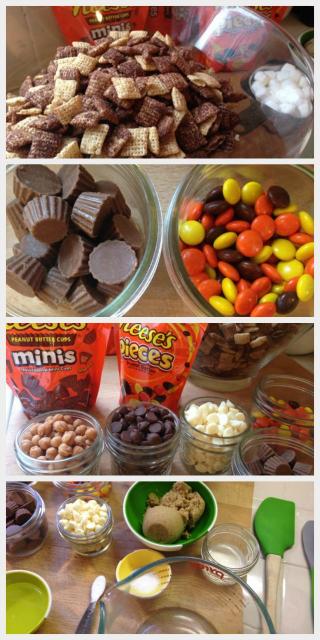
On to this awesome recipe.  All of the ingredients can be found at Walmart.
Reeses1
Salted Caramel Reese’s Peanut Butter Chocolate Dribble & Drizzle Mix
8 cups chocolate Chex cereal
3/4 cup packed brown sugar
6 tablespoons butter or margarine
3 tablespoons light corn syrup
1/4 teaspoon baking soda
1/2 cup Reese’s Pieces Candy
1 cup miniature marshmallows
1/2 cup caramel bits (found by the chocolate chips in the baking aisle–or chop up regular caramels)
1-3 tablespoons heavy cream
1/2 cup milk chocolate baking chips
1/2 cup white chocolate baking chips
1 teaspoon coarse sea salt
1. Into large microwavable bowl, measure cereal; set aside.  Line cookie sheet with waxed paper or foil.
2. In a 2-cup microwavable measuring cup, microwave brown sugar, butter and corn syrup uncovered on high 1-2 minutes, stirring after 1 minute, until melted and smooth.  Stir in baking soda until dissolved. Pour caramel mixture over cereal, stirring until evenly coated.  Microwave on High 3 minutes, stirring every minute.  Spread on cookie sheet.  Cool 10 minutes.  Break into bite-sized pieces.
Reeses3
3. Make sure Chex mixture is cool to the touch (so candy doesn’t melt.) Evenly sprinkle mini peanut butter cup candy and miniature marshmallows over Chex mixture.
4. In a small microwavable bowl, microwave caramel baking bits and cream uncovered on high about 1 minute or until chips can be stirred smooth. Use a spoon or fork to drizzle over snack.
Reese4
5. Microwave the milk chocolate baking chips next, starting with 20-seconds and stirring, then at 20 second intervals until the mixture is completely smooth (microwave temps vary, so watch the chocolate and stir frequently until it’s of drizzling consistency.)  Drizzle over the snack mixture.  Then microwave the white baking chips in 20-second intervals, stirring until smooth.  Add heavy cream if needed for drizzle consistency. Drizzle that over the snack mixture. Quickly sprinkle coarse salt over all while candy drizzles are still wet.
6. Refrigerate until set.  Break apart and store in tightly covered container.
Reeses2
Enjoy!
————-
Again, don’t forget to vote for my recipe by visiting the REESE’S® Baking Bracket Challenge!

Visit Sponsor's Site

Healthy Eating/ Organizing/ RECIPES/ Sweets

No Bake Chocolate Peanut Butter Freezer Slice

I will be making this recipe for years and years to come.  Yes, it is that good. It is the perfect chocolatey peanut butter treat!  It is healthy, easy to make, everyone loves it, and it keeps forever in the freezer.

It starts with nuts, and we all know how good nuts are for us.  They are full of protein and all of those good oils that help with digestion and make your skin shine!

There is no processed sugar in these, but they satisfy a sweet tooth and are plenty sweet thanks to the dates, raisins and honey that are in them.  The coconut oil adds a bit of sweetness, too.

Start with processing the nuts in a high speed blender or a food processor until crumbly.  I have a little one who does not like nuts, so I went pretty powdery with my nuts to keep her happy.  She devoured these and kept asking for more!

Add dates, keep processing until they are in small pieces & mixed well.

Add the rest of your ingredients.  Process until consistency can be rolled into a ball…a messy ball.  Keep scraping the sides of your blender or processor to help blend.

Make sure you lick that spoon!

Press mixture into a lined pan. I used my fingers but then smoothed my prints out with the back of a spoon to make it pretty for all of you!

Mix up the icing.

Are you drooling yet?  This is the best part.  Mmmmmm.

Top bars with icing.  Use a bit of water to thin if too thick.  If too thin, don’t worry, it will firm up in the freezer.

Slice it up and hide it in the freezer.  If you share it will be gone in minutes.

The texture of this slice is so satisfying.  It is chewy even when frozen, easy to bite into.  The frosting melts so creamy in your mouth.  I love that they are cold, too, which really adds to the satisfaction!

{Don’t Forget To Pin It!}

Chocolate Peanut Butter Freezer Slice

 
6-8 Fresh medjool dates
¼ cup of raisins
1 cup of nuts (they can be mixed nuts or not. I like to use macadamia nuts, Brazil nuts or walnuts)
pinch of good quality salt
1/2 cup cocoa
1/4 cup peanut butter
1/3 cup of honey
2 Tsp of water
 
Icing
1/3 cup cocoa powder
1 Tbsp coconut oil (melted) (no substitutes)
2 Tbsp honey
2 Tbsp peanut butter
1/2 tsp vanilla
pinch of salt
 

Directions
~Place your nuts into your food processor or high speed blender and process until crumbly.

~Add your dates and raisins and process again. 
~Now add your salt, cocoa, honey and peanut butter.
~ Process till it starts to come together. If the mix is too dry add a little water a bit at a time till the mix sticks together when pressed into a ball. 
~Press this mix into a small lined container. 
 
Directions For Icing 
Mix cocoa, melted coconut oil, honey, vanilla & a pinch of salt to bring out the flavor. Add water if too thick, if too thin, don’t worry, it will firm up in the freezer.


Pour or spread the icing onto the raw chocolate slice. Pop back into the freezer till the icing firms up, then slice and enjoy. This slice keeps great in the freezer if it lasts that long.

———
This post was inspired by our amazing Raw Foods Contributor Teniel Moore from Addicted To Raw. She wrote about a similar chocolate slice minus the peanut butter and high raw.


GF, Vegan & Raw/ RECIPES/ Sweets

Peanut Butter Cream Filled Cupcakes With Fudgy Frosting {Gluten Free}

Peanut butter cream filled cupcakes with fudgy frosting
 

Don’t these cupcakes look scrumptious?  They were.  I can’t take credit for them, that goes to my amazing sister-in-law, Wendy.  She had us over for dessert and I knew she would come up with something delicious…she always does.  She has a son with Celiac disease and her desserts are always gluten free.  I have found I am a big fan of gluten free desserts.  They can tend to be a bit more dense than gluten desserts, and my palate LOVES that denseness and can never get enough of Wendy’s recipes.

These peanut butter filled cupcakes with fudgy frosting are actually a gluten-free cake mix, but the cream and frosting are both homemade.  Wendy’s presentation was so beautiful and a major wow factor, and much easier than trying to get cream into each cupcake and perfectly frosting the tops.  I thought they were just beautiful.
Peanut butter cupcakes

Are you drooling yet?  Nothing like a cupcake that you must eat with a fork!

Isn’t her home and presentation of her desserts so pretty?  I always tell her that when I come to her home, I could sit and stay forever.  There are many reasons for this. Her home is beautiful, but never does one feel intimidated being in it.  That is because Wendy is a beautiful person and just has a way of making those around her feel loved, cared for & wanted.  She is a gift to me.

Angel food cake and peanut butter cupcakes

She also served angel food cake, with simple sliced strawberries and whipped cream.  If you eat gluten free or have friends who need to eat gluten free, this is a great dessert to quick pick up at the market, slice some strawberries, sprinkle berries with a bit of sugar, and serve with cream.  Easy!

Large bowl of strawberries on a kitchen counter
Back to the cupcakes, they do not have to be gluten free if you do not have a gluten sensitivity.  Any chocolate cake mix will do…but…when I make them, I will use a gluten free mix, just because the denseness really made me happy and stood up to the cream and frosting.  
PEANUT BUTTER CREAM

2 cups creamy peanut butter
1/4 cup (1/2 stick) butter, softened
3-3 3/4 cups (16-oz. box) powdered sugar


Beat peanut butter and butter until combined.  Add powdered sugar until desired consistency. 

………………..

PERFECTLY CHOCOLATE” CHOCOLATE FROSTING

1/2 cup (1 stick) butter or margarine
2/3 cup HERSHEY’S Cocoa
3 cups powdered sugar
1/3 cup milk
1 teaspoon vanilla extract

Melt butter. Stir in cocoa. Alternately add powdered sugar and milk, beating to spreading consistency.
Add small amount additional milk, if needed. Stir in vanilla. About 2 cups frosting.

RECIPES/ Sweets

Peanut Butter Banana Chia Seed Roll Up

I’m always looking for ways to reap the benefits of the nutritional powerhouse called chia.  Chia seed is a super easy way to boost the nutritional value of all kinds of snacks.

Navitas Naturals Chia Seeds Aztec Superfood, 16 Ounce Pouch

Chia seeds and I are fast friends.  Why?

~the are jammed packed with plant protein and minerals, healthy fats and fiber
~they provide more plant based Omega 3’s than any other food, even FLAX
~they have 5 GRAMS of fiber PER TABLESPOON!
~they are flavorless and partially dissolve in juice, soups, stews, shakes etc..
~they are FILLING!


These Peanut Butter Banana Chia Seed Roll Ups are really yummy, and are healthy and hearty enough to be considered breakfast, although we use them most often as a snack.  They are easy to make ahead of time, and are quite portable.  They could even take the place of a boring sandwich in those school lunches.
To make them extra yummy, try slathering some date paste on them as well.  Date paste is an easy to make, super delicious sweetener spread.  It reminds me of a caramel flavor, and I just love it.  I use it most often on oatmeal, and I really loved the flavor it added to these rollups.  Of course, it is optional.  These roll ups are delicious even without the date paste.
Peanut Butter Banana Chia Seed Roll Ups 
Whole wheat tortilla
Peanut butter
Banana
Chia seeds
Date paste, optional
Spread tortilla with peanut butter & date paste, if using.  Sprinkle with chia seeds.  Place banana on one side of the tortilla & roll up.
Enjoy!

Top