Browsing Category

RECIPES

Meals/ RECIPES

Mexican Food Pile On

MEXICAN FOOD PILE ON

This recipe is the perfect recipe for when you are having guests over.  It can all be prepared ahead of time so you can enjoy your guests.  For a larger party, all of the ingredients can be doubled.

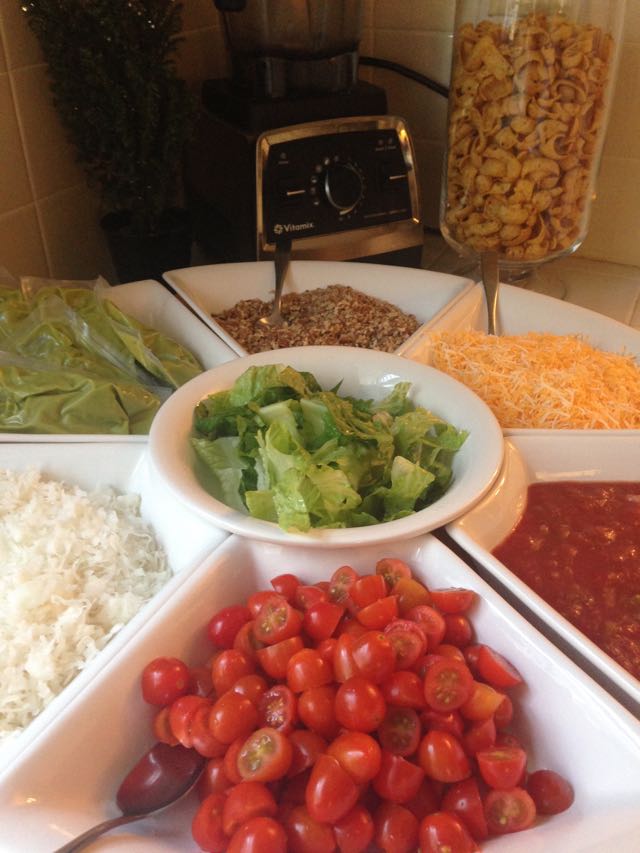
The recipe consists of all types of Mexican food toppings & a crockpot full of a meat & bean mixture.  There are 2 ingredients that make the recipe extra special, which I will share with you later in the post.  The foundation of the pile-on is a bed of frito’s, the meat mixture, rice & cheese; but really, your guest can choose to make their Mexican Food Pile On’s any way they would like!

IMG_2936

The first time I had this recipe was at a sweet friends house.  I was so intrigued by 2 of the topping ingredients that she set out among all the typical Mexican toppings.  Sweetened shredded coconut and chopped pecans! I piled the typical Mexican food toppings on, and was brave and added the coconut and pecans.  Boy am I glad I did.  Those two ingredients MADE the dish.  The coconut gives a nice sweetness that compliments the savory and spicy of the rest of the toppings.  The pecans add a nice nutty crunch.

The second time I had this recipe it was at a Christmas Party at my dear mentor’s house.  She had quite a group but was not stressed at all about feeding all of us.  She had it all prepared ahead and we just helped ourselves.  Everyone raved about the recipe and what great party food it was.

IMG_2929

I decided it was time to make it at my home.  We had some great friends over, I made the meat/bean mixture ahead of time, set out the toppings, and it was the easiest entertaining I had done in a long time.

I’ve made this recipe a couple of times just for our family, too.  The kids love it.

IMG_2932

Mexican Pile On

2 lbs ground beef

1 large onion

1 can chopped tomatoes

1 can tomato sauce

1 can tomato paste

1/2 tbsp garlic salt

2 tbsp chili powder

1 can chili beans

Cook ground beef and onions in a frying pan together until meat is no longer pink and onions are nice and soft.  Drain.

Put meat and onions into the crockpot.  Add the rest of the ingredients and stir.  Cook 4 hours on low, or put into the refrigerator to cook on party day for 4 hours.

To Serve:

Time to pile it all on! In separate bowls, offer the add-ons of choice & let your guest make their own pile-on’s:

~frito’s (I like to use Trader Joes brand, as it uses organic corn and no high fructose corn syrup)

~rice

~onions

~shredded cheddar cheese

~tomatoes

~lettuce

~black olives

~picante sauce

~sour cream

~guacamole

~jalapenos

~pecans

~coconut (sweet & shredded)

Enjoy!

IMG_2964

GF, Vegan & Raw/ Meals/ RECIPES/ Sides

Spicy Chipotle Tomato Sauce

Unknown

by Teniel Moore–Raw Foods Contributor

Want dinner made in way under 10 minutes?

Then keep reading and get the recipe below for my Spicy Chipotle Tomato Sauce.


For those of you that follow me on my face book page Addicted To Raw, you will

know that at the beginning of February I went on a raw food cleanse.


I eat lots of raw in my diet but not 100% so I like to do reboots like this every few months.


This is where I choose to eat raw, almost completely raw (except for a few sneaky chai’s)

but I did admit that to my followers that I am going to have a hot tea if I feel like it.

So I am being naughty!

 Raw-sauce-2

I love doing these raw food cleanses because it reminds me of why I love raw food so much. I love the simplicity of it and how I can get so much flavour from my food using all natural ingredients.

It gets me back into experimenting and using my imagination as to what I can come up with.

This raw food cleanse I’ve had an addiction to zucchini noodles and the sauce I made. I must have made this for dinner about 5 nights in a row, so I thought I would share it with you all and hope you enjoy it as much as I do.

 Raw-sauce-1

Spicy Chipotle Tomato Sauce

Serves 1 (generous serving)

Large handful of cherry tomatoes or about 2 large tomatoes

3 delicious sun dried tomatoes
Generous pinch of himalayan salt
Generous dash of smoked paprika

Generous dash of chipotle powder (I use Frontier brand)

1/2 small knob of garlic
1/4 large red capsicum (red pepper)

Throw all your ingredients into a blender and blend till smooth.I love to give mine a good kick of spice so I am quite heavy-handed with the chipotle.Pour straight over your pasta of choice. To keep it raw I use zucchini noodles or you could use kelp noodles.This would be lovely over cooked gluten-free pasta. also. and don’t forget to throw in additional flavours like olives or basil if you fancy. I have just been enjoying it as is or with a dollop of my cashew cheese on top.

………………..

Its summer over here in Australia so it’s a perfect meal in the heat. If you want it warm you can heat the sauce on the stove or warm in your dehydrator if you have one.

Hope you try out this super easy recipe. Its a great one for a fast lunch or dinner.

………………..

Teniel-Veggies-Resized

Teniel Moore of Addicted To Raw

Raw Foods Contributor

FUN/DIY/ Healthy Eating/ RECIPES/ Sides

Simple Mason Jar Salads

mason-jar-salad

Mason-Jar-Salads

Salads in a Mason Jar

I’ve seen these mason jar salads all over Pinterest and Instagram, and have been wanting to make them myself for quite a while now.  I love the idea of just grabbing a jar and having a healthy lunch or snack right at your fingertips.

These jars took just minutes to make. I decided to keep mine simple, which helped make the process super easy.

 I wanted to use ingredients that all members of my family would eat, as I hoped that having some beautiful jars of goodness in our refrigerator would encourage my 3 girls to grab one and eat up their veggies.

It worked, especially on my oldest girl who is a cross-country runner and is quite motivated to get her veggies in!  She loved these so much that she asked if she could take them in her school lunch instead of a sandwich.


Salad-in-a-jar-Collage


Salad in a Jar

I’ve seen quite elaborate salads- in- jars all over the internet, but I knew simple would work best for our family.  Most that I’ve seen put the dressing at the very bottom, then add veggies, a protein (beans or hard-boiled eggs) then the salad at the top.

Putting hearty vegetables in-between the dressing and the lettuce keeps the lettuce dry and makes them last 5-7 days in the refrigerator.  It is great for a to-go lunch or snack.

My family members all like a different dressing, so I skipped putting the dressing in the bottom.  We ended up eating most of these at home, where we could easily grab the dressing we liked, dump the jar onto a plate, and add any other toppings at the time of eating.

Really, for my family, the salad jars were a great way to present enticing, healthy, grab and go food.  I think it is worth the little bit of time to put the jars together to make this happen.

Sometimes when veggies just sit in their bags in the refrigerator, my girls are less likely to grab them and eat them. Having them in such pretty jars really made a difference in the number of vegetables we consumed that week.

I’ve written before about keeping fresh veggies cut in jars in our refrigerator.  Most weeks when I am making a salad for dinner, I will cut up extra vegetables and put them into jars–again–worth the extra time for my family to see healthy foods in our refrigerator.

They will not grab a cucumber and cut it up to eat it, but they will grab a jar of sliced cucumbers and munch away.

The week I made these jars, I made sure I had hard-boiled eggs peeled and chopped, ready to go as it is one of my families’ favorite salad toppings and a great way to add protein.

I also had red pepper slices and cooked peas, both in separate jars, which are two of my favorite salad toppings.

In my pantry, I had a large jar of croutons, a jar of dried cranberries & a jar of sunflower seeds, all of which are great salad toppings.

Jars a wonderful way to keep healthy ingredients at your fingertips, store ingredients so that they last a long time, and make the refrigerator and pantry look beautiful and organized.  I just love them!

Below is a list of salad ingredients that can be stored in jars to top your Simple Mason Jar Salad, or to make more elaborate Mason Jar Salads.

If you are wanting to make these with the dressing and all of the ingredients layered in the jar, make sure you buy large mouth jars and layer the ingredients in the right order.


Best Order:

Dressing, hearty vegetables (ones that can marinate in the dressing without breaking down like carrots, peppers, grape tomatoes, cucumbers), fruits, protein/carb (beans, pasta, chicken), dry toppings (seeds, croutons, dried fruit) then lettuce.


Ingredient Ideas for Mason Jar Salads

Shredded Rotisserie Chicken
Chopped Bacon
Whole-Wheat Bow-Tie Pasta
Sliced Strawberries
Blueberries
Grapes
Pineapple
Mandarin Oranges
Dried Cranberries
Avocado
Green Peppers
Cauliflower
Broccoli
Carrots
Peas
Radishes
Cucumber
Tomatoes
Shredded Cheddar Cheese
Feta Cheese
Croutons
Sunflower Seeds
Sliced Almonds


Simple Mason Jar Salads

Here is how I made mine:

Cucumber

Shredded Carrots

Shredded Broccoli Stalks

Baby Spinach

Lettuce Mix

*all of my ingredients (except cucumber) came prepped in bags from Trader Joes- easy!


Directions:

Add ingredients in jars in the order given.  Put a lid on and store in refrigerator 5-7 days.

When ready to eat, take out, add whatever extra toppings you would like, add dressing & enjoy!


What about you?

Do you like the idea of having these available in your refrigerator ready to grab and eat?  Do you think it would motivate you to eat more veggies?

For a very detailed article on Mason Jar Salads, click here.

4th of July/ Holidays/Parties/ RECIPES/ Sweets/ Valentine's Day

Cheesecake- Stuffed Strawberries

Cheesecake-Stuffed-Strawberries

Do you know what July and February have in common?

The 4th of July & Valentine’s day both give us an excuse to eat lots and lots of  STRAWBERRIES!

Cheesecake-Stuffed Strawberries are a super great way to celebrate a holiday.  They are special, beautiful, and a nice change from chocolate-covered strawberries.  Can’t give your Chocolate Covered Strawberries up? Then mix the 2 on a beautiful platter and get ready for the oooo’s& ahhhh’s !

My 11- year- old Avery is quite the pastry chef and loves any excuse to get her pastry bag out and do some filling or decorating.  She made these beauties for her sister’s birthday which is at the end of January, and we loved them so much we are going to make them again for Valentines Day.

I love recipes that have a bit of natural, healthy goodness along with a sweet.  This recipe is just that.  Nature’s goodness with a creamy sweet addition.

Enjoy!


Cheesecake Stuffed Strawberries

2 lbs. fresh strawberries

8oz cream cheese

1 tbsp sour cream

3/4 cup powdered sugar

1 tsp vanilla extract


Wash the strawberries and pat dry with a paper towel.  Use a melon baller to remove the stems and create a small hole in the strawberries for the cheesecake to sit.  Set aside.

In a medium bowl, beat the cream cheese and sour cream until fluffy.  Add in the vanilla and powdered sugar.  Beat until smooth and combined.  Place cheesecake mixture into a piping bag or

zip close bag, with the corner snipped off.

Squeeze a bit of the cheesecake mixture into each strawberry.  Place on a wax paper lined baking sheet when done and let chill in the refrigerator until ready to serve.  Place on a pretty tray to serve.

Drinks/ Featured/ Healthy Eating/ RECIPES

Honey Ginger Lemon Tea – A Cold Reliever

IMG_0192

Yesterday there was a blizzard here in the Midwest.  It was super fun to be snowed in, even though it was Super Bowl Sunday. We stayed in our jammies all day, I made a big ol’ lasagna, and my Avery made some chocolate chip cookies.  It was a super slow, super chill, super fun Super Bowl Sunday!

Today my 3 girls had a snow day as the roads were still a mess and the windchill was too low to be outside and stay safe.

We decided it is the perfect day for tea, especially when my Avery girl (11 years old) came to me and said “Mom, I think I’m getting a cold.  My nose is stuffy and my throat is a little sore and has ‘stuff’ running down the back of it.”  Oh no. Not cool.  Especially when she has been home bound for 2 days already.  She will be extra bored with a 3rd day at home, especially if she is not feeling well.

IMG_0181

Time for a cup of good, healthy tea.

I’ve been drinking this particular tea every morning, shortly after I wake up, and before I have a cup of coffee.  It is a great way to hydrate and get all those amazing good things that lemon- in -water gives you.  The addition of honey and ginger makes the tea even more nutritious. When I drink it in the mornings, I add a pinch of cayenne.  I’ve read that it is a great way to stimulate the liver to do its detoxifying magic first thing in the morning.  Read more about that here. 

I know when I have a cold, sipping on something hot is so very soothing.  I prefer something hot & light…like chamomile tea or this honey ginger lemon tea.  The steam will warm you  right up, and the ginger & lemon will help clear sinuses, and the honey will help soothe a sore throat. My sweet Avery certainly enjoyed it
and was very thankful for her cup of tea.  Later I will make her my Sweet Tart Smoothie for even more nutrition from aronia berries.  I do not want this cold going anywhere but away!

IMG_0182

IMG_0187

The lemon in the tea gives a nice dose of vitamin C & there is wonderful goodness to the essential oils that diffuse into the tea from the rind of the lemon.  The ginger, honey and lemon all have their own natural medicinal qualities so when you drink them combined, they create a calming and relaxing tea that can ease cold symptoms and boost immunity.

This cleansing tea will become a favorite , whether you have a cold or not.  Make it for your family.  You will love it and so will they.  It tastes like a lightly sweetened hot lemon drink, with just a hint of ginger flavor.  It is so very thirst quenching and soothing.

IMG_0188

Before we move on to the recipe, I have a great tip for having ginger on hand and how to store it. It is to keep it in the freezer.  I like to store it in mason jars in the freezer 2 ways.  One–sliced thinly for tea.  Two–in chunks in a jar ready to be grated and used in the next recipe…like Korean Beef over Rice.  Frozen ginger is easy to peel and grate, and it lasts so much longer in the freezer.

Here are 7 of the top benefits of ginger:

1. Ginger improves the absorption and assimilation of essential nutrients in the body.
2. Ginger clears the “microcirculatory channels’ of the body, including the pesky sinuses that tend to flare up from time to time.
3. If you chew on ginger, it will help with nausea and airsickness.
4. Got a tummy ache?  Eat some ginger.
5. Joints giving you trouble?  Ginger has anti-inflammatory properties that can bring relief.
6. If it is cold outside, ginger tea has warming benefits.
7. Rid throat and nose congestion by drinking ginger tea!

IMG_0186

IMG_0184

IMG_0190

Don’t you love that porcelain infuser teacup?  It was a gift and it is my fav.  Buy it here.

IMG_0189

On to the recipe.


Honey Ginger Lemon Tea

6 oz hot water

1 teaspoon raw honey

1 teaspoon thinly sliced ginger

1/2 lemon


~Start heating up water.  I LOVE my electric tea kettle and use it everyday.  It does a great job of heating the water quickly and keeping it warm for multiple cups of tea throughout the morning.

~Take a tea cup that has an infuser in it, and using a fork, pierce the half of lemon while holding it over the infuser and twist the fork and lemon to juice it.  Squeeze as much of the juice out of the lemon half as possible.  Cut the lemon half into 2-4 pieces.  Add them to the infuser.

~Meanwhile, take 1 teaspoon of thinly sliced ginger and put into the infuser.  (Slice using a mandolin and store in the freezer in a mason jar.)

~Last, take 1 teaspoon of honey and drizzle it over the lemon and ginger.

~Put the infuser into the cup of tea, then pour hot water over.

~Let steep 3-4 minutes.

~Lift the infuser our of the cup and enjoy your amazingly light, clean, fresh & oh- so- good for you Honey Ginger Lemon Tea!

Meals/ RECIPES

Quick Dinner – Korean Beef Over Rice

KOREAN-BEEF

A Flavorful Dinner Staple

It is so fun to stumble upon an easy, healthful and delicious dinner that I know will be a weeknight staple around here.  This recipe will be in our rotation because it pleased every single person in our family, which is not an easy thing to do!

The flavor of this dish is very, very similar to Mongolian Beef, it is sweet and salty and just darn good!  Using ground beef makes it quick dinner that you can making in minutes. It is amazing how developed the flavor is in such a short time!

IMG_0146

To Substitute Or Not Substitute

It is key to use certain ingredients in this recipe, so be careful with substitutions.  The sesame oil adds a flavor that is impossible to get with anything else.  The green onions and ginger are also ‘must-have’s’ in this recipe. We are not huge onion fans in this family, but when cooked right, in the right dish, they are amazing.

The substitutions I might make the next time I make this dish is brown rice for white rice, and maple syrup instead of brown sugar — just to make it a bit more healthy.

IMG_0147

Fresh Ingredients

You just can’t go wrong with a recipe that has such great, fresh ingredients like garlic, onion and ginger.  Yum!  They are not only full of flavor, but also full of amazing nutrients for the body.

IMG_0148

IMG_0149

Grass Fed & Organic Please!

I highly recommend using grass-fed beef from a farmer you trust.  I cannot tell you the difference in flavor when I buy ground beef from my local co-op, where I know exactly what farm the cow came from.  My family can even tell when I substitute cheaper ground beef for organic, grass-fed beef.  It is worth every penny of the extra cost.  Flavor and peace-of-mind is priceless.

IMG_0150

My Favorite Rice Maker

I use and love a handy-dandy rice maker.  This is the model I have.  It never fails to produce the perfect texture of rice.

IMG_0152

Recipe


Korean Beef Over Rice

1 cup uncooked brown or white rice

1/3 cup brown sugar, packed (or maple syrup)

1/4 cup soy sauce ( I used tamari)

1 Tablespoon sesame oil

1/4 – 1/2 teaspoon crushed red-pepper flakes

1/2-1 teaspoon grated ginger

1 pound ground beef

3 cloves garlic, minced

2 green onions, thinly sliced


Instructions:

1. Cook rice according to package directions.

2. Mix together brown sugar, soy sauce, sesame oil, red pepper flakes, & ginger in a small bowl.  Set Aside.

3. Brown ground beef in a skillet, set over medium-high heat.  Once cooked, drain off an excuse fat.  Add garlic to skillet and saute for 1-2 minutes, until fragrant.  Stir in sauce and half of green onions.  Bring to a simmer and cook for 2 minutes until well coated and heated through. Garnish with remaining green onions.  Serve over rice.


……………

What About You?

What is a dinner staple in your house?

What do you think of the sound of this recipe?

Drinks/ RECIPES/ Sponsored

Morning Cranberry- Orange Creamsicle Smoothie – A Vitamin C Monster

CRANBERRY-ORANGE-SMOOTHIE

There is something about the new year that excites me and makes me want to just do better.  I love setting goals and figuring out how I can grow as a person.  I am so not ok with staying ‘as is.’ Oh Heaven help us all if I were ok with that! I have so much growing to do, but do you know how thankful I am to be alive to do that growing?  It is so cliché’ to say that God isn’t finished with me yet, but boy, do I rest in that truth.  He allows us a brand new day, a new morning, to get back up again and start anew.

New Mornings & Morning Routines

I am discovering a key way to stay strong and be ready for whatever life brings is to have a solid morning routine. I cannot tell you the difference this is making in my life.  I happened upon a life-changing podcast that introduced me to Hal Elrod and his book ‘The Miracle Morning.‘  I have been implementing his strategy the last 3 days and it is seriously blowing me away–yes, big change in just 3 days! Today I was up at 5:30 and how I spent my time during that extra hour and a half made the world of difference in my day.  Life even brought me a huge bump emotionally later in the morning, and because of the prep work I did early morning with getting my thoughts where they need to be, I was able to pick myself back up, realize what is in my power to change or not change, and move on with my day.  I will share my specific early morning routine in up coming posts, but for today I want to focus in on the simple routine I’ve implemented in the mornings to nourish my body.

Routine To Nourish My Body

1.before coffee.

2. Eat a nutrition-filled breakfast that includes a bit of protein.

3. Take Extra Vitamin D + Turmeric. (The rest of my supplements I take at night)

4. Early morning OR mid morning smoothie. (As breakfast or as a mid-morning snack)

_MG_7889

Let’s talk smoothie.

It is amazing how many nutrients one can pack into a smoothie.  Fruits, veggies, leafy greens, superfood, and even oats or nuts. I have been adding yogurt to my smoothies because yogurt has amazing probiotics in it.  This makes me especially happy because I am on a big probiotic kick.  Why? Because gut health effects brain health, and gut health starts with balanced flora which is what probiotics help do.

Although I limit dairy, I don’t hesitate to add yogurt to my day due to its amazing probiotic content. By adding it to my  routine of morning smoothies, it knocks out #2 & #4 above. Another plus is it gives my body a great dose of protein!  It is amazing how much longer I feel full when I have a bit of protein for breakfast.

_MG_7893

Hello Yulu. Goodbye Greek.

My new favorite brand of yogurt is called Yulu.

I have never been a big fan of the sour taste of yogurt.  I’m a bit picky with my yogurt, as I prefer it to be creamy, but not as thick as Greek yogurt. Greek yogurt tends to be an “acquired taste,” as it is quite tangy, so I have stayed away from it.

Yulu is an Aussie-style yogurt that is made here in the USA.  It is double-smoothed and double-creamed, so it was a whole new yogurt experience for me.  It is not too thick or not too thin. It does not have the too-sour quality that is found in Greek yogurt. I think it tastes divine.

It comes in a container that is see-thru, which I thought was pretty cool and is a clear sign of the honest company that it is.    The ingredient list made me smile as they use real fruit, fruit juice and even vegetable juices for color and flavor– so no artificial colors– and it there is 9 grams of protein in each cup.

If you want to know more about Yulu, you can check out at yuluyogurt.com or follow them Facebook or Instagram.  You can also check out all their Aussie style ‘pinspiration’ at their pinterest boards.  Keep in mind that Yulu is a new product on the market, so check their site for locations & availability in your area.

IMG_4831

Morning Vitamin C, Antioxidant, and Protein Monster

I must to tell you about this new smoothie creation that I have been crushing on.

I call it my Morning Cranberry -Orange Creamsicle Smoothie & it is a vitamin C, antioxidant & protein Monster!

I stock up on Cranberries when they are in season, because they are so good and so healthful.  I love combining them with the flavor of orange and a hint of cinnamon.  This smoothie recipe does just that and  is extra creamy thanks to Yulu yogurt and the addition of a banana.

This smoothie is really special and delicious.  Special enough to be served in fluted champagne glasses on Thanksgiving, Christmas, New Year’s or Valentine’s morning.  Or you could just do what I do and fill up these cute little bottles, pop on a lid, store in the refrigerator and have them ready to go for the morning.  I’m not sure how long they last in the refrigerator.  I have stored yogurt filled smoothies up to 3 days and they keep their deliciousness.  My kids get to them so fast that they never have been around for longer than that!

_MG_7950

Morning Cranberry Orange Creamsicle Smoothie

1 cup fresh raw cranberries

1 cup freshly squeezed orange juice (or a whole orange if you have a high-powered blender)

1 banana

1/2 to 1 cup milk of your choice

1 container honey or vanilla flavoed Yulu brand yogurt

3-4 Medjool dates (or other sweetener of your choice. Only use dates if you have a high-powered blender)

1-2 tsp orange zest

1 teaspoon vanilla

1/4 teaspoon cinnamon

1/2 cup ice

pinch salt (preferably sea salt)

Add all ingredients to blender and blend until creamy.

_MG_7951

————

What about you?

Do you do smoothies for breakfast? Do you have a morning routine?  Do you wake up just in the amount of time needed to get out the door or do you give yourself extra time?  Do you like the idea of a less tart, new creamy- textured yogurt?

This is a sponsored conversation written by me on behalf of Yulu. The opinions and text are all mine.

Top