Browsing Category

HOME

HOME/ Organizing

Before and After Home Office Organization

Home-Office-Organization-Main

“This shop is part of a social shopper marketing insight campaign with Pollinate Media Group® and Sharpie, but all my opinions are my own. #pmedia #EverydaySharpiehttp://my-disclosur.es/OBsstV

I have been ignoring our home office closet for way too long. Now that fall is here I have been motivated make our home office uncluttered, minimalized & esthetically pleasing.  I loved the simplicity of our home office since removing things from the walls and giving it a paint treatment–that is– until I would try to open a desk drawer or look for something in the closet. We we’re to the point where drawers were not closing, closet shelves were falling down, and closet doors were not closing!  It was time to focus in and tackle it, and I did just that on a cool fall-like Sunday afternoon.

Office-Before-After

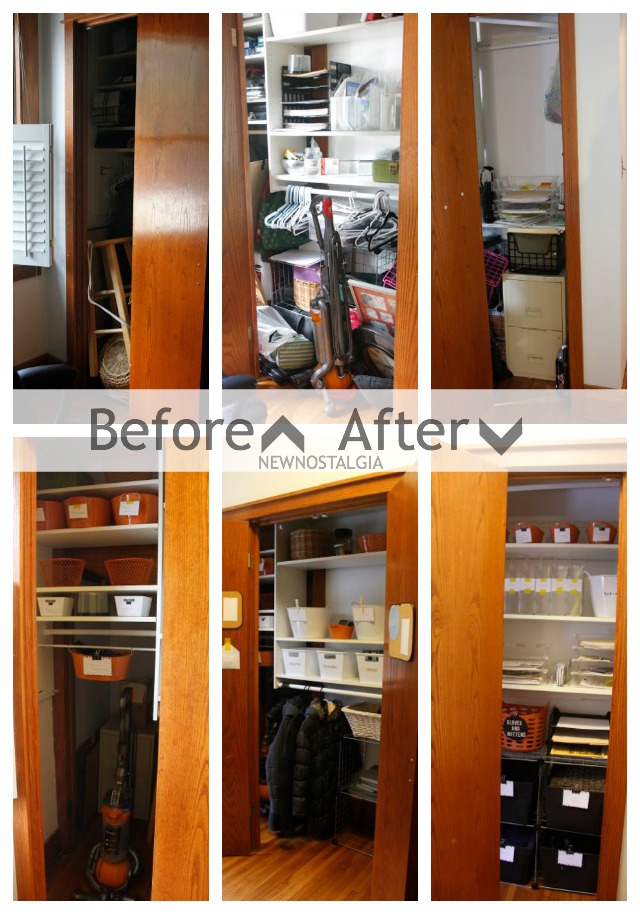
I started on Saturday, tentatively opening drawers and closet doors, taking in what was causing the clutter, and taking note of the things I knew we would be keeping in the office.  This step was important in order to visualize what the best use of the space in the closet would be.  I ventured out on Saturday, visiting Walgreens and my favorite dollars store for supplies.  I looked for a variety of bins of different sizes and textures.  I wanted to keep the color scheme simple, so I chose white, orange, black & a touch of natural brown wicker color.  I thought this color combination would go great with the new deconstructed chevron wall I just painted in our home office.

I also bought supplies to create labels.  I knew in order to keep this closet looking great, the first step would be getting rid of everything that is not used or necessary, and then label containers for all that is left, giving each item a clearly marked home.

I bought some fun yellow washi tape.  I couldn’t find an orange to match the containers I purchased, and I knew this yellow would be a fun pop of color, just as my special yellow chair is that is in the study.

_MG_2078

_MG_2112

I bought some chevron grey, white and black note cards, some white 3×5 cards, and my favorite Stainless Sharpie Pen 1S.  I’m a bit of a pen snob, and I wanted a pen that would work well, look & feel sleek, & make my handwriting look somewhat decent.  Isn’t it funny how a good pen can actually do that?  I also wanted a pen that would be permanent like a marker but write like a pen; without smearing.  Walgreens has the Stainless Sharpie Pen 1S for $5.29.  I also grabbed the Sharpie Pen Grip RT Black, this is my second favorite.  I love that it has a comfortable grip & is retraceable and does not have a lid. My girls tend to lose lids quickly, which is why the Stainless Sharpie Pen is MINE. For older kids and teenagers, retractable Sharpie pens rock!

_MG_2060

I bought the wooden clothes pins from the dollar store, and some binder clips.  I decided I am done with sticky type labels–washi tape does not count as it is super easy to remove.  I like the idea of being able to quickly change out a label depending on the need at the time.  This is why I went with very inexpensive 3×5 cards–they were .50 cents for 400!  Can’t beat that price!  The chevron cards I picked up would be the perfect backing to these 3×5 cards to make them pretty! I used the chevron notecards to back my 3×5 cards, then clipped them right to the container with a clothes pin. When I need to change the label, it will just take a matter of seconds to write on a new card and clip it back onto the container.  Easy!

Armed with my supplies, I started clearing out the closet.  Oh my. It is amazing how much stuff gets thrown in there!  Our home office is a very central location of our home and it just seems to be a magnet for clutter.

While I cleared things out, I made a pile for donating, had a trash bag handy for trash, and made another pile for items that belong elsewhere.  There was also a nice big basket full of papers that need sorted, but I didn’t allow that to distract me from the mission.  I set them aside and will go through them slowly throughout the week, maybe while watching Dr. Oz!

_MG_2046

I spread all my containers out on my kitchen table, and as I cleared out the closet, it became apparent what items needed grouped together and a home.  I brought those items out and put them in the appropriate container, labeled it, then carried it back into the closet and put it together in the most practical,efficient, and beautiful way I could think of– kind of like a puzzle.  I wanted the closet to be appealing to the eye, but also as functional as possible, as this would be key for keeping it organized.

Before I carried all the labeled containers back into the closet, I made sure to sweep, dust and clean the shelves.  I also had to fix the base of the shelves, as it had come apart from the wall and was leaning heavily to one side.  That alone kept my procrastination in full gear when I thought of organizing this closet.  I’m pretty good with power tools but I don’t like the process of using them.   I can’t tell you how happy I was once the base was screwed back into place and the shelves were straight and usable again.  That gave us almost a 1/3 more closet space then we had before when it was broken. Thank you drill and electric screwdriver!  I am woman…hear me roar.

_MG_2065

I put my power tools (and my roaring) away and got out the tools I am more comfortable with:

washi tape

paper

note cards

letter stickers

binder clips

wooden clips

scissors

Sharpie pens

I had great fun making the labels. Like I said above, I kept it simple enough to be able to do a quick change of label if needed, just by grabbing a 3×5 card, a clip and my Sharpie pen.  I stored the 3×5 cards, cut in half, in an envelope and taped it to the inside of the closet door with washi tape.  I utilized the inside of the closet doors by hanging a few bulletin boards.  The board marked ‘Truth’ will hold a weekly scripture verse to keep front and center in our minds throughout the week.

_MG_2089

IMG_0246

I’m super excited about how the closet turned out.  I can’t believe the difference.  Because the closet is in such a central location in our home, and because we do not have a coat closet, I decided to make this closet an office/coat closet.  This is why you see coats hanging & bins marked for mittens, gloves, scarves & hats.  I even kept an open square of the wire shelving open for storing my snow boots.

_MG_2111

I’m trying to keep our office free from paper piles, so I made each family member a magazine file holder with their name clearly marked on the front.  I like that these are big enough to not only hold paper, but also any projects or items I find lying around in the office.  I also made one for my receipts & for papers that need filed.

_MG_2114

_MG_2128

I did give in and use some stickers on a few larger bins that hold items that I know we will always need for storage & whose labels will not need changed out.  I just couldn’t pass up how cute they were.

_MG_2118

One of my favorite areas of the closet is the wire shelving that holds bigger bins.  We have had this for a while, and have been utilizing it in this way, but the closet got so full you could not see it, and the bins were not clearly labeled.  I now have 4 clearly labeled bins.

IMG_0272

IMG_0273

They are marked:

Library

Donate

Deliver

Socks

Are you wondering about the sock bin?  Our laundry room is downstairs which is just to far to go whenever someone cannot find socks.  This bin holds those dreaded missing socks that everyone is always asking for.  Now I just send them to the sock basket.

The library bin keeps the books we get from the library in one place.  I love that I can quickly make another label and jot down when they are due and clip it right to the bin.

The donate & deliver bins are pretty self-explanatory.  I am always collecting items that people left at our home, especially my kids’ friends.  I love having a place to put this stuff and will tell said friends to go check the deliver basket when they come.  I will also use it to keep track of what I need to return to people and deliver myself.  The donate bin is a great place to keep items I want to get rid of.  Minimalizing is an ongoing process in this house, so I always try to have something in that bin!

_MG_2086

IMG_0284

I can now get to my vacuum quickly, and the attachments are all in one place stored above the vacuum.  I hung them in a bucket on a tension rod that I found in the back of the closet.  I also found a hook that is perfect for hanging my camera bag.  I take photos constantly for New Nostalgia and now my Colsie has an interest in photography, so I like having a specific place for the camera where everyone knows where it is and where to put it away.

_MG_2137

_MG_2155

_MG_2152

On to the desk.  Cords were an issue…but not anymore!  I used my Sharpie pen and marked plastic zip bags with what specific cord wasis inside.  Make sure to use a Sharpie, other markers will smear.  Earbuds also got a home.  No more tangled mess!

_MG_2168

I bought a bunch of little round containers from the dollar store & used them to corral all those small items that make a mess in drawers.  I also moved printer paper & lined paper from the closet shelf to a drawer.  I found when my girls would grab a piece, more than one would come and my closet would be littered with paper.  A drawer should solve this problem.  This is an example of how important it is to always look for the most efficient way to store items.  Put items that are used regularly front and center.  Keep ‘like’ with ‘like’ and when one item is always creating clutter, figure out another way to store it or give it a specific home.

_MG_2135

I am so very happy with how our home office is shaping up.  I have a couple more fun project planned for it–an artistic wall piece that doubles as a way to display photos, a fun project with clipboards, and a homemade light fixture.  Look for those posts coming to New Nostalgia this fall.

HOME/ Simplifying

The Best Way To Pack A Lunch


PACKED-LUNCH

I’ve written a couple posts on packing lunches. It has been something I have done every school day for the past 7 years, and  I think I have finally found the best way to pack a lunch.

Last year I ditched plastic baggies and bought containers with lids.  It was a step in the right direction, but not quite what I wanted.  I quickly found washing out all those small containers and keeping track of their lids made lunch making more of a chore than it should be.  I’m all about efficiency, working smarter not harder, and keeping things simple.  A bunch of lids and containers was not smart, simple or efficient.

photo 1

This year before school started, I was on a mission.  I wanted to find something different that would keep me from going back to baggies but that would be just as simple as baggies.  These lunch kit containers from Sistema were the perfect find. They are affordable and a huge plus– BPA free!

photo 2

The school lunches I make for my girls 90% of the time start with sandwich & something crunchy–tortilla chips, crackers, pretzels–free from artificial colors, preservatives, and high fructose corn syrup.  I think this habit stems from the school lunches I had as a young girl.  I always loved a crunch along with my sandwich.  The other 10% of the time I throw soup or leftovers into a thermos.

photo 5

These containers have a large area for a sandwich,  with an attached lid/divider that keeps the sandwich safe and your chips from tasting like peanut butter. My girls favorite bread is an oat bread & I use a peanut butter with no hydrogenated oils or corn syrup in it. If you make a cheese or meat sandwich, this small blue ice pack is perfect for putting right on top of the sandwich.  I place a paper towel in between the sandwich and the ice pack, but I have found it is not necessary as these ice packs do not ‘sweat.’

I use the second compartment for something crunchy, and the 3rd area for some type of bar (store bought or homemade) or cut up veggies.  A cut kiwi with a spoon fits nicely in there–I just cut it in half, unpeeled, and my girls scoop the fruit out with a spoon, using the peel as a bowl when they eat it. Carrot sticks are another great item for that compartment.

photo 4

I like to add a piece of fruit on the side.  A nectarine, banana, or apple.  Having a fruit and veggie gives my girls a head start on eating their daily rainbow.

See how the container shuts so nicely into a compact square.  Hearing the ‘snap’ of the lid after packing their lunch in the morning gives me such a satisfied feeling.

photo 3

This BUILT Neoprene Lunch Tote bag is really cute.  It belongs to my now FRESHMAN girl.  When did my Teagan get so old?

When did I get so old?

photo 2

This water bottle fits nicely alongside the sandwich container.  Usually my girls just get a cup of water at school, which leaves that area free for fruit.


photo 1

This system is the best, most efficient way I have found to streamline the chore of not only packing lunches, but also emptying them out and cleaning the containers for the next day.  They can be placed in the dishwasher, but I find a quick rinse is easy and enough, making sure they get cleaned with hot water and soap at least a couple times a week.

Do you pack lunches?  What do you use to hold the food?

What are your kids favorite foods to eat in their lunches?

Would you like to try out the Sistema Lunch Cube lunch container?  If so, Amazon has a great deal on them, and if you order them through this link I will get a small percentage which would support New Nostalgia & make me happy!

———–

mini squeeze bottles

Ok…I said I didn’t want a bunch of little lids to wash…but I might make an exception with these super cute sauce-to-go containers!  My girls would love them filled with ranch dressing for dipping those veggies, and I would love that I can control the portion size.

 ———–

More on school lunches at New Nostalgia:

14 Healthy School Lunches Your Kids Will Love

School Lunch Smoothies

How To Make A Note Into An Envelope–Perfect For School Lunches


ANTI-PROCRASTINATION/ HOME

Anti-Procrastination Tuesday

APTuesdaysBigger-1


Goals Last Week:

~laundry

~get fall/winter clothes out


Goals This Week:

~get fall/winter clothes out

~Avery’s room rescued

~yard clean up/ pull weeds


 Home Zone This Week: (15 minutes a day in said zone)

~Avery’s Room


Hot Spot This Week: (5 minutes a day in said hot spot)

~ clothes under control/clothes hung up

  Computer Hot Spot: (getting my digital organization on!)

~~organize files & folders…put important reference type files in Evernote


Last Week’s Pin Accomplished:

~Homemade Coffee Sugar Scrub


This Week’s Pin To Accomplish:

Sourdough-Starter-From-Scratch

Making A Homemade Sourdough Starter From Scratch


Last Week’s Most Clicked On Links:

I had them all up and ready, but then lost all that I did. 🙁  I ended up pinning them instead, so click here to see your post in my feed at Pinterest.

Gardening

Square Foot Garden Update

Square-Foot-Garden-Update-2014

I am seriously behind in updating you on the progress of my Square Foot Garden!  It has been another great year of watching tiny seeds and seedlings become big beautiful plants full of heathy goodness for my family.  This process never ceases to amaze me, especially when I am quite the neglectful gardener.

Square foot gardening takes so little work.  The soil mixture is super absorbent which is quite forgiving of my infrequent watering.  It also takes just one bag of compost each season, which gives my plants all the nutrition they need for the season.  I don’t fertilize at all.  Oh..and weeds?  They do not exist in a square foot garden.  There is no room for them.

IMG_9141

I ate the above tomato on my favorite Tomatoes On Toast.  The cucumber is going into this Sweet & Sour Dilled Cucumbers recipe…one I cannot wait to try!

Square-Foot-Garden-pallet

The last time I wrote about gardening, it was spring and my garden looked like the above pic.

Now…it looks like this:

IMG_9107

Whoa, right?  Amazing.  Those tiny swiss chard plants have been growing leaves bigger than my head.  They are great for juicing, blending into green smoothies.  Basil is sitting pretty right next to it, and will be made into pesto this week.  There is dill in there, taller than my waist.  My cucumbers are super happy and just keep growing up, up, up and producing much fruit.  I used a pallet as support for my cuckes and it has worked great. There is a pepper plant in there…which is hard to see.  I replaced kale with baby pumpkin after the cool weather growing season of spring.

Speaking of kale…I grew a ton of it, but was very disappointed that squash bugs got to it.  This is my first time dealing with squash bugs and they are nasty little things! They lay a bazillion little eggs to the underside of leaves.  I spent a few evenings out there with duct tape, dabbing at those dumb eggs.  I won the battle without insecticide, but they ate most of my kale and one summer squash plant before I won.  They have tried to get to my baby pumpkins, but I was not having it and drowned the few adults I found and then went after their eggs with my weapon of choice–good ol’ duct tape.

square-foot-garden-ladder

The above picture is my second 4×2 bed, full of spring time plantings of kale and chard.

IMG_9108

I replaced the kale with tomatoes, pepper, more swiss chard and a squash plant.  All have done beautifully except my squash plant.  May he RIP.

Cucumber-2

I planted just one cucumber plant, and it has kept us in supply of cucumbers for all of July and August, and it is still producing.

IMG_9110

My tomatoes are not as productive as last year, but still holding their own and doing just fine.  Ahhh…I’m so gonna miss the deliciousness of a still-warm from- the- sun, vine-ripened tomato.  I just made freezer salsa, which made my entire family very happy!

Square-Foot-Garden-Chard-2014

So much leafy beauty and texture!  The red veins of this Rainbow Chard is just breathtaking.

IMG_9145

The vine of mini pumpkins is just going crazy and taking over my deflated wheelbarrow.  I can’t wait to use them as fun fall decorations in a week or so.  I envision large glass vases full of mini pumpkins adorning my dining room table.

——–

What about you?  Are you a gardener? Do you want to be? What flourished in your garden this year?  What bombed?

———–

More on Gardening From New Nostalgia:
HOME/ Organizing/ Simplifying

Organizing A Small Pantry

Organizing-Small-Pantry

I have a very small kitchen with very little cupboards.  I am thankful that I have a pantry, even though it too, is very small.

I’ve learned some tricks over the years to keep it organized and functional.  I find organization in the kitchen is key to keeping me motivated in the kitchen, cooking for my family and feeding them healthy food.

Here are a few tips for keeping a small pantry organized:

1. Only buy what you need for the week — I don’t have the storage space for buying weeks at a time, and honestly I think it keeps life much more simple to buy what we need for the week and start fresh the next week. Obviously some food items last much longer than a week (like baking powder and cocoa) but there are other items that I just don’t need 10 bags or boxes  at a time (pasta, cereal, etc.)

2. Keep like with like–always store like items with like items.  I keep all  my nuts together in a brown wooden box.  We have a bin for pasta/rice/grains and a bin for snacks.  I have a basket for all my tea items. Keeping tea in a cute basket motivates me to drink it more often.  Cereal and oatmeal stay together, as they are both breakfast items.

3. Use functional storage helpers–I love kitchen carousels and mason jars.  I like to be efficient in the kitchen, and jars quickly show me what is inside, and a carousels display their items with a quick spin.

4. Create extra shelving with wire organizers — because I lack drawer space, I keep my foil & plastic bags on a wire organizer.  The space organizer gives is just the right height for these items, and allows me to store things underneath them.

ORGANIZING-KITCHEN-COLLAGE5. Use hooks– I use hooks for my duster, broom, mop, a holder for my plastic bags, & my girls 3 lunch bags.  Hooks are a GREAT way to stay organized and keep things off the floor and shelves.

6. Buy an over-the-door organizer — this is one of the best purchases I have made.  It has a tea shelf, a shelf for most used baking items (baking powder, baking soda, cocoa & salt) that I can just quick grab when baking.  I have a vitamin/supplement shelf.  I keep my straws next to those.  The very last shelf is a deep one and holds my dish cloths, again, saving a drawer.

———-

I hope this inspires you to embrace organization even if you have a small space.  Small spaces are a great motivator for staying organized, as one really doesn’t have much choice but to get creative!

What are ways you organize your kitchen space?

Decorating/ HOME/ Homemaking/ Sponsored

Deconstructed Chevron Wall

This is a Sponsored post written by me on behalf of FrogTape for SocialSpark. All opinions are 100% mine.

DECONSTRUCTED-CHEVRON-COVER

Our home office is pretty small–I like to call it cozy. Because of this, I have wanted to bring interest into the room without adding clutter. The best way to do this was with a fun, deconstructed chevron wall treatment using paint. I have had this project in my brain for a while now, but procrastinated because the texture in our office walls freaked me out a bit. I wanted a large, geometrical design, and I knew I needed to use tape to get the lines I desired.

We all know tape on textured walls usually means disaster, but this is no longer the case, thanks to Textured Surface by FrogTape® for textured surfaces. I knew this would work beautifully for our office walls, because I had already done this Chalkboard Paint Treatment on my daughters textured walls using Textured Surface by FrogTape®  That project was so easy that I no longer could procrastinate on getting this fun deconstructed chevron paint treatment out of my brain and onto my walls.

Textured Surface by FrogTape® is a pretty impressive product.  The kit comes with a tape roll (it is orange), and a bottle of Liquid PaintBlock® Edge Sealer.  I also had FrogTape® Multi-Surface on hand (it is green) to tape all the wood trim and around the doors and windows of our office.

FROG-TAPE-PAINT-TREATMENT

So let me tell you why I decided on a deconstructed chevron.  I am a big fan of the chevron pattern, but the traditional pattern was just a bit too proper and structured for me.  I’m also feeling a bit ‘over-it’ –ya know?  It is EVERYWHERE!  I wanted the same geometric, clean lined feel of chevron, but without the trendiness of chevron.  I also loved that this deconstructed version would require NO measuring.  Both the vertical lines and the horizontal lines are spaced out however your little heart desires.  The only thing that needed to be exact was the vertical lines needing to be straight up and down.  I used a laser level to do this, which made it super easy.

IMG_8910

1. I started by using FrogTape® Mulit-Surface (green) to tape off all trim, windows and doors.

2. I decided how close together I wanted the vertical lines, then used a laser level to mark them, then used FrogTape® Textured Surface to tape them.  I was purposeful about not having them all the same distance from each other.

3. I then started in on taping off the horizontal lines.  This was very easy and really mindless.  I turned up the music and enjoyed the process, which took about 40 minutes to complete all the taping.

IMG_8921

4. I used a damp cloth to simply wipe each line of tape per instructions that came with the kit.  The instructions are very clear and easy follow.

5. I then unscrewed the lid to the Liquid PaintBlock® Edge Sealer and added the brush lid provided in the kit.  I gave it a good shimmy-shake, and used it to paint along each edge of tape. It seems like a tedious task with all of the tape I used, but it went fast and was easy.  The pic above is after using the Liquid PaintBlock® Edge Sealer.

This step is what makes Textured Surface by FrogTape so impressive.  It is treated with patented PaintBlock® Technology, a super absorbent polymer that reacts with the water in latex paint and instantly gels to form a micro-barrier that seals the edges of the tape, which helps prevent paint bleed.  It really works! I have seen it work on walls with much more texture than my walls have.  It is really a great product for getting that sharp line that looks so professional.

IMG_8916

6.  I then stirred my paint, and started with outlining all along the edge of the wall, just as you would when painting a normal wall.

IMG_8922

This went very fast and I was getting giddy excited to peel off that tape!

IMG_8927

7. As soon as I finished painting, I started removing the tape.  This needs to be done before the paint dries.  My WORD it was so much fun to pull and see the stripes reveal themselves and the wall come to life.

FROG-TAPE-PAINT-TREATMENT-2

I was super happy with the paint color, it is exactly the stormy blue/grey that I was wanting.  I was also super happy with how amazingly sharp the lines were.  Isn’t it impressive?  I love the fun pattern the paint made on the vertical strips of tape.

office-before

Here is a picture of our home office before the paint paint treatment. Boring & bland!

IMG_8936

And here is the after.  I decluttered and minimalized our desk top and the wall.  Less is best.

IMG_8940

I found a fun clock screen saver.  No need to have a clock on the wall. I see it as one more thing to dust, and who wants more to dust?  Not me.

IMG_8945

The paint color looks great in all light, even at dusk.  I’m glad I left the rest of the walls white.  If I would have done the treatment on every wall it would have closed the office in and made it look even smaller.

IMG_8935

I added this precious chair that was just given to me by my sweet Grandma.  It was my Great Grandmother’s Grandmothers’ chair.  I wrote some thoughts about the chair here.  I sit in it and have some prayer time most mornings after my kids go off to school.  There is a small square table out of the frame to the right of the chair, perfect for holding my mug of coffee.

See that small wall to the left of the door?  I have yet to decide if I should put the same deconstructed chevron paint treatment there.  I decided not to because it is not flush with the door…it comes out about a foot.  What do you think?  Leave it or treat it with paint?

DECONSTRUCTED-CHEVRON

{for your pinning pleasure}

 Do you have a textured wall you have wanted to paint? Do you have a vision for it yet?   I say get the Textured Surface by FrogTape® and do it!  It can be found at participating Lowes & Walmart stores, and can be found in all Menards across the United States.  For inspiration,  follow the FrogTape Textured Surface board on Pinterest.

I never dreamed this small home office would become a favorite place of mine to sit in our home.  It is amazing what some paint and great tape can do!

Visit Sponsor's Site

Brunch/ Healthy Eating/ HOME/ RECIPES

Baked Banana Chocolate Oatmeal with Triple Berry Puree


Baked-Banana-Oatmeal-Triple-Berry-Puree-Pinterest

Oh how I love my oats.  I never tire of them, especially when they have chocolate in them and are drizzled with a triple berry puree!

This felt very decadent, like eating dessert for breakfast.  It reminded me of eating chocolate chip oatmeal cookie dough, but doing it in a way that is grown up and sophisticated. The berry puree is the perfect accompaniment, and I just might have guzzled the left-overs!

Using berry puree as a topping in place of syrup, is a great way to get those antioxidants in to my kids, and saves money as they are less expensive than 100% maple syrup.  Making berry puree have saved me many times when making pancakes, waffles and oats that I would usually top with syrup.  Perfect for when you have run out of syrup and have a freezer full of berries.

photo 2

Baked Banana Chocolate Oatmeal

(inspired by this recipe at The Oatmeal Artist)

  • 2 bananas
  • 3/4 cup of milk of choice
  • 1/2 cup water, or more milk
  • 1 tsp vanilla extract
  • 2 cups rolled oats
  • 1 tsp baking powder
  • 1/8 tsp salt
  • 1 cup chocolate chips
  • Berry Puree
  1. Preheat the oven to 350 degrees and grease 8×8 pan or line with parchment paper.
  2. In a large bowl, mash bananas, and then mix in milk, water, and vanilla extract.  Add oats, baking powder, and salt.  Stir.
  3. Add chocolate chips.
  4. Pour into prepared pan and bake for 25-30 minutes.
  5. Top with Berry Puree (recipe below)

TRIPLE-BERRY-PUREE

Triple Berry Puree

  • 1 12 oz bag frozen mixed berries (I used Trader Joes Frozen Mixed Berry Blend of Strawberries, Blackberries, Raspberries, & Blueberries), thawed
  • 2 medjool dates (or more depending on sweetness desired), pitted
  1. Pour thawed berried into blender.
  2. Add pitted dates.
  3. Puree until smooth.

photo 1

A Little Bit About Blenders

My Very Favorite by far–Professional Grade High Speed Blender

Some of the best money I have ever spent!
Vitamix Professional Blender and accessories
This is the model I have.  I drooled over it for a couple of years!
It was a splurge, but worth EVERY penny.  I use it 2-3 times a day.
It makes crushed ice in seconds.  It takes almonds to almond butter in seconds.  It makes the best raspberry fruit puree for pancakes and ice cream–obliterates all those little seeds into smooth puree heaven! We are eating 3 times the amount of fruits and veggies since purchasing this amazing blender, which I know is keeping us out of the doctors’ office and away from those expensive co-pays, so in my mind it has paid itself off.
Ninja Mega Kitchen Blender and accessories.

Runner Up

I’ve never used one, but have heard good things about them.  They are not professional grade like the Vitamix, but the price is much easier to swallow and they are powerful.
Oster and New Vitamix blenders in kitchen.
{my old Oster on the left, my New Vitamix on the right}

Economy

I had one of these for years and it does the job.  You can’t beat the price, and for smoothies, it works, although you have to blend much longer. You will still have chia and raspberry seeds in your smoothies, but if you don’t mind the extra texture, this one will do.  If you have had a high-speed blender, you will not be happy with this one.  If you are looking for something to get by until you can get a high-speed blender, and to just get those smoothies in you, this will do just fine.
What about you?  Do you have a high-speed blender?  Do you desire to have one?
Top