Browsing Category

RECIPES

Frugal/ HOME/ RECIPES/ Sweets

Homemade Popsicles

This morning, there was no fresh fruit in the house.  My girls are used to having some type of fruit with their breakfast, so I decided to make them fruit smoothies with some frozen fruit I had hanging out in the freezer.
My method of making fruit smoothies is pretty much dump and blend.  I fill my blender 2/3 full with frozen fruit, then add enough liquid (start with a cup and add as needed) so that it will blend easily and smoothly. I like mine thin enough so I can see a vortex when looking down into the blender, then I know it won’t get stuck in our straws!  I usually use water and a splash of orange juice.  I will add honey or sugar if the fruit is not very sweet, you won’t know until you taste a bit of the smoothie.  I like having frozen peach or frozen banana in our smoothies, they both add a nice texture/thickness, and are both less expensive then frozen berries.  If you were to use all berries, it would take a lot and would be costly.
This morning, I used a frozen fruit mix that had peaches, pineapple, grapes, and melon.  I also added frozen strawberries and blueberries.  We were running a bit behind, and I did not leave my girls enough time to slurp much of their smoothies down.  Because of this, I had a bunch leftover.

What to do with it??

Make homemade popsicles!!  The kids love these, they are so easy to make and MUCH less expensive then the whole fruit popsicles you can buy. These little plastic molds are great, but if you don’t have any, you can use a paper cup with a wooden craft stick. We made these all summer long, their favorite is when I add yogurt to the smoothie, which makes a creamy popsicle.
I will do a series on smoothies coming up. There are so many ways to make them: green smoothies, fruit smoothes, yogurt smoothies, protein smoothies, we even make healthy chocolate peanut butter smoothies and chocolate covered cherry smoothies. MMM-MM!  They are a staple in our home, a great way to have a healthy snack and to get those fruits and veggies in!!
Brunch/ RECIPES

Whole Wheat Waffles

I have a childhood friend to thank for this awesome Whole Wheat Waffle recipe. (Thanks, Joy!) They are super yummy and very filling due to the high amount of fiber and protein.  They are also high in calcium and make an easy, nutritious breakfast.

This morning, my girls were busy downstairs playing a new Wii game their dad surprised them with when they woke up.   Can you believe the smell of these waffles were able to tear them away from the Wii game and make them come stomping up the stairs, to see what that amazing smell was?  They loved the waffles, ate 11/2 each, and their tummies stayed full past lunchtime.

I served them with 100% Real Maple syrup.  Nothing compares! Just walk past and give a polite nod to  Mrs. Butterworth and Aunt Jemimah.  I know their price looks nice, but they are not as nice as they look!  I pay extra for the real stuff for a few reasons. 1. Because it tastes good, 2. I like eating real, whole foods that are as close to the way nature created them as possible, 3. because almost all imitation syrups have high fructose corn syrup in them which I am trying hard to avoid in our home. (Here is a post about why with some of the links if you are interested)

My friend, Joy, mixes the dry ingredients together and stores them in a jar for a quick Waffle Mix, which I think is brilliant and I plan on doing the same.  This recipe makes about 12 waffles.  Whenever we have extra pancakes or waffles, I just freeze them in a gallon ziplock bag and the girls help themselves in the morning.  They reheat the pancakes in the microwave for a few seconds and the waffles in the toaster.

Whisk dry ingredients, add wet ingredients.  Pretty simple so far, huh?  I took a picture and poured at the same time, impressed?

I love this silicone basting brush.  You can buy one Hereon Amazon.  I pour a little oil into the oil lid (yes, the small lid of my oil) so I can dip the brush without dirtying another dish.  I do this anytime I need to grease a pan.  It is so much better than using a cooking spray that contains propellants, that can be flammable, cause sticky build-up on pans, and cost money!  It is less waste because there isn’t a can to throw away.

I will leave you with a tip from Joy-“to get the best waffle texture, cool COMPLETELY on a rack before you freeze them.  If you set them hot on a solid surface, they sweat and get quite soggy.”  I agree with her!  If fact, I do the same before serving to keep them crispy on the outside and soft on the inside.

RECIPES/ Sweets

Fudgy Buttons

Tonight I wanted something sweet, and there was NOTHING in the house (I need to grocery shop!).

I knew it was time to pull out my recipe for Fudgy Buttons once again.  I found the recipe in a magazine, given by a grandma who said she stirred up a batch for her grandkids every time they visited. I’ve made these many times, and I am sure I will still be stirring them up when I am a grandma.

I like them for a few reasons.  I always have the ingredients on hand,  I don’t have to turn the oven on,  I can make them in 5 minutes, my girls can help roll the balls and make them into buttons, they are round and cute, and they satisfy even the most intense craving for chocolate and peanut butter.

They are not the healthiest thing we could choose to eat, but when compared to the ingredients in some of the most popular chocolate and peanut butter candies:

Peanuts, Milk Chocolate, Sugar, Cocoa Butter, Chocolate, Nonfat Milk, Milk Fat, Lactose, and Soy Lecithin, and PGPR, Emulsifiers)Sugar, High Fructose Corn Syrup, Partially Hydrogenated Vegetable Oil (Cottonseed, Soybean, Palm Kernel, and Palm Oil)Sorbitol, Dextrose, Chocolate, Nonfat Milk, High Maltose Corn Syrup, Refined Palm Kernel Oil, Cocoa Butter, Salt, Corn Syrup, Whey, Whey Protein Concentrate, Caseinate, Soy Lecithin, Artificial Flavor, Glycerin, Lactose, Mono and Diglycerides, and TBHQ.

I feel pretty good about my 5 ingredient, (ones I can pronounce!) cute, little Fudgy Buttons.


Fudgy Buttons
Prep Time
5 mins
Total Time
5 mins
 

An easy, 5-ingredient snack for when you need a quick sweet.

Recipe Type: Sweets
Servings: 4 people
Ingredients
  • 4 Tbls butter or margarine
  • 3 tsp baking cocoa
  • 1 cup confectioners' sugar
  • 1 tsp milk
  • 4 Tbls creamy peanut butter
Instructions
  1. In a small saucepan, melt the butter; remove from heat. 

  2. Add cocoa and mix well. 

  3. Stir in sugar. (Will be quite thick) 

  4. Add milk and stir until smooth. (You will feel like you should add more milk- don't. The peanut butter will make it creamy and perfect) 

  5. Add peanut butter and mix well. 

  6. Drop by teaspoonfuls onto waxed paper; roll into balls and flatten with your thumb.


.


How-Tos/ RECIPES/ Uncategorized

Does Your Lunchbox Make You Special?!


One of my least favorite things to do is pack lunches for my girls to take to school.  They have never had cafeteria school lunch (well, one of them snuck a chocolate milk and had to do a bunch of chores to pay for it. eyyy.)  At first, my reason was because it was much cheaper.  Now, after reading up on health, I am glad they take their own lunches. I’m ok with occasional processed food, but EVERY day for lunch?  Nope, can’t do it.  I have to admit, I do A LOT of peanut butter and jam.  A LOT.  I grew up on the stuff and to this day love it!  I make ours with yummy homemade bread and jam, but they are still getting sick of it, so I have been trying to get a bit more creative by packing some hot food in a thermos.  I LOVE, LOVE, LOVE these  Funtainer Food Jar by Thermos. You fill them up with hot water from the faucet, let them sit a few minutes to warm, dump out the water and fill them with hot food.  My girls say they are still nice and toasty warm at lunchtime, and they get so excited to open their lunchbox and see a thermos instead of another peanut butter and jam sandwich. 
So on to the title of this blog post. 
The girls hang their lunch bags up every day on a hook in the pantry when they get home from school.  My youngest daughters hook happens to be right above the trash can, and this morning her lunch bag was missing.  I asked her about it, and she insisted that she hung it up.  I believed her because it is a great habit of hers and she always remembers. After staring at the empty hook for a minute, and then looking down at my empty trash can with a brand new bag in it (thanks to my wonderful husband who takes the trash out every morning) it dawned on me what must have happened.   I asked the girls if any of them had seen the lunch bag in the trash, AND CAN YOU BELIEVE I GOT A YES!!   AND CAN YOU BELIEVE THEY DIDN’T REACH IN TO GET IT AND HANG IT BACK UP??!!  

My husband left for work by this time and I was NOT about to go dig in our trash bins (we’ll let him do that when he gets home, poor guy) so I went to look for an old lunch bag. As I triumphantly pulled out the extra Scooby Do lunch bag, my youngest (the one with the missing lunch bag) crumbled like her world was coming to and end.  “Mom!!”  (sob, sob) “I’m too old for a Scooby Do lunch box!!”(sob, sniff, sob, her six year old head in hands)  Knowing the school bell would be ringing soon, I knew we had to do this conversation quickly.  Me- “Honey, why are you special?”  6 yr old-(sniff, sniff) “because God made me”  Me-“Would you still be special if you went to school with an ugly, torn, stinky lunch bag?” 6 yr. old (sniff and slight chuckle at me plugging my nose which changed my voice when I said the word stinky) “yes.” Me-“are you still special with a Scooby lunch box?” 6 yr old-(big sigh, arms crossed, pouty downward pointed eyebrows) “yes.”  Me- (with a tickle to try and erase the pouty eyebrows) “well, its a good thing a lunchbox doesn’t make you special” 6 yr old-(arms still crossed, too stubborn to give in to the tickle) Me-(quick, very strategic change of subject) “hey, I think it might be sprinkling, that means you get to carry your very own umbrella!!”


Thank goodness, the change of subject worked and off to school she went, smiling and waving,  Scooby lunch bag in hand and still feeling special.
*if you are wondering about the lunch bag in the picture, I have a girl that is really into black and pirates of the caribbean.  Girls don’t HAVE to like pink, ya know.  I think she knows that it is not her lunch box that makes her special.:)

Save

Drinks/ FUN/DIY/ HOME/ Homemaking/ RECIPES

Mason Jars: Easy Iced Tea

I used to buy a 2-liter of pop every week.  I decided to try and cut pop out at least when I am at home.  I still enjoy a coke occasionally, especially when we are out for pizza or at a movie with popcorn.
What helped me in this transition was making iced tea instead.  I found a super easy way to make it that does not include boiling water or sitting it in the sun all day, and uses a mason jar which we all know I love!

Basically, you take a jar, put in 4 tea bags, fill it to the top, screw on the lid and put it in the refrigerator overnight.  In the morning, take the bags out and give them a little squeeze over the jar.  What this does is makes an iced tea concentrate!  Love it!  Now when I want a glass of tea, I pour about 1 part concentrate to 3 parts water into a glass of ice and stir. I adjust the amount of concentrate depending on how weak or strong that particular brand of tea is.  Here is the blog that I got the idea from, there are a bunch of comments regarding specific measurements if you are someone who likes more details.
*the picture above was taken before the jar sat overnight.  The concentrate gets much more, well, concentrated:)

 
RECIPES/ Sweets

Go Ahead And Sneak In The Cookie Jar!


I’m crackin’ up! My girls (age 10, 8, and 6) are “mmm-in” and “aww-in” over Chocolate Chip Cookies. Pretty normal for a kid, right? Well, not when the cookies have very little sugar, no oil, and double the amount of fiber than a ‘normal’ Chocolate Chip Cookie. I was skeptical, but tried the recipe anyway. I have to say, these cookies are really good! They are crunchy on the outside and chewy, gooey on the inside.
Our family have been on an adventure of trying to eat more natural, healthy foods. Little by little we have eliminated most processed foods from our home. Our motivation was a couple of health scares, one concerning my husband and another concerning my youngest daughter. We are so grateful to our awesome God that they are both fine and in good health. I will share their stories on a later post. For now, I will leave you with the recipe of these yummy, healthy (shhhhh!), Chocolate Chip Cookies.

**I changed quite a few ingredients. I will put what I used in parentheses along side the ingredient.

Healthy Chocolate Chip Cookies

Work Time: 15 minutes
Total Time: 45 minutes
Servings: 16

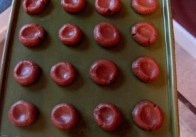
The result: A crunchy, healthy chocolate chip cookie with a chewy center.

1 1/2 c whole wheat flour
1 tsp baking soda
1/2 tsp ground cinnamon
1/2 tsp salt
1/2 c canola oil ( I used unsweetened applesauce)
2/3 c granulated sugar ( I used 1/2 c Rapadura)
2/3 c brown sugar ( I used only 1/2 c)
2 lg egg whites ( I used 1 egg white and 1 whole egg)
1 1/4 tsp vanilla extract
1/2 c old-fashioned rolled oats ( I used 3/4 Cup)
3/4 c semisweet chocolate chips or chunks (4 oz) ( I used 1/3 c semi-sweet and 1/3 c white chocolate chips)

1. Combine flour, baking soda, cinnamon, and salt in medium bowl. Whisk together oil, granulated sugar, and brown sugar in large bowl. Whisk in egg whites and vanilla until smooth. Stir in dry ingredients until blended. Fold in oats and then chocolate.

2. Cover and chill dough at least 15 minutes. Meanwhile, heat oven to 375°F. Line 2 baking sheets with parchment paper.

3. Shape dough into 16 balls (1/4 scant cup each) with hands,(*I used a 1 inch scoop and made mine little) using a little pressure. Place 8 balls on each prepared sheet. With fingers, press each into a patty about 3″ in diameter, allowing about 2″ between patties for slight spreading.

4. Bake 7 to 10 minutes or until desired brownness (do not overbake), switching position of sheets halfway through. Let cool a few minutes before moving to rack to cool completely.

Nutritional Info Per Cookie (4″ diameter): 218 cal, 3 g pro, 32 g carb, 2 g fiber, 10 g fat, 2 g sat fat, 0 mg chol, 162 mg sodium
(this nutritional info is for the original recipe. Obviously, the ones I made would be different due to less sugar/oil and much smaller cookie size)

Top