Browsing Category

FUN/DIY

Beauty

My New Favorite Self Tanner

{continued from this post}

My new favorite self tanner is Jergens Natural Glow Foaming Daily Moisturizer.  I have used Jergen’s self tanning lotion in the past and really like it, but this was even better!  It dried much faster than the lotion, so getting dressed right after application was not an issue, and it did not leave a greasy feeling.
I used this product 4 days in a row, and I really like the results.  It is gradual color that looks natural.  I had no streaking, no orangey spots, and the scent was very mild compared to most.  I noticed color right after the first application, it took me from quite light to a color that looked like I put a powder bronzer on.   By the third application, I had enough color for my husband to notice.  Jergens has 2 kinds of Natural Glow Foaming Daily Moisturizers, fair to medium (what I used), and medium to tan.

A little goes a long way, so go easy with your first pump– it comes out fast.  I think one bottle will last me quite awhile, after 4 applications I am happy with my color and will now only use it every few days, if that.  I started using it to have some color for a night out, to celebrate our wedding anniversary, so I am not sure if I will continue to use it on a regular basis.  We’ll see if the fun feeling of being “girly” with beauty products, will outweigh my desire to keep things simple and natural.  I am not over-top-tan, but have color and do not feel paste-y anymore, which is nice!

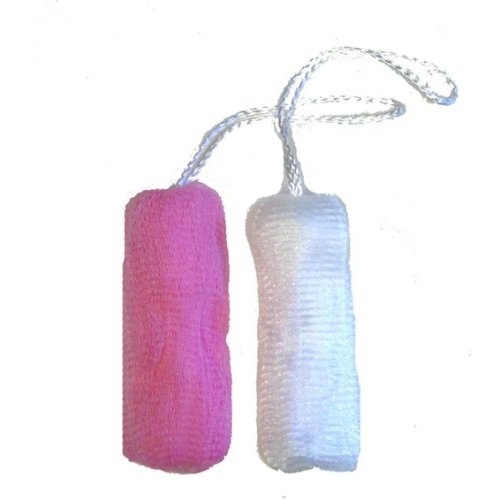
The only prep I do, is in the shower.  I use an exfoliating soap pouch that looks like the one above, which I LOVE.  It makes my bar of soap last forever, and keeps my skin exfoliated.  Ever since I started using this soap pouch and a natural bar (made locally with no sodium lauryl/laureth sulfate and a coconut oil base, like this one), the little bumps on the back of my arms have vanished, and there has been no irritation when I shave (I use the same natural soap to shave).  I’ve seen a huge difference in my skin!
 In the review of the pouch above, some people have said that their soap falls out the bottom.  I have never had that problem, but if I were to buy a new one, I might try one like this:

AquaBella Loofah Soap Pouch


                                                AquaBella Loofah Soap Pouch
or this:

Body Crystal Ayate 100% Agave Soap Pouch


                                         Body Crystal Ayate 100% Agave Soap Pouch
The only other tip I have for you is right after I put the self tanner on, I take a tissue and wipe my knees and elbows, just because these are the areas that tend to grab onto product and turn darker.  I don’t know if it is necessary with this foam, but I’ve always done it with the lotion so now it is habit.  When I use it on my face, I do the same with my eyebrow area and right around my lips.

Do you use a self tanner?  If so, what brand?

This post is linked to:
WFMW @ We Are That Family

Beauty/ Frugal/ HOME

How I Saved Over $200 By Not Going To The Spa

Tonight my husband and I are going out to celebrate our 14th wedding anniversary.  I’m so excited!  It is a special occasion, so I decided to put some extra effort into making myself look somewhat special for our hot date!:) 

 The last few months, in the name of simplicity and being more natural, I have not put much effort into my physical appearance.  Don’t worry, I have showered (ha), but I have not had color in my hair for the first time in years, I stopped polishing my nails, and it was the first summer where I really didn’t care if I had a tan.  There are numerous reasons, such as:

~I wanted to experience my natural hair color before it started turning gray
~I’ve had Melanoma, so baking in the sun is not the best thing for me
~Nail polish was time consuming and always needs reapplied a few days later
~Beauty products are expensive
~I was trying to use more “natural” products. Hair color chemicals and acetone nail polish remover do not quite fit under that category.

All good reasons, but I’m a licensed cosmetologist, and it seems like I just can’t go too long without wanting to practice my creative beauty skills on myself.  It is just too much fun being a woman not too!

So, the last 2 evenings, instead of writing blog posts, I have turned my home into a spa and have played beauty shop.  It has been fun and worth it, and I feel ready for my date.  I have to admit, I did pout a bit thinking about how great it would be to have someone else shampooing my hair and doing my pedicure, but in the end, I SAVED A TON OF MONEY!  That is a good feeling.

Here is what I did:
~Cut my hair.  I kept in long but put a ton of layers into it.
~Highlighted my hair.  My natural color is a coppery red.  I added pale blond highlights.
~Shaped my eyebrows
~French Manicure
~Pedicure
~Whitened teeth
~Tanned using self tanning products

Now just because you are not a licensed cosmetologist does not mean you cannot do this, too.  The web is a great resource for tips and tutorials on how to do things yourself. It is where I get a ton of ideas!

Haircut
For the most part, I would recommend you leave this to the pros, unless you are trimming your bangs or making a side swept fringe.  Kandee Johnson has a great tutorial on how to cut a fringe.  

Highlights
Another thing to leave to the professionals, UNLESS you are a natural light brown or blond.  If you were to try and highlight hair that is darker, it will tend to pull a brassy gold color and it will not be pretty.  If you are already naturally light, you will have much more luck.  Depending on how much warmth you have naturally in your hair and eyes, you may still tend to pull some yellow, but it will be much easier to tone with an ash color and many would not even need to tone.  Because I am a natural red head, with lots of warmth, I definitely needed to add a toner to my hair after the lightening process.  


Highlighting My Hair
~Last night I bought a highlighting kit that comes with a plastic cap and hook.

~I pulled strands of hair through the cap (kinda old school process compared to foiling, but I can’t foil my own head of hair!) If you want natural, slight highlights, pull less hair through every other hole.  I wanted to be quite blond so I pulled it through quite heavy, every hole. Since I couldn’t see the back, I just stuck the hook through randomly, not caring if I got in the marked holes or not.  🙂

~I put the lightener that came with the kit on the pulled through strands of hair. (it is usually a thick pasty white or purple color, essentially hair bleach)

~I put a plastic Target bag over my head and secured it with a clip. This holds heat in to help process faster.

~I let it lighten until a pale yellow color. This took about 25 minutes for me. Your goal is the color of the inside of a banana peel if you are wanting a beachy, light blond highlight. If you can get it that color, great.  Like I said earlier, some people have a lot of warmth in their hair and will get “stuck” in a yellow stage and will not reach the “inside of a banana peel” stage.  If you have had the lightener on for the maximum amount of time recommended and you are still too gold, you will need wash and tone with a light blond ash color.

~I shampooed the strands without pulling off the cap, and towel dried with the cap on.

~I mixed a light ash color to tone. If you were at the store you would look for a light ash blond. (as apposed to a light natural blond or a light gold/warm blond)

~I put that on for just about 5 minutes. (it does not take long, if using hair color to tone, do NOT follow the timing directions on the box, or you will end up with strands that are too ashy) Wipe a strand off with a paper towel to determine if the yellow has been toned down.  Keep a close eye on it!

~I rinsed the color off with the cap still on, then took it off and shampooed and conditioned my hair.

I saved myself at least $120.00, just by cutting my own layers and doing my own color.

This post is a “to be continued…”
{My New Favorite Self Tanner} saved $30.00!!
I have to get ready for my date, but I will write soon about teeth whitening, manicures/pedicures, self tanning products, and shaping eyebrows and how doing it all yourself can save you a ton of money!  I will write a break down of how much money I saved and let you know what products I used.  
More to come…


This post is linked to:
Nifty Thrifty Tuesday @ Coastal Charm
Thrifty Thursdays@ Tales From Bloggeritaville
Penny Pinchin’ Party @ The Thrifty Home
FUN/DIY/ HOME/ Homemaking

Decorating With Numbers

Decorating with numbers is all the rage right now, thanks to Pottery Barn. I have seen so many great Pottery Barn knock-offs all over the web, and I think it is time that I get in on the action.

I found these great baskets at our local thrift store for $4.00 each.  My plan is to paint them each with a number using a stencil, then hang them on my kitchen wall.  I have very little storage space in my kitchen, so they would hold things like dishcloths, paper products, foil and ziplock bags, etc.  I am contemplating spray painting them black, then making the number on each of them white.   The wall they will be hanging on is a deep red, and all the cupboards in my kitchen are white.  I have a glass topped, rod iron table with 2 black chairs right in front of the wall I want to hang them on.  Here is a small glimpse of the area I am talking about.

What do you think? I need your input–should I spray paint them black?  White?  Keep them natural with a black number?  Should I hang them horizontally or make a square, hanging 2, with 2 directly below them?  I am leaning toward painting them black with a white number, and hanging them in a row horizontally. What do you think?  

FUN/DIY

Homemade Puffy Paint

It has been on my Summer Doozy list, and because of company we had another little artist in our home,  I thought it was the perfect time to make Homemade Puffy Paint. (thanks to Skip To My Lou for the idea)

My four little artists had great fun mixing, painting, and using the microwave to puff their little creations.
It was a super simple project that took little effort, but kept their art brains busy for quite awhile.  My dining room became a work of art itself, littered with paper, Qtips, plates of swirled paint and finished creations, pushed aside to make room for more.  The microwave was our background music, with every beep, another idea went from brain to paper, a finished work of art.

{this one needed more time to cook, it is a bit de-poofed!}
 It was a great way to spend a portion of the day, when the heat outside was too great to play!!

How To Make Puffy Paint:
Mix Equal parts of:
Water
Salt 
Self Rising Flour
Mix salt & flour.  Add water. Stir well.

Then add:
Food Coloring
Glitter (optional)
Stir well.

~I used 1 cup of all 3 ingredients.
~ I divided it up onto 6 paper plates.
~We added 2-3 drops of food coloring to each plate and stirred.
~We added glitter to a chosen few of the colors (I let the girls decide which ones.)
~Each creation was microwaved for 10-25 seconds or until puffed and hardened. (time depends on microwave power and how thick the little artist applies the paint)

This post is linked to:
Works For Me Wednesday @ We Are That Family
Show & Tell @ Blue Cricket Design
Its So Very Thrifty @ Its So Very Cheri
Penny Pinching Party @ The Thrifty Home
Strut Your Stuff @ Somewhat Simple
Thrifty Thursday @ Tales From Bloggeritaville

Father's Day/ FUN/DIY/ Holidays/Parties/ Homemade Gifts/ RECIPES/ Sweets

Butterscotch Bars For Father’s Day

Butterscotch Bars–
5 ingredients.
5 minutes to make.
25 minutes to bake.
=35 minutes for a simple, thoughtful and yummy Father’s Day gift.

My father-in-law loves Oatmeal Scotchies (ya know, the oatmeal cookies with the butterscotch chips in them?).  They are super good, but he is pretty health conscious, so I thought I would try something a bit different with healthful ingredients in mind, but still with a buttery, butterscotch flavor.  I’ve been eyeing this 5 ingredient recipe for Butterscotch Bars from Heavenly Homemakers for awhile now,  and hoped they would taste as good as she made them sound.  Well, of course they do–after all, it is a Heavenly Homemakers recipe, and she never disappoints.

Now, when I say healthful, I do not mean eat- a-whole-pan-in-one-sitting kind of healthful.  They do have a cup of butter in them, so they are not low calorie.  What I mean is that they are made with healthful ingredients that are not artificial, and contain ingredients that are beneficial to the body. (example-fiber from the whole wheat flour, protein from the eggs)

My husband was heading out the door to meet his dad and brother for dinner and a movie, when I stopped him and pleaded for him to wait a few minutes so I could finish up the bars.  I got that look from my husband, the look that said “you know my dad is a stickler for punctuality, please hurry!”  Well, my patient husband waited for me to package these pretty, and in turn was 5 minutes late to dinner on Father’s day.  Oops. 🙁  Hopefully a little package of still-warm-from-the -oven Butterscotch Bars will make it all ok. 🙂  I dearly love my father-in-law, and I am so very thankful for his influence on my husbands life, my life and my children’s lives.  I love you, Don! (I’m smiling.  It is good he does not read my blog, that PDVA -public display of verbal affection-would make him roll his eyes.  You know the type, tries to be grizzly on the outside but everyone knows he is teddy on the inside-love it)

To be quite honest, I am feeling pretty overwhelmed with gratitude on this Father’s Day.  I have been so blessed to have an amazing husband who is such a great dad to our girls, a super loving, giving and involved father-in-law, and my own daddy, whom I know loves me, has done so much for me, and reads my blog despite most of the content being of little interest to a guy like him-now that is love, huh? (miss you dad, hope you are having a GREAT time in Wisconsin!)  I. AM. BLESSED.

On to the recipe…
it is easy and really yummy.  It is bursting with buttery goodness and a bit on the gooey side–yum. I’m wondering if it would be just as good with a little less butter in it.  I may try that next time.

Easy Butterscotch Bars
1 cup butter, melted
11/2 cups sucanat (pure cane sugar)
2 eggs
1 tsp. vanilla
11/2 cups whole wheat flour

Stir butter and sucanat together.  Add eggs and vanilla, mixing well.  Add whole wheat flour and mix until well combined.  Pour batter into a 9×13 inch pan ( I greased mine)  Bake 350 degrees for 25 minutes.
The Girl Creative

FUN/DIY

Homemade Scratch N Sniff Paint

My girlfriend came over with her daughter this morning, she needed a haircut and color (I’m a hairstylist for those of you who do not know), and I wanted something simple and fun for our girls to do while I was busy making hair beautiful.  I had seen the idea of making your own Scratch N Sniff paint out of Kool-aid mix from Frugal Family Fun a while back, and it has been in the back of my brain for awhile now.  It finally made it from the back of my brain onto my “Things I Want To Do This Summer Doozy List,” which really helped make it a reality today.

IT WAS SO MUCH FUN!  All you have to do is mix 2 Tablespoons of water to one packet of Kool-Aid mix, and voila…you have Scratch N Sniff paint.  Adding the water and mixing it up is part of the fun, so make sure you let the kids help with this part.  My girls just could not believe how yummy it smelled, and neither could my girlfriend and I.  We kept saying to each other “Wow, that smells so good!”  It smelled like a fruit basket in my house while they were all busy painting their little hearts out.
I thought the end product was beautiful.  I was surprised with how vibrant the colors were, I loved all the different hues.

We put them in my sunroom to dry and I was greeted with a whiff of fruit when I came home later in the day.  I am sure many of these pieces will be cut down to make homemade cards for friends, and we will make sure we write on them “Scratch N Sniff!!”

{this abstract was made by a very special young lady artist I know.  Love you, M!:}

**make sure kids are wearing aprons or old tshirts, and be prepared for stained fingertips.  Not a huge deal, I’m sure it will fade soon:)

***This would make a very fun and unique gift for a child.  Find a basket.  Include a 6 cup muffin tin, 6 kinds of Kool-Aid, 6 paint brushes, some sponges, stencils, paper and directions.  Make a card with directions on it and tie it on with some ribbon. You or your child could even paint a little Happy Birthday message on the front of the card with Scratch N Sniff paint and instruct them to scratch n sniff it!:)
giveaways
Crafttastic Monday @ Sew Can Do
Thrifty Thursday @ Tales From Bloggeritaville
Show Off Your Stuff @ Fireflies and Jellybeans
Get Your Craft On @ Life As Lori
Weekend Wrapup Party @ Tater Tots & Jello
Saturday Is Crafty Day @ Along For The Ride
Its So Very Creative @ Its So Very Cheri
DYI Showoff Parade @ DYI Showoff
Motivate Me Monday @ Keeping It Simple

Homemade Gifts/ RECIPES/ Sides

Strawberry Freezer Jam

Tis the season of strawberries!  It’s the perfect time to make strawberry jam!

My girls and I went to the strawberry patch with some friends recently.  We came back with a TON of strawberries-they were only 99 cents a pound! We hulled them, pureed them, then froze the puree.  I love having a freezer full of strawberry puree, sitting there ready to be used in Strawberry Bread, Strawberry Smoothies, and yes, Strawberry Jam.

I have never made jam before, but now that I have, I don’t know if I will ever buy store made again!  It is so very easy to make your own, especially if you freeze it instead of can it.  You can make jam with just 3 ingredients:

~Fruit
~Sugar
~Pectin

It is just a matter of mashing your fruit, and stirring in the sugar and pectin. That’s it! (detailed recipe below)

If you read up on jam, you will find there are 2 versions out there.  One uses Sure-Jell Pectin, the other uses Ball Pectin.  With the Sure-Jell version, you have to cook it, and it uses 4 cups of sugar to 2 cups of strawberries.  The Ball version is no cook, uses 11/2 cups of sugar and 4 cups of strawberries.  I’ll give you one guess which one I chose.:)

I usually do not use refined white sugar when I make things here at home, but I have found that there are just a few food items that I am willing to compromise on!  Example-until I can find a Homemade Lemonade Recipe I like that does not use sugar (I’ve tried quite a few with honey and a couple with maple syrup), then by golly, I’m gonna use sugar!  Same with Jam.  I was up to my elbows in strawberries, and misplaced a recipe that I had found that used honey and grape juice instead of sugar, so white sugar it was.  (gasp-ha!)

Kimba, at A Soft Place To Land, did a GREAT post on Strawberry Jam.  She tried both brands of pectin and both recipes, just to see the difference between the two.  She ended up with 25 containers of jam in her freezer!  She is crazy awesome.

  I used the low sugar recipe, and it perfectly sweet.  Granted, our taste buds are now accustomed to food that is less sweet in my family due to the recipes I make, but  I really think it is plenty sweet for everyone, and I have had very positive feedback from those who I have given a jar of jam to. Kimba thought you would need fairly sweet strawberries, to begin with for the ball recipe, but ours were not super sweet and it still turned out plenty sweet.

Here is the Ball Recipe I used (the insert in the Ball Pectin box has these same instructions)


Ball No-Cook Strawberry Freezer Jam


1 pkg. Ball No Cook Pectin
11/2 cups of sugar
4 cups crushed strawberries (about 4 lbs or 2 quarts)

~Wash & hull strawberries.
~Use a potato masher to mash up the strawberries for a more chunky jam.  If you prefer less chunks, use a food processor or a hand blender.
~Add the sugar and pectin and stir.
~Ladle into containers, these can be any type of jar, or plastic containers with lids. (make sure to leave some room at the top for expansion when freezing)
~Let sit for 30 minutes.  Put into refrigerator or freezer.
~A jar will keep in the refrigerator for 3 weeks, and in the freezer for up to a year.

I love that I now know how easy this is.  I put mine in cute little jars and have already given many away to friends, family and new neighbors.  We use it over ice cream and put a spoonful or 2 in our oatmeal in the morning–mmm–Strawberry Cream Oatmeal.
I will make this even in the winter, using frozen fruit that I can hopefully find on sale!

Have you made freezer jam?
Do you have any favorite strawberry recipes for me?  Even if they use sugar, send them on through, most recipes that use sugar can be modified to use other forms of sweeteners, such as honey, or pure cane sugar.

Top