Browsing Category

Holidays/Parties

FUN/DIY/ Seasonal

Thanksgiving Craft-Thankfulness Tree

This was fun and easy! My girls helped trace and cut out the leaves.  Everyday until thanksgiving,  we will write what we are thankful for on the leaves, and paste them on the tree.

On her leaf, my youngest wrote “God”  Awww.

My middle girl wrote “Family”  So sweet!

My oldest wrote “Video Games”  Hmmm…

…at least she is thankful.
FUN/DIY/ HOME/ Organizing/ Seasonal/ Simplifying

Christmas Journal

This is officially my first post about Christmas, although Christmas has been on my brain for awhile.  I just love Christmas, I already have over half my shopping done!  My mom-in-law (Kathy) is done every year by Thanksgiving, so I try to keep up with her and do the same!:)  It really does make December much more enjoyable.  The only drawback is missing the fun shopping atmosphere in December, and those amazing sales the few weeks before Christmas.   I feel like I miss out a bit,  but really, with Amazon.com, I can usually get the best deal anyway, and the more I can stay out of the stores the better!

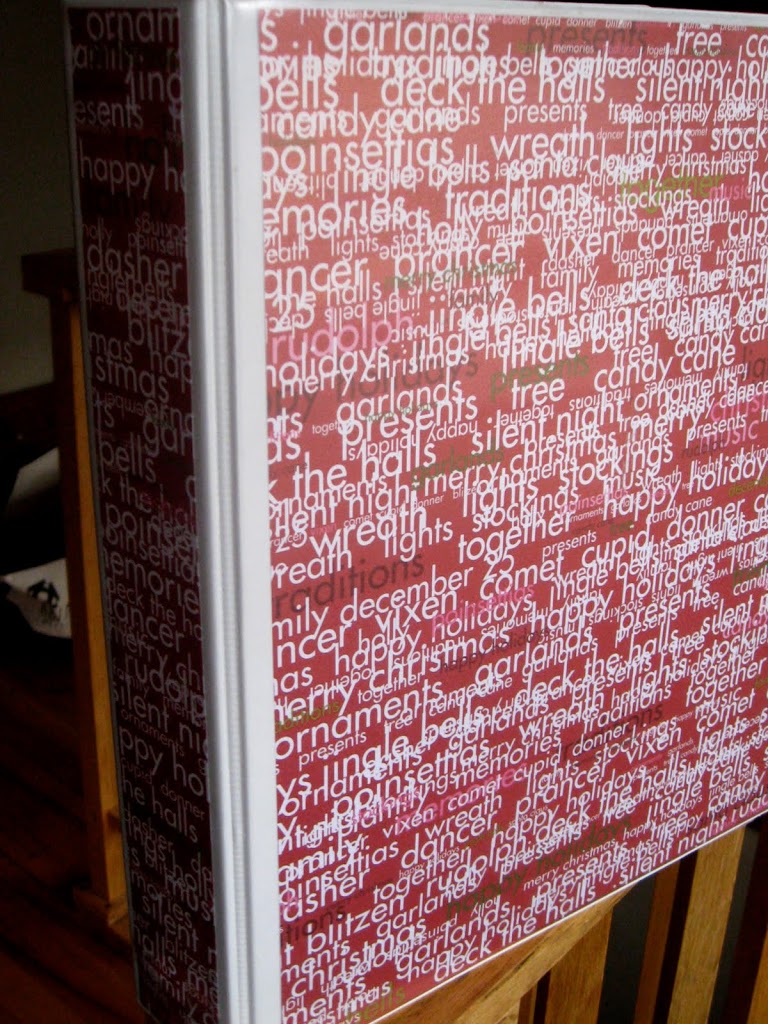
I wanted to share with you one of my MOST favorite gifts.  My birthday is around Thanksgiving, so the timing of this gift was perfect.  It is a homemade Holiday Journal.  My amazing sis-in- law (Wendy) put it together for me in 2004, and I have been using it ever since.  It is so much fun to grab it each year and look through all the memories and plans.  Newsletters of Christmas past, pics of my girls with Santa, cherished memories, lists of what I bought each family member–pretty much everything is in one place and it is so handy!

She took a 3 ring binder, put some pretty Christmas paper in the front and back of it, and filled it with tab dividers.  Here are the tabs she included:

Calendar -its very handy to have the month of December and January in one place, to refer to when out and about, or to check what gift you need by what date, etc.

Dates–shipping deadlines, greeting cards mailed, departure/arrival dates if you are traveling, party dates, etc

Gift List— recipient, gift ideas, final Gifts

Christmas Card List–who you sent one to, who sent one to you

Kids Wish Lists–a very important list indeed!
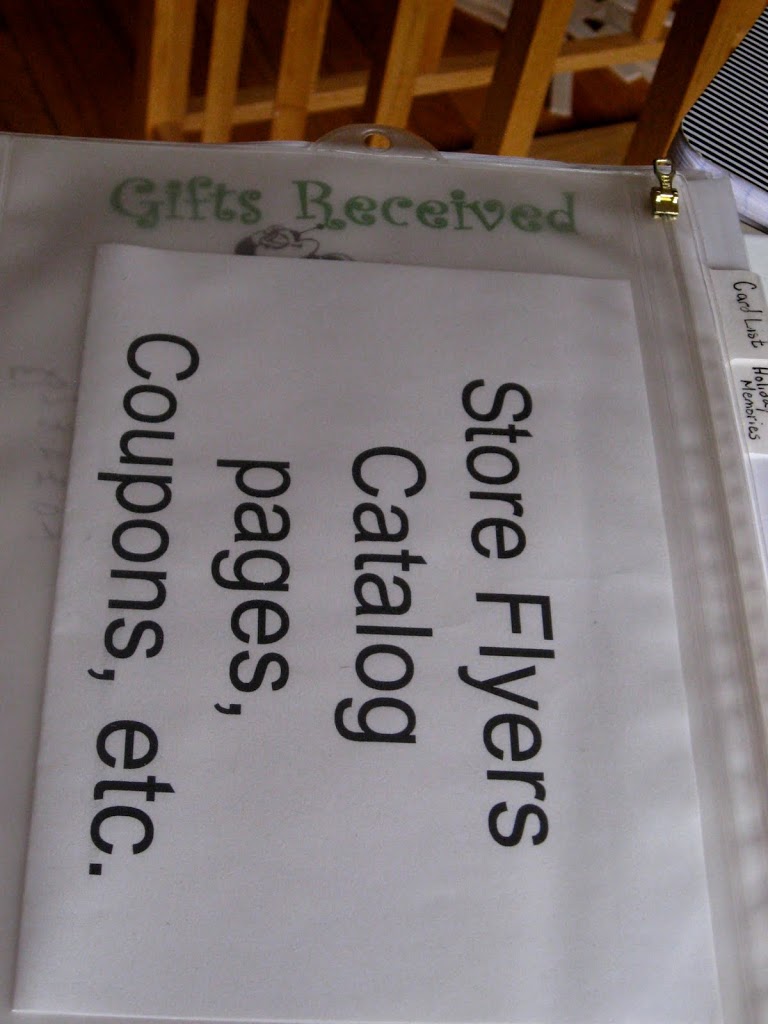
Gifts Received–makes thank yous easier, and I need all the help I can get!
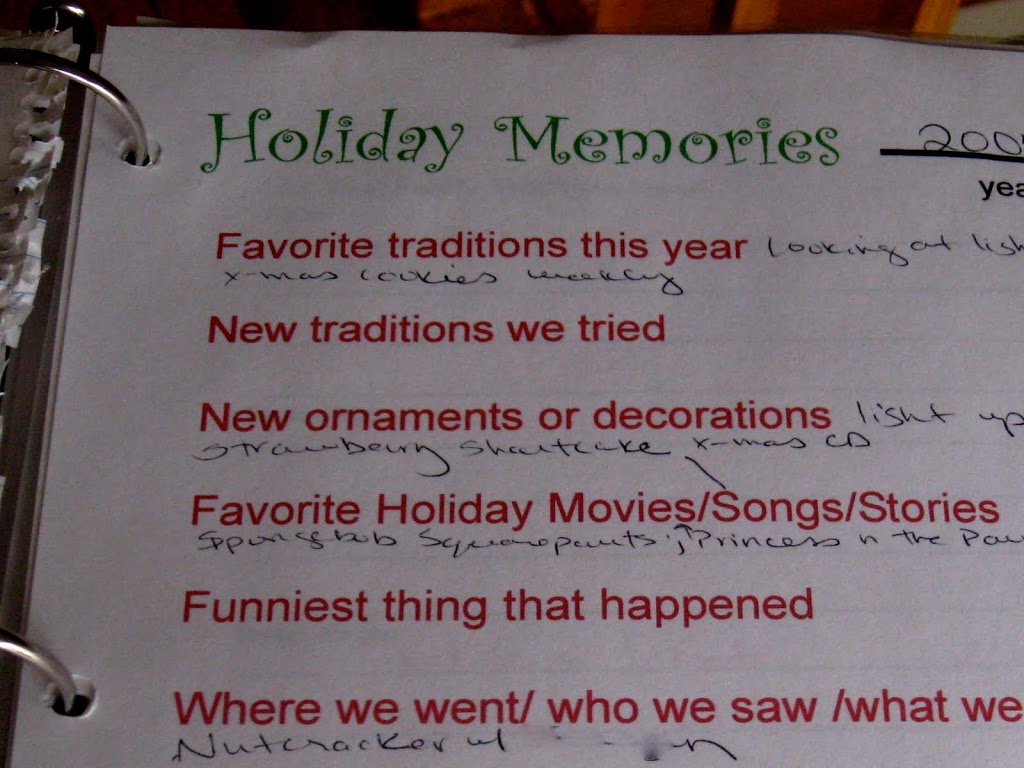
Holiday Memories–my favorite! Old traditions, new traditions, new ornaments or decorations, where we went, who we saw, what we did, favorite memory, funniest thing that happened, etc.
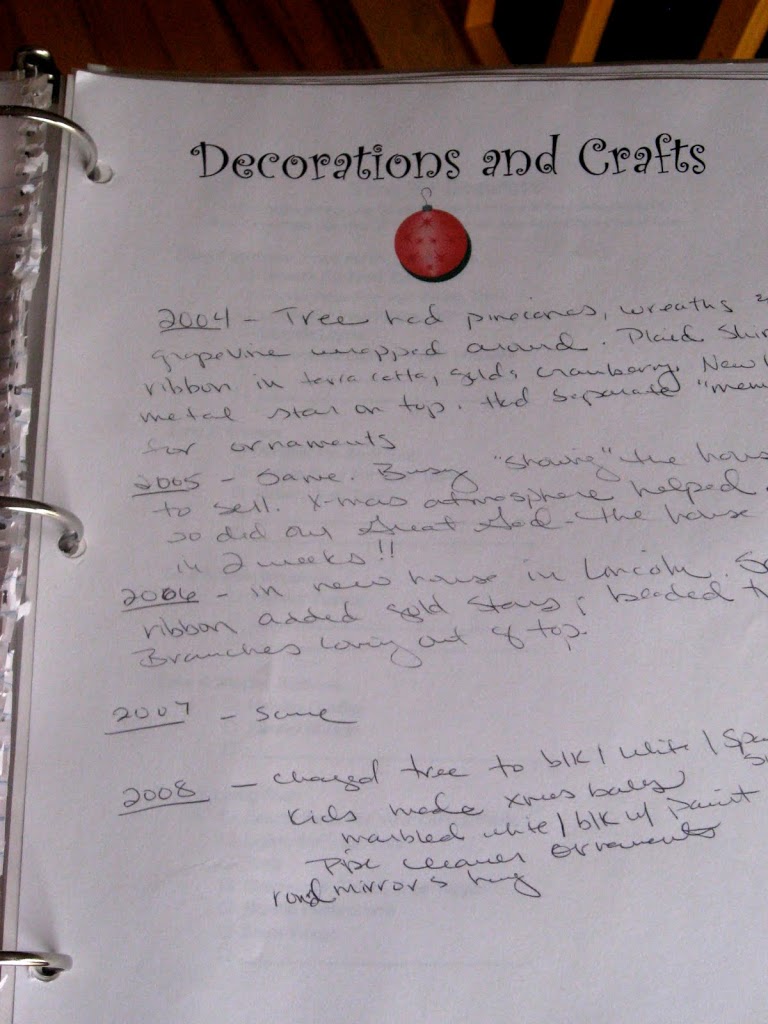
Crafts And Decorations–how the tree was decorated, color themes.

Recipes–what you made, what you wanted to make, favorite cookie recipes, tradition recipes (like my grandma’s pfeffernusse cookies!)

She also included a zipper pouch for store flyers, catalog pages and coupons.  She filled it with plastic sleeves that are great to keep the paper protected and to slide in different memorabilia.

If you want to make your own, the Flylady website has great holiday journal pages, already written and free! You just have to print and fill in the blank, they are awesome and very detailed, she walks you through the holidays step- by- step.  If interested, click here, then click on Holiday Control Journal.
Seasonal

Trick Or Treat?

My husband and I just got back from a trip out of town.  When we leave our girls, we always try to bring them a little something back.  This time, they got quite the gift.  I was in the airport in Cincinnati, and came upon these creepy candy treats-Scorpion Suckers!

I had to buy them. My girls love being grossed out, and I knew they would be fascinated by these suckers.  I knew it was a complete waste of money, since they wouldn’t eat them, but that was all part of the plan! Quite a creative way to cut down the sugar, if I do say so myself.  How’s that for tricking with a treat?  Sure enough, after all the squeeling and “ew, gross!” settled down, they bravely took a few licks and then decided to save them to “show their friends.”  My youngest did lick enough for the scorpion tail to stick out the bottom.  Yuck!  Who thinks of these things, and what kind of mom actually buys them?!?:)

While we are on the subject of creepy candy, I have to share these Chocolate Human Skulls. (see what you can stumble upon when you read as many blogs as I do?)  These take it to a whole different level. They are made from molds cast from real human skulls, made available in your choice of chocolates, including “bone chocolate” “delicious blend of Belgian milk and white chocolates” resembling the color or freshly cleaned human bones.  That is just WRONG!  I will NOT be purchasing these.  So creepy!

Frugal/ FUN/DIY/ HOME/ Seasonal

Halloween Fun!

We have been having a ton of halloween fun here at the Bowman House.  My girls just  LOVE all things spooky, and have been creating all kinds of spooky fun.  I am not one who is creative enough to come up with a project, so I depend heavily on FamilyFun.com!  It doesn’t matter what the season, the Family Fun website always has great, simple ideas.

Here are a few that we tried recently:

Salt Dough Ghosts and Paper Bag Trees
I can’t believe we have never made anything with salt dough before!  It is a cup of flour, cup of salt and a half of a cup of water.  Mold into any shape and microwave until hardened!  So easy!  The plan was to just create ghosts, but my girls wanted to get more creative, which was great, it kept them busy the entire evening.  The paper bag tree is a cute idea, but all that twisting left my wrists tired, so we decided to make just one!  I think making mini trees with brown paper lunch bags would be much better for little fingers and wimpy wrists.

Gotta have a snack in the middle of all this creepy craziness!  Apples and Almonds, can’t get much healthier than that!

These were so much fun!  My girls spent almost 2 hours at the table creating these, and every few minutes there would be a trio of giggles drifting from the dining room.  They just loved finding silly face parts to glue on to their bags.  Aren’t they funny?

What would I do without Family Fun?  What did moms do without computers back in the day?  I am very thankful for ours, its kinda SCARY thinking about doing life without it!

BOO!

Brunch/ Frugal/ HOME/ RECIPES/ Seasonal

Easy One Bowl Pumpkin Bread/Muffins

I have made this Easy One Bowl Pumpkin Bread/Muffin recipe TWICE this week and I really love it.   It is a “dump all ingredients into one bowl in no certain order and stir” recipe, so it takes minutes to whip up.  It is super moist, makes the house smell like fall, and fills up little tummy’s when they need a snack.  Another great thing about this recipe is that it has a few different options to make the original recipe healthier.  Love that!
*For the healthier version, keep reading.

Easy One Bowl Pumpkin Bread/Muffins

1 ½ c. sugar                                        ½ t. cinnamon
2 eggs                                                     ½ t. nutmeg
¼ t. baking powder                           1 2/3 c. flour
1 t. baking soda                                  ½ c. oil
¾ t. salt                                                ½ c. cold water
½ t. cloves                                          1 c. pumpkin (about half a 15 oz can)
Mix all ingredients together in one bowl. Put in greased loaf pan or muffin tin.  Bake at 325 degrees.
  • Bread (one loaf) = 75-90 minutes
  • 12 Muffins = 45 minutes
  • 24 Mini muffins = 25 minutes

——————–

Cost:  about $1.50 !!!  
I was at my neighborhood natural market this weekend and they were selling freshly baked pumpkin bread for $7.99 a loaf!  That’s just craziness!!  They were skimpy little loaves, too.  I walked away smiling to myself, thinking about how I can go home and whip up a generous loaf of my own pumpkin bread that would be just as healthy as theirs!
——————–

Easy Ways to Make It Healthy:

  1. Level one: decrease the sugar by 1/4 or even 1/2 cup (1 c. sugar total) or use honey
  2. Level two:  use half whole wheat flour
  3. Level three:  make the “oil” melted butter or applesauce

One Bowl Pumpkin Muffins Healthy Remake

3/4 cup honey                                     ½ t. cinnamon
2 eggs                                                    ½ t. nutmeg
¼ t. baking powder                           1 2/3 c. whole wheat flour
1 t. baking soda                                  ½ c. coconut oil
¾ t. salt                                                1/4 c.water
½ t. cloves                                          1 c. pumpkin (about half a 15 oz can)
1 Tbs molasses
Mix all ingredients together in one bowl. Put in greased loaf pan or muffin tin.  Bake at 325 degrees.
Baking Change: Only bake muffins for 30 minutes – honey browns faster!
——————–
Both recipes call for only a half a can of pumpkin.  I wondered what to do with the other half, until I saw how quickly my family ate up the first loaf.  I made a second loaf the very next day.  You could double the recipe and freeze a loaf.  I knew we would be home quite a bit this weekend and I love to have something yummy baking in the oven, so I made the loaves on separate days.
 Tip: Make sure your spices are not dated and tired.  I could not believe the difference in my 2 loaves, the first one I made with spices I know have been in my cupboard since last fall, and although the texture was awesome, I wondered, “if the spices were super fresh, would taste any different?”
For the second loaf, I went to my market where they sell spices in bulk (you can help yourself to whatever amount you need and they charge you by weight).  DO THIS IF YOU CAN, the second loaf was amazing!  I love the buy spices in the bulk section option!

 I have been buying a small amount for whatever recipes I am going to make in the next week or two.  I did this for 2 recipes that I make all the time, chili and chicken curry, and both recipes tasted like they had a makeover, when all I did was buy super fresh spices.  It is very economical, and so very worth it!

Frugal/ HOME/ Homemaking/ Seasonal

Fall Decorating

I finally got my fall decorations out this week.  I have been looking forward to digging the bin out of the attic closet and seeing what goodies were waiting for me.  Here is a picture of what was inside, boy it looks like a lot!  Don’t know if I can call it simple, but it was pretty easy to place things around the house, and I didn’t feel like I had to use everything, and got rid of stuff that didn’t excite me

Fall decorating really can be done quite frugally.  It really just takes a few touches.  Even just a couple little pumpkins sitting around gives a festive feel. I did not buy a thing this year, over the 13 years we have been married, I have accumulated quite a bit, so I didn’t need to add more.  As much as I love the look of real pumpkins and gourds, it kills me just to have them sit there and get soft and thrown away after the season, so I didn’t buy any.

Here are some picture of what I did with that table- full of fall

This is my sunroom.  It is fun to put seasonal decorations out there to greet my guests when they visit.
Notice the basket of pine cones.  Pine cones are a great way to decorate fugally.  I use them during the fall and keep them out for Christmas. I know people here in Nebraska who can just go right out to their own yard to gather pine cones.  Now that’s cheap!

These pictures are all of my living room.  Just little fall touches here and there.  That leaf candy dish is from a dollar store, I like to fill it with nuts when guests are here.  You can find sprigs of fall berries
quite inexpensive at craft stores, they add a lot and keep year after year.

Throw pillows and magazines are two of my favorite ways to bring touches of the season into my home. This chair did have a red pillow with yellow circles on in, but it was just too bright and summery, so it got packed up with some other red touches I had in the living room, and replaced with this fall looking one instead. Magazines are great, use them to decorate!!  I love, love, love the cover of the Martha Stewart Living magazine this month!

On to the dining room. I didn’t get a picture of our dining room table, but it is a central location in our home, so  I always have a seasonal candle sitting on my table during the fall and winter months.
  We have one lit almost nightly, I even light them during the day when
I am the only one home!  I love candles!
Kitchen-I don’t do much decorating here.  I like my kitchen simple and clutter free, so just a few fun things here and there.

Lastly, you just can’t forget the bathroom!  This is another room I like to keep pretty simple (who wants to clean around a bunch of chotskies?)  This is another place I always have a candle burning when guest are over, and um, the back of the, um, ‘throne’ is a great place for potpourri and deodorizing spray.  This spray smells like Red Delicious Apples.  I hope it still smells delicious,
 it has been packed away since last fall!:)
So there you have it.  Simple fall decor…  a pumpkin here, some pine cones there, a couple of throws and pillows, a magazine or two, candles and…VOILA!  FALL!  It really did help warm up the feeling of my home, and compared to past years, I kept it pretty minimal.  Happy Fall!
FUN/DIY/ Seasonal

Mason Jars- Glowing Monster Jars

**Thought I would re-post this now that it is getting close to Halloween!  This is actually one of my most popular posts on the blog, it does really well with search engines for some reason.  Let me know if you end up making these little monsters with your little monsters!

In this previous post, I told you about my love affair with mason jars.  Well, I’m still having the affair, and I said I would post about all the great things a mason jar can do, so here we go!
Here is a super cute idea for a Halloween craft using mason jars.  I have not made them yet, but I know the minute my daughters see them they will beg me to make them.  I found them here at Not So Idle Hands and they make me love my jars even more!

Crafts…I wouldn’t say I am a person who likes making crafts.  I think it is my impatience.  I like the idea of the craft, but I just want it to be done and do not really enjoy the process.  Still, I buckle down occasionally and just do it, mostly because I have 3 very crafty girls so it is a way to spend time with them, and I have found that being crafty is a frugal way to decorate my home, so that is also motivating.

These little light up monster jars get me a bit excited because I love anything that creates atmosphere, and I know these will. Maybe I can just start simple and make three of them representing my own three lovely, little monsters.  I think these would be fun in my sunroom at night, creating a spooky fun glow!

*update:  We made them today!  I used tissue paper that we had on hand which happened to be a goldish, coppery color.  They were really fun, my girls got really into it.  They look cute lit up with a tealight!

Top