Browsing Category

DIY/Crafts

DIY/Crafts/ FUN/DIY/ HOME/ Organizing

Organizing Tips With My Pastry Chef

_MG_0044

This is going to be a fun post, where I get to show off my little pastry chef and give organizing tips on how to literally organize tips–pastry bag tips that is!

My 13-year-old Avery is my little pastry chef, and has been for the last few years. I’m amazed at her baking skills and have to say, it is quite fun having someone who bakes in the house! Every holiday, birthday, or event gives her an excuse to make something beautiful and delicious. Her creations show so much love & make a simple gathering something special.  The following photo is a cake she made for her Grandpa’s birthday–Chocolate Cake with Cookie Dough Filling, Chocolate Ganache & Piped Peanut Butter Buttercream. Amazing!

Chocolate-Peanut-Butter-Cake (1)

We are having out-of-town company this weekend and she already has decided on what she sweet she is going to greet them with. Vanilla cupcakes with thickened Chocolate Ganache filling and piped Nutella frosting. Oh my!

Image-1 (1)

FullSizeRender (1)

As her baking hobby has grown, so has her collection of baking supplies. I have made it clear that I don’t have the space to store all of her supplies in my small kitchen. We have kept all of her baking supplies in her room, but it has been difficult to keep everything organized and carry it all downstairs when it comes time to bake. That is…until now.

_MG_0009

I found the perfect solution to her needs while shopping at Michaels craft store. They carry the Creatives Options organization line and it was exactly what I needed. I desired a system that was portable and that would fit a variety of baking items, large and small. It needed to fit measuring cups & spoons, cupcake liners, cake pop sticks, piping bags, piping tips & more. We also needed storage for some of  her larger cake pans. I picked up both the Creative Options Large Rack & the Creative Options Project Box at Michaels, which I knew would fit all of her supplies, big and small.

Creativesorganizer2

{To Pin}

The Creative Options Rack comes with individual organizers that have adjustable dividers that worked great to give each little pastry tip a home of their own. I kept the dividers out of middle organizer to store cupcake liners. The individual organizers slide easily into the rack, and there is more great storage at the top of the rack under the lid.

_MG_0032

When I showed her the Creatives Options Large Rack organization system with all of her supplies organized, her eyes lit up, and she loved it! Having a little compartment for each size piping tip was her favorite part.

_MG_0021

_MG_0033

{Creative Options Project Box}

She loved that the Creatives Options organization system is portable, so she can easily carry it up and down the stairs from her room to the kitchen. She can even take it to Grandma’s house to bake with her cousin during sleepovers!

It fits perfectly in her room and even matches the decor. It is the perfect system!

_MG_0050

_MG_0062

Here are a few other organizing tip ideas for you, using the Creative Options Organization Rack:

Crafts–the obvious

Home Office Supplies

Makeup Storage

Hair bows, brushes, elastics, & headbands

Organizing receipts & coupons

Pantry Storage

Playroom Storage –for all those small toys like cars, doll clothes, dress up supplies

Jewelry

Under the Bathroom Sink

Garage Organization — nuts, bolts, zip ties

Garden Organization — seed packs, plant markers, garden hose attachments


What about you?

Do you have any favorite organizing tips for me?

What would you use the system for?

Keep an eye out for the upcoming post featuring the recipe for Vanilla Cupcakes with Chocolate Ganache filling and Nutella Buttercream!


DIY/Crafts/ Homemaking/ Spiritual

When Hopelessness Needs a Remedy + Simple Curtain Hack

a window with a curtain hack

**This is a guest post by Deidra Riggs.  She is my dear friend and neighbor, and I am so excited to have her here as guest at New Nostalgia.  This post is just a glimpse of her authentic, loving heart—a heart that has been there for me & prayed me through some of my toughest life moments. Read on to know why her heart is happy these days, and enjoy the Simple Window Hack at the end of the post.

……………………………..

I’ve been having a secret celebration in my heart these days.

One year ago today, I was one sick woman. Last February, I had a business trip in California and, when it was over, I flew to Vancouver to meet up with my husband. It was the week of Valentine’s Day. Rarely do we do anything really special for Valentine’s Day, but last year, we decided to take a trip so that my husband could ski and I could write.

We had a great trip. While not the best ski weather (it rained nearly every day), it was good for us to get away and spend some time together. At the end of the week, we flew home to Nebraska and, not long after we’d settled back into our routine, I came down with a nasty virus.

It was one of those viruses that wrestles a person to the ground in about twelve hours. At first, I thought it was just a cold, and that I could press my way through it for three or four days. I was wrong. By the end of the first day, I knew I’d have to surrender and so, I climbed into bed, hoping to doctor myself back to health with Tylenol and NyQuil. But this one was a doozy. I was achy from the fever and worn out from the coughing. My head maintained a constant ache that made me wonder if someone had implanted a knife behind my eyes when I wasn’t looking.

That virus knocked me down for two entire weeks. Somewhere in the middle of those fourteen days, my husband drove me to see my doctor. She checked me out and then patted me gently on my knee. “This thing is going around,” she said. “It’s nasty, and you just have to tough it out.” So, home I went. Back to bed.

Now, worse than being sick with that virus was the fact that it rendered me incapable of doing anything but lie in my bed in my empty house with nothing but the thoughts in my head. My husband came home each day at lunch to check on me. At night, he’d bring me dinner and sit with me in the bedroom. But, for most of the day, I was all by myself and it that was not good. Not good at all.

Depression is a nasty bugger. For me, it usually begins with a sad or scary or sinister thought that won’t let go. It keeps running itself around on a little track in my head and, before I know what hit me, I’ve fallen down the rabbit hole of hopelessness. If you’ve ever experienced it, you know what I’m talking about. In those times, it’s a struggle to hold onto any shred of anything that offers hope.

Last year, in my bed, hope came through the window. I’d turn over onto my right side and peek out through the curtains, looking for a slice of blue between the branches, or listening for the call of the cardinal. Sometimes, a robin would land on the peak of the roof just on the other side of the screen. Most of the time, the hope lasted for just a few minutes, but a few minutes of hope is a magnificent deposit in the battle against deep sadness. Slowly, over a few weeks (at the tail end of that virus, I got a nasty case of strep throat which set me back for another week), my body healed and I was able to get myself outdoors. There, with daily doses of sunshine and fresh air and the promise of Spring, my mind found its way back to wholeness.

This year, I was silently fearing February. I know it was an irrational fear, but it was there, just the same. I was afraid I’d get sick again and wind up with a repeat of last year. But, here we are, all the way into Spring! Hoorah!

There is no guarantee that I’ll never be sick again. I probably will be, because we live in that kind of world. But, each time I pass by a window, or hear the song of a cardinal, I’m reminded of the power of hope, even in the smallest dose. And you, sweet warrior? You who know these feelings, too? I’m praying the power of hope over you today. May it reach you through the window of even the tiniest faith, and restore your beautiful soul.

And this hope will not lead to disappointment. For we know how dearly God loves us, because he has given us the Holy Spirit to fill our hearts with his love. (Romans 5:5)

………………………………….

CURTAIN-HACK-PIN

SIMPLE CURTAIN HACK

Here’s a little decorating hack for the windows that surround you. It’s one I’ve used for many years and I love it because it’s sooooo inexpensive and easy! Not a single tool required. All you need is a tension rod, two tea towels, and some drapery hooks on rings. The total cost of this easy window hack? Less than $15!

………………………………….

Picture of Deidra RiggsDeidra Riggs is a national speaker, editor, and the founder & host of Jumping Tandem: The Retreat. She has been a featured speaker at Q Women, TEDx, and The City Gates Initiative, as well as several women’s events, including Allume, Winsome Retreat, the Beautiful Life Conference, and Compel. She is a contributing writer for Incourage, and her work has been featured online at the Washington Post and Today’s Christian Woman.

Deidra is the author of “Every Little Thing: Making a World of Difference Right Where You Are.” Her second book will release in the Spring of 2017. Deidra and her husband are the proud parents of two adult children, and the happy inhabitants of an empty nest. They live in Lincoln, Nebraska.

 Follow her here:  Website | Twitter | Instagram | Facebook | Pinterest
DIY/Crafts/ Featured/ FUN/DIY/ Seasonal

Snow Day Memories & 3 DIY Snow Paint Ideas

Snow-Paint-Collage

Have you ever made snow paint? It is one of the easiest DIY’s we have done & is lots of fun too!

We are on day two of blissful snow days. I’m wearing the same pajama pants that I wore all day yesterday and you would all just laugh at me if you saw the state of my crazy hair. It is 10:30am and even my husband is still walking around in his pajama pants, so we are truly taking advantage of the forced slow that snow brings!

Snow days are so different now that my girls are older (16, 15 & almost 13). I found myself reminiscing about snow days of old, and I remembered a few photos of one particular snow day from 2013.  My Avery was 10 and was so very excited to stay home from school. Those were the days when she was young and snow was magical & she couldn’t wait to get out in it. I dug the pictures out to keep the memories alive on this blog & to share them with you!

IMG_0867

I vividly remember my Avery waking up that day in her snuggly jammies with a cozy bathrobe wrapped around, but still her feet were bare.  Is it just me or do naked toes on cold days drive any of you other Mama’s out there nuts? To see naked feet on a snow day just makes me shiver.

“Put some socks on those cute feet, you are making me cold!” My kids have heard me say this more than once on cold winter days.

That morning, Avery made a list on the white board she kept in her room. I love that she made plans that took action. Now, during the last 2 snow days, the action is less as she lays in her bed with her ipod and Netflix.  I do know those cute toes got a coat of polish yesterday, so I guess that counts as movement!

IMG_6862

She did come our from her room yesterday afternoon and baked some cookies.  I can always count on my Avery to get in the kitchen on the weekends or days off of school to bake something yummy.  She LOVES to bake.  Back in 2013 on that fun snow day, we baked brownies while waiting for the afternoon sun to warm the day up a bit.  Look at that brownie batter all over her face! Now, the only mess is in my kitchen after she is done baking, but not on her face. Both are precious moments, though, and I know I will miss that messy kitchen someday, as much as I miss mess on her face!

IMG_6865

We continued to pass the time by making paper snowflakes. My goodness she was so adorable! I loved that stage with adult teeth but child face. So cute! Soon she will be getting braces on those teeth and look very much like the middle schooler that she is. Now if I want snowflakes, I make them myself. This is the first year she has not been too into crafty things. She is growing up!

IMG_6855

I snapped a picture of her boots warming by the vent.  She outgrew those long ago.  She now is in the stage of her feet staying the same size for more than a few months at a time. A blessing, as adult size shoes are about double the cost of children’s shoes.  She now wears the same size I do.

IMG_6843

DIY SNOW PAINT IDEAS

Before she went out into the snow, we decided to make some DIY Snow Paint. This is so simple to make. It is just food coloring and water.

~Fill squeeze bottles halfway with water.

~Add drops of food coloring until desired shade is achieved.

~Put your finger over the hole and shake to mix.

Kool-Aid Snow Paint

~Fill bottles up with water.

~Add a packet of kool-aid

~Shake to mix

~Enjoy the fun colors that smell wonderful!

Magic Snow Paint

~spinkle areas of snow with baking soda

~fill squeeze bottles or spray bottles with vinegar & a bit of water

~add food coloring for color & shake to mix

~have kids find the ‘magic snow’ by spraying the snow and watching for a bubbling reaction of the baking soda and vinegar

IMG_6846

IMG_6810

Avery had fun that day painting snow, but the highlight of the day was when a local news crew saw her shoveling and stopped to ask her a few questions. They featured her snowman & asked her why she liked shoveling. Her answer? “Because you get to help out your parents and..it’s just FUN shoveling!”  Aww…be still my heart.  She told me today that even though she looked cute and composed, she was a little freaked out as they didn’t ask us to interview her and just started filming. We still have it locked and saved on our DVR. I need to figure out how to get it off and save it another way! It was fun to watch again today as a family. Her little voice was so sweet.

IMG_6858

After her big interview, she came in to warm up… with an icicle?!? Love the pink cheeks & the willingness to pose for a photo.  I find that my teenage girls are now much less likely to let me take their photo.  Now I just steal their instagram photos and use them as my own when needed, knowing they are already approved for the public.  Or pictures like the one below, where they are prepared & ready to smile!

BOWMANCHRISTMAS_2015-13 resized

{Christmas 2015}

As much as I miss my girls and their younger versions, I am cherishing every moment of them as teens, as I know there will be a day coming where I will miss their teen version! I am so very thankful to be here, to be their Mom in every stage they go through. I love my girls…oh, and that man in the middle? He’s not so bad either!

…………

Do you have snow days in your part of the world?

What do you love to do on snow days?

Do you have littles or teens? How do you enjoy every stage?

SNOW-PAINT-HEART{for your pinning pleasure}

Christmas/ DIY/Crafts/ FUN/DIY/ Holidays/Parties/ Homemade Gifts

DIY Wine & Snack Gift Basket

WINE-SNACK-GIFT-BASKET

I love showing up to a holiday party with a little hostess gift. Usually I keep it small and simple, like a homemade snack in a mason jar. During the holidays, it is fun to get a bit more generous and creative, so I did! I made this this festive DIY Wine & Snack Gift Basket. Wine is the perfect simple, sparkly & sophisticated hostess gift.

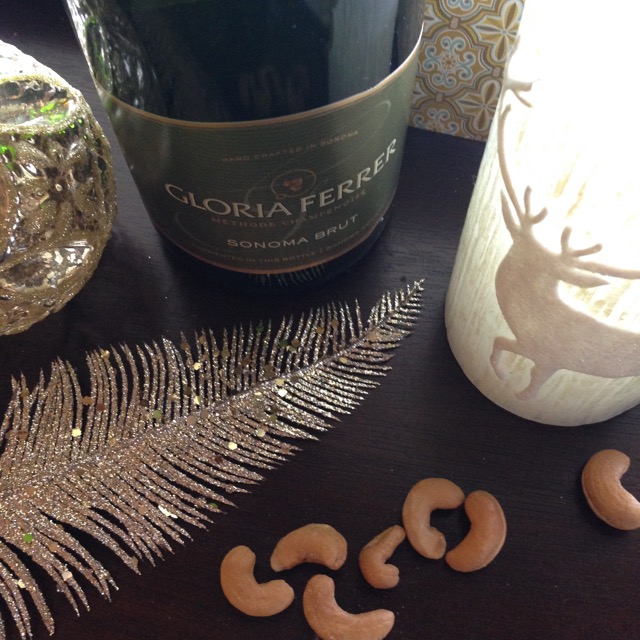
2 bottles of Gloria Ferrer Wine & a sparkly gold ornament

Gloria Ferrer wines is the star of this DIY Wine & Snack Gift Basket. Gloria Ferrer caves and vineyards opened in 1986, is Carneros’ original sparkling wine house, owned and founded by the Ferrer family of Spain. Exuberant and fruit-forward, Gloria Ferrer wines go perfectly with today’s diverse and flavorful cuisine, and have earned over 400 gold medals and 50 90+ scores in the last 5 years. Needless to say, they are the perfect wine choice for my gift basket.

I chose the Sonoma Brut & the Royal Cuvée:

Sonoma Brut –91% Pinot Noir, 9% Chardonnay

Winemaker Notes: Delicate pear and floral notes backed by toasty almond.  On the palate, one finds lively citrus, toast and apple flavors overlaid with persistent effervescence, a creamy mid-palate and toasty finish.

Royal Cuvée Brut –67% Pinot Noir, 33% Chardonnay

Winemaker Notes: The wine opens with green apple, citrus and honey on the nose.  This continues into the mouth adding black cherry and brioche with Asian pear.  The mousse is fine textured and creamy.  Light mineral character and Meyer lemon continue into a long crisp finish.

After typing that, I am tempted to keep the basket for myself! They sounds so delicious!

Glittery feather, reindeer candle and wine for a gift basket

I wanted a few fun things in the basket along with the wine. I wanted the basket to have a simple, classy and elegant feeling, to compliment the Gloria Ferrer Wine. I wanted a touch of glitz without being overdone.

Continue Reading…

DIY/Crafts/ FUN/DIY/ Gardening

11 Ways To Start Thinking Garden

Time-To-Garden-2

Grow Food Indoors via Ebay

{microgreens, sprouts & more!}


Simple Painted Rock Plant Markers

{could not find the link to these, but they were too cute to not share! Could use a white or silver Sharpie}


The Ultimate Seed Starting Guide via Garden Therapy

{this truly is the ultimate seed starting guide.  Click through for some awesome inspiration and how-to’s!}


Using Tubs As Greenhouses via Garden Web

{use paper cups instead of styrofoam to be more eco-friendly}


$_3


Herbs You Can Grow Indoors via Empress Of Dirt

{there is nothing like having something green and edible indoors, even while it is cold outdoors}


Time-to-garden-collage


Use Coffee Filters To Line Flowerpots via This Old House

{could even double up for extra protection. Less mess!}


Start Seedlings In Egg Cartons Via Planet Forward

{love this simple way to recycle}


Grow Sprouts  via The Thrifty Couple

{grow sprouts in a sunny windowsill indoors}


Square Foot Gardening via New Nostalgia

{I just love my square foot garden. This picture was taken of  me right before I was diagnosed with stage 3b breast cancer. Oh how life changed! So thankful to be here for another garden growing season!}


letterbox-garden-tools1

Set Up A Mailbox In The Garden To Store Tools via Home and Garden

{I think this idea is great.  It would keep tools handy and protect them from wet weather.}


Plants-In-Mason-Jars

How To Grow Plants In Mason Jars

{you know I had to include something with mason jars! I grow succulents in mason jars and they are wonderfully happy!}

………….

What about you?

Are you ready to start gardening?  Is it cold where you live or are you able to work the dirt now?

DIY/Crafts/ FUN/DIY/ Kids/Family

Outdoor Chalkboard

OUTDOOR-CHALKBOARD-MAIN

I have had this outdoor chalkboard project pinned to my Home: Yard boards for over a year now.  Making an outdoor chalkboard has been on the back of my brain in “projects to definitely do” file and I still can’t believe we actually FINALLY got to it.  It was such an easy project– I’m not sure why we put it off for so long.

IMG_6459

We have been busy making our teeny tiny backyard a family gathering place, and this chalkboard adds so much fun without taking up space.

This project cost us about $40.00.  It helped that I already had chalkboard paint left over from this indoor chalkboard project.  All I had to purchase was the plywood and primer.

Supplies:

Paint brush and roller

Kilz outdoor primer

Chalkboard paint

Plywood

Sandpaper

6 Galvanized Wood Screws

Small bucket + chalk + eraser + jute or rope to hang the bucket

IMG_6246

My eleven year old Avery was the perfect partner for this project.  She delighted in ever detail, and I made sure each step was a fun bonding process with her.  This summer has been such a great time of slow living, and this project is the perfect example of how slow living doesn’t mean lazy & boring living.  Just purposeful & meaningful living.

We took our jeep to our local hardware store.  We asked for a 4×8 plywood sheet.  They had one for $20.00.  I grabbed a small can of Kilz primer and 6 galvanized wood screws.  We had the rest of the supplies at home.

IMG_6255

On the way to the hardware store, we stopped for a fun little snack of bubble tea.  I am determined to learn how to make our own bubble tea, and visited the asian store next to the bubble tea cafe and picked up the supplies.  I will share how in an upcoming post!

The super nice guys from the hardware store helped me tie the plywood to the top of our jeep, and even supplied the rope.  They made it really easy on us.  We drove the few blocks home carefully and with giggles, feeling quite proud of ourselves.

We untied the wood from the jeep, and I carefully slid it down the jeep to my girl.  Teamwork!  We saved the rope, it would be perfect for hanging the chalk bucket.

~We set the plywood on some plastic storage containers in the driveway, and started sanding.  We did not go for perfectly smooth; we just got rid of potential slivers and made sure the front and edges were sanded.

~We dusted the plywood then applied a coat of Kilz to the front, back and edges.

IMG_6265

~We let it dry for 3 hours, then applied a coat of chalkboard paint to the front and edges only.

~We let it dry overnight and applied a second coat of chalkboard paint to the front and edges the next morning, then hung it up that evening.

~I taught little one learn how to use the drill, and she pre-drilled 6 holes in the wood, 3 on each side.

~We were determined to hang the board all by ourselves, and did so with the help of some stacks of books to hold the board up.  It would have been easier to wait for Dad to get home from work, but we wanted to do it ourselves!  It was a bit humorous as one book stack fell and we had to re-stack it.

IMG_6374

~Using the power drill with a screwdriver bit, we screwed it into the wall making sure we hit studs (it is the side of our garage, and the studs were easy to find as they are exposed in our garage), and tied a little bucket of chalk with holes drilled into the bottom for water drainage.  We are counting on the rain to be our friend and help us wash the board clean…or the hose will do just fine too! No chalk mess! We used a nail to hang the bucket and then gave each other a high-five.

IMG_6458

The chalkboard paint we used suggest drying time of 48 hours, then directed us to cover the entire chalkboard in chalk and then erase it. This layer of chalk dust primes the board for future artistic fun.

Chalkboard-shadows

The board has been much, much fun.  We have played many drawing games & had fun with our shadows at sunset.

hammock-dad-chill

It gives our family one more thing to do while we are hanging out in the yard.  While Avery and I were busy making silly shadows, Dad relaxed with a book, sister Colsie took over the hammock, and Teagan shot some hoops. Being purposeful with creating an outdoor space is working and it makes my heart so happy to see the family out there enjoying it!

Chalkboard-PinThis project came about thanks to Project Denner ‘s awesome post, who was inspired by OhDeeDoh.

DIY/Crafts/ FUN/DIY/ Gardening

How To Make A Fairy Garden

This fairy garden was one of the most fun projects I have done with my girl.  We did it about a year ago, and she is already asking if we are far enough into spring to make another one!  
She is already getting creative and finding things around the house to put into this year’s fairy garden. My Avery doesn’t really believe in fairies, (she wanted to make sure I let you all know that) {grin} but it is very fun and magical to pretend.  I loved that this project gave me precious time with my girl, as took a little planning & a fun date to buy plants.  I also loved teaching her a bit about gardening.
We started looking online for some different ideas for a fairy garden. Now, this is where perfectionist might set in.  There are some amazing miniature gardens and fairy gardens online, so use them for inspiration, but don’t allow yourself to get intimidated.

I challenged Avery to get creative and told her I only wanted to spend money on planting soil and plants.  The rest needed to be created by her.  She did such a great job, and even though a couple things she made were not weather proof–paper and stickers– they lasted a long time and was not a big deal to remove once they were spent.  

I also gave her lots of freedom to make the project her own, and encouraged her to get her hands dirty and do most if it all by herself.

We bought plants that would add texture.  A tall fern-like plant that added height & movement when the wind blew, a mossy type low-growing ground cover that would spread and fill in, a medium height plant whose leaves had a soft, white fuzz on them, and a few flowers for color. 

Avery made a fairy house out of Lincoln logs and covered the plastic roof piece with fun patterned duck tape.  She made a mushroom and lady bug out of clay and painted it, and a few stones out of clay which she sprinkled with glitter for a bit of fairy dust sparkle.  She also broke some wooden coffee stirrer sticks and colored them with marker to make a fence.

She placed her larger items first, and made a path with rocks and sparkly clay stones.  She added the low-growing ground cover type plant.

She then added the tall plant for added height toward the back by the fairy house.

She then filled in with the flowers.

She added the coffee-stirrer stick fence along the rock path.  By the way…fairies don’t need a door according to Avery.  

 Avery was very proud of her creation.  We kept it on our front porch in plain view so we could enjoy it and so Avery would be reminded to water it.  It was great fun to watch it grow and see the plants spread out and fill in.

How To Build A Fairy Garden
~1 large container with drainage holes in the bottom
~rocks or gravel to put in the bottom of container for drainage
~potting soil
~a fairy house (get creative–a small birdhouse would work, or glue wooden blocks together)
~decorations that are waterproof and sparkly! 
~wooden sticks to make a fence
~stones
~glitter
~plants (one tall, one medium, one low growing, some flowers.  Make sure they are all annuals & take the same amount of sunlight)
———
1. Put gravel or rocks in the bottom of container.  
2. Add potting soil.  
3. Add fairy house
4. Make a path with rocks
5. Add low growing plant
6. Add tall growing plant toward the back of container.
7. Add medium plant and flowers.
8. Made a gate with the sticks
9. Add the rest of decor
10. Sprinkle with fairy dust.. aka glitter
11. Water
(and Avery :))

Top