Browsing Tag:

kids

RECIPES/ Sweets

Teddy Graham Bear Treats Tucked In A Chocolatey Bed and Covered in Fluff


The non-profit my husband works for has been so very loving during this time of surgery & healing. The staff brought us meals for a week!  I cannot tell you how amazing it is to have people love us in this way.  I did not have to worry about cooking or feeding my family.  A HUGE gift.

My friend Melanie brought a great dinner of Chicken & Wild Rice Soup, bread sticks, salad & these cute little bear cups.  They made me smile so much and I immediately thought they looked like little bears tucked in bed.  She included a note that said “Kick back, relax & feel better soon.”

This started an argument between my hubs and I.  He said they were bears in a bubble bath.  I said they were bears tucked in bed, with a fluffy down comforter.  My 10 year old Avery just grinned as we argued and was delighted when she discovered under the fluffy “covers” was  oowy gooey caramel.

I had to message Melanie to see who was right, and darn it…Todd was.  The original recipe called these  Teddy Bears in a Bubble Bath.

I’ve changed the name, because I love my fluffy white comforter & my bed.

These are as delicious as they are cute.   The perfect little treat to take to someone who might be stuck in bed for awhile.

Teddy Graham Bear Treats Tucked In A Chocolatey Bed and Covered In Fluff

Ingredients
  1. 24 miniature cupcake liners
  2. 1 (18.25 oz.) box of chocolate cake mix
  3. 1 stick unsalted butter, melted
  4. 1 egg, lightly beaten
  5. 24 Rolo candies, unwrapped
  6. 72 miniature marshmallows
  7. 24 plain or chocolate chip Teddy Grahams
Instructions
  1. Preheat oven to 350 degrees. Line your miniature cupcake tin with the liners and spray with cooking spray.
  2. In a large bowl, combine the cake mix, melted butter and beaten egg. Stir until completely mixed together; it will be texture of playdough.
  3. Roll batter into 24 balls and place one ball in each cupcake liner. Gently press one Rolo candy into the center of each dough ball.
  4. Bake on center rack of oven for 10 minutes. Remove tin from oven and evenly place 1 Teddy Graham and 3 miniature marshmallows on top of each cupcake, pressing lightly to adhere to top.
  5. Return to oven for 2-3 more minutes. Remove from oven and allow to cool for at least 10 minutes in tin before removing to wire rack to continue cooling. 

Healthy Eating/ HOME/ How-Tos/ RECIPES

The Perfect Vegetable Tray-Keep It Full In Your Refrigerator & Watch Your Kids Devour Their Vegetables!

This vegetable compartment carry along tray has been one of my most favorite recent purchases.  I just LOVE IT!  I was keeping cut up vegetables in mason jars in my refrigerator, and they were pretty and great for creating salads, but I didn’t like that I had to grab one at a time, open all the lids, grab the dip and then set them out for the kids to eat.  Too many steps, and I found we were not eating raw veggies as often as I liked.
I thought about how my girls devour their raw veggies when we are at parties with veggie trays.  I thought about why that is, and a light bulb went off as I figured figured out a few reasons why that is.

1. Easy to grab veggies.
2. Dip right there ready to go.
3. It is pretty
4. It is convenient.
5. They can choose the veggies they like and leave the rest.

I decided to search Amazon and the perfect vegetable tray, one with an area in the middle for dip, and one with a lid so I could store it in the refrigerator easily. 

I found this one.  The perfect one.  I love it.  It is easy to clean, easy to carry, easy to snap the lid right on and take it off. It is not too tall to fit on my refrigerator shelf.  It takes up a bit of refrigerator space but boy, it is worth it!  What else would I want taking up space in my refrigerator other than healthy, beautiful vegetables ?
I pull it out every afternoon when the kids walk in from school and set it out on our table.  They come by, grab a veggie and gobble them up.  If it is out and in sight, with dip available, they will eat their vegetables.  
I fill it at the beginning of the week and usually once more mid week.  I love grabbing it when making a dinner salad and adding veggies that are already chopped or just need a bit more chopping.  So easy!

The handle on it is a plus.  I have grabbed it and gone to the park and taken it to my inlaws pool house. The perfect healthy snack that is always ready to grab and go!
Get this!  You will love it.  

 Don’t Forget To Pin It

FAMILY/ Healthy Eating/ HOME/ Homemaking/ Meals/ Parenting/ RECIPES

14 Healthy School Lunch Recipes Your Kids Will Love


How do I  know your kids will love these? Because mine do!  With summer break coming to an end, I decided to gather my favorite recipes to add to my girls school lunch boxes.  I will refer to this list often, to keep me out of the “peanut butter and jelly sandwich” rut.  Even if I do give them a pb & j sandwich, at least they will have some interesting and yummy sides!

Heavenly Hummus Sandwich
The apples and sweet dried cranberries make this sandwich kid friendly.
Udon noodles with sesame seeds and peas
The clementine juice in these noodles give a hint of sweetness.  We never have leftovers when I make these noodles.  Can be eaten hot or cold.
orange homemade fruit roll up
These are so easy to make and very versatile.  Use what fruit you have on hand, especially those that are starting to go soft.
chocolate peanut butter chia pudding with raspberries
This can be breakfast, lunch or snack.  It has wholesome oats in it and the amazing superfood, chia.  Chia has great fiber, protein and more omega’s than flax!  They are flavorless and help thicken  this pudding.
slieced applesauce bread
This bread is simple and delicious.  Uses ingredients that we always have on hand.
Peanut butter banana chia seed roll ups
Another great way to use those chia seeds!  These are protein filled thanks to the peanut butter and chia.
Whole wheat banana honey muffins
These muffins are so moist and this recipe makes a ton of them!  I freeze at least half.  You will love this recipe.
Crockpot apple sauce in mason jars
Great fall recipe, but really we make it all year long.  Just grab an extra bag of apples when you are at the store, throw them in the crockpot, and enjoy the amazing scent this recipe gives the entire house!
These are delicious and have gone viral on Pinterest, with many raving about the recipe.  It is a must try!  You will love knowing there are no preservatives and less salt in your kids crackers!
Black bean soup with spoon
This soup is perfect for a lunch box thermos.  It is a breeze to whip together the night before.  It is one of my MOST easy recipes, and has lots of great fiber and protein.
Crunch roasted chickpeas
I’m amazed at how a simple bean can become a healthy crunchy snack with just minutes in the oven.  Use these in place of chips!  Much more healthy & full of nutrition.
Lunch box smoothies
My girls LOVE when I put these in their lunches.  I take them straight from the freezer and by lunch time they have thawed perfectly.  I love knowing they are getting such nutritious berries and fruit in their lunches.
Cheesy Kale chips
These are actually vegan, but get a cheezy flavor from nutritional yeast.  Nutritional yeast is packed with vitamin B12 and is a popular ingredient in the vegan world, often used in place of Parmesan cheese.  These kale chips are a weekly staple in our home.  So nutritious. So delicious!
Orzo and roasted fall vegetables
My girls beg me to make this recipe.  They love the little bits of pasta, and the amazing flavor comes from roasted veggies that have been chopped so small that the girls have no idea that they are eating kale and a load of other veggies.  Winning!

///

Other posts on School Lunches from New Nostalgia:
School Lunch Plan: No More Baggies & A Free School Lunch Planner

Drinks/ RECIPES

Green Smoothie For Kids

Green smoothie for kids


I’ve been able to get more greens into my kids this summer than ever before, thanks to our new Vitamix blender.  I have been wanting a Vitamix for years, and finally saved enough Amazon bucks (thanks to you all clicking on my amazon links in the sidebars!) to get one for our family.  They are pricey, but MY WORD they are worth every penny.

We have been making green smoothies at least 5 times a week.  I’ve been freezing them in Popsicle holders which my kids love.  Kids are used to seeing green Popsicles, so this is a great way to get picky little ones to eat green.

Back to the Vitamix. I got the top of the line, the professional series 750 The difference in this blender compared to others is its power.  I can make crushed ice in seconds.  It chops our greens so small that they just end up coloring the smoothie, there are no tiny green pieces to get stuck between your teeth or for your kids to turn their noses up to.  The series 750 has pre-programmed settings so I can walk away and let it do its thing.  There is a smoothie setting, a puree setting (oh my the peach and strawberry puree’s I’ve made are to die for!) a soup setting (it whips so fast that it creates just enough heat to make perfect soup), and my fav, the self -cleaning setting. You just fill the container half full of water, add a drop of dish soap, and push the button.  It cleans itself!

Here is more from the Vitamix website:

With all the quality and precision of a commercial machine and a quieter, more elegant design, the Professional Series 750 offers five pre-programmed settings, including a self-cleaning option. The ultra-responsive Variable Speed Dial and Pulse feature allow you to precisely chop and mix ingredients to your exact specifications, making this blender the ultimate sous chef for your home kitchen.

Five pre-programmed settings ensure simple cleaning, walk-away convenience, and consistent results for smoothie, frozen dessert, soup, and purée recipes.

Newly designed 64-ounce container is perfect for family meals and entertaining, while fitting comfortably under most kitchen cabinets.


Vitamix blender

It is big, POWERFUL, and I love it.  If you have been thinking about getting a Vitamix, I highly recommend them!  If you use this link from Amazon I will get percentage of your purchase, which I will put towards the food dehydrator I’ve been eyeing..and will be most grateful.

Vitamix blender and box

Shipping was free through Amazon and delivery was quick. I was a happy girl the day this came in the mail!

Banana, mango, pineapple and kale for smoothie

On to our green smoothie!  This is a delicious smoothie that my girls really like.  It has twice the amount of fruit most green smoothies have compared to greens, so it is a good started smoothie.  As you get used to the flavor of greens, I encourage you to use less fruit and more greens.

Green Smoothie For Kids

2 cups (I use handfuls) or spinach or kale ( I used baby kale)

1 cup water

1 cup frozen mango

1 cup frozen pineapple

2 frozen (or not) bananas

Place greens and water in blender.  Blend until greens pieces disappear.  Add the fruit.  Blend until smooth.

If you look at the recipe, it counts for 8 servings of fruits and vegetables.  This recipe made enough for my 3 girls to have about 4 ounces each, and I had about 12 ounces, which means this counted for 4 of my 8 daily servings of fruits and veggies for the day!  Not bad for a snack, huh?  This is precisely why I am a big fan of green smoothies.

Blending ingredients together for a green smoothie

Isn’t the color amazing?  This is sweet, tropical-tasting, and delicious!

A blender containing ingredients for a green smoothie

The bananas make it so creamy.  I always make sure I have frozen bananas in my freezer, as they are the base for most of our green smoothies.

More smoothie recipes to come!

What do you think of green smoothies?

Have you tried them?

What is your favorite fruit/greens combination?

Meals/ RECIPES

Spaghetti Sauce Sweetened With Carrots–Your Kids Will Never Know!

spaghetti sauce sweetened with carrots

This is a version of a recipe introduced to me by my dear friend Debbie.  When I was going through cancer treatment, she made and brought spaghetti to our home quite a few times.  Not only did she bring her food to nourish our bodies, but her presence in my home was such a light in those dimmed times.  Her sauce was some of the BEST I’ve ever tasted, and I had to know her recipe.  She was sweet enough to share it with me.

This recipe has 2 super cool things about it.  They are so super cool that I am only introducing one of those things in this post, and will be writing another post about the other very soon.  The first cool thing is that it has NO SUGAR in it.  It is nearly impossible to find a jarred, store-bought sauce with no sugar, or the evil high fructose corn syrup.  I also had yet to find a spaghetti sauce recipe that I love that didn’t add sugar. Until this one of course. Carrots give the perfect sweetness to this sauce, and add some healthiness to it, too!

The second cool thing is that this recipe is just about 1/5 the amount of the original recipe.  In the original recipe, you make a huge batch, then freeze the leftover sauce in muffin tins, which then gives you a whole big Ziploc full of spaghetti sauce freezer pucks.  These are so great to have on hand!  I will be giving you the instructions and all the ways we use them at our house in an upcoming post.

Ingredients for spaghetti sauce

Here are some of the wholesome ingredients used in this recipe.  This photo is pretty special to me…wanna know why?

spaghetti sauce ingredients

This one is too…


spaghetti sauce ingredients

…and this one.


Little girl photographing

Here’s why. My little 9- year old took them!  She has been watching me and now has an interest in photography.  Discussions on natural lighting, using the whiteboard as a light reflector, composition and NOT getting the dirty dishes in the shot have all resulted in some great shots from Lil’ One.  I’m a proud Mama.

roasting carrots

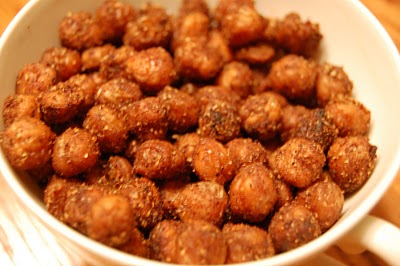
Back to our recipe…here is a not so great shot taken by my phone of some carrots roasting for this recipe.  The rest of the photos in this post are all taken by my iPhone, so little one’s pics above are definitely gonna shine in comparison.  I think that is fitting.

ingredients to make spaghetti sauce
Ingredients in this recipe include: Roasted carrots, onion, garlic, olive oil, tomato paste, diced tomatoes, oregano, basil, thyme, marjoram, parsley, chili flakes, black pepper, salt & water.

roasted carrots with olive oil

Start by roasting your carrots.  You only need 3 for this recipe, but I roast a whole bag of carrots when I make it because I LOVE roasted carrots.  I line a pan with foil, lay peeled carrots on, drizzle with olive oil and sprinkle with salt and pepper.  Roast at 450 degrees for about 20 minutes.  You will hear them sizzle and are looking for the carrots to caramelize on the bottoms a bit.  Mmmm….roasted wholesome sweetness!  You can reheat the carrots later and serve with your spaghetti dinner, or you could just save 2 out for the recipe and eat the whole pan for lunch like I did today!  For more on roasted vegetables, click here to read 5 reasons why I love roasted vegetables and 19 roasted vegetable recipes!

roasted carrots

Break three roasted carrots up into a bowl.

mashed carrots

A quick mash with a fork is all you need. Set aside.

onions and garlic

Heat olive oil in a pan.  Add your onions and garlic.  Let cook for a few minutes until softened and transparent.  Add spices, salt and pepper.  Take a whiff–this smells so good!

mashed carrots and onions and garlic


Add mashed carrot & stir.


making spaghetti sauce

Add tomato paste and…

stirring spaghetti sauce

….stir.

crushed tomatoes

Add crushed tomatoes, or if you have chopped, you can crush them yourself. I like to chop my canned Italian tomatoes up with my Cuisinart hand blender before adding.  My family does not like big chunks of tomatoes in our sauce.  I use my Cuisinart in this way all the time, it makes it so easy!

spaghetti sauce in bowl
Add tomatoes. Stir.


simmering spaghetti sauce

Simmer the sauce for 2-4 hours.  Could also put into a crock pot on low for the day.

mason jar spaghetti sauce

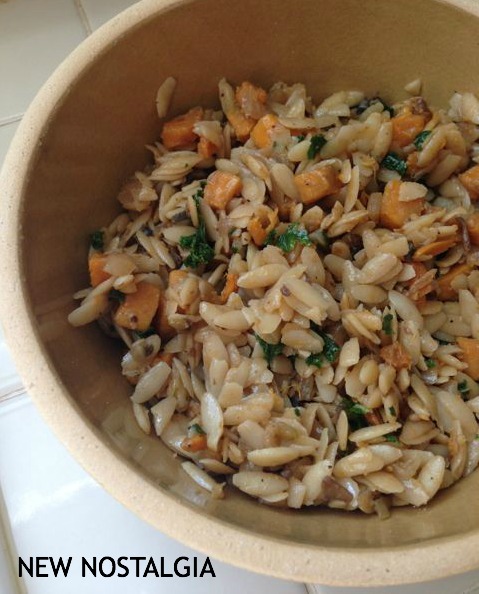
This recipe made about 5 cups of sauce.  The recipe I will share with you soon is this same recipe, but it makes 28-30 cups!  I will for sure be making a big batch next time.  I love recipes that give you a BIG payoff for little amount of work.

spaghetti sauce in mason jar

This recipe was enough for 2 meals for our family.  I froze 1/2 in a mason jar and will be using it tonight for our dinner with some roasted eggplant and pasta.

………………..

Spaghetti Sauce Sweetened With Carrots

3 long cooked carrots – roasted, steamed or boiled

2 tbsp olive oil

salt & pepper

………………..

2 tbsp olive oil

1 onion, chopped

2 cloves garlic, minced or pressed

1 tsp dried thyme

1 tsp dried basil

1 1/2 tsp dried oregano

1 1/2 tsp dried parsley

1/4 tsp marjoram (I left out didn’t have)

pinch of red chili flakes (optional)

11/2 tsp salt

1/2 tsp pepper

2 14.5 oz cans chopped or crushed tomatoes (I used Italian herb type)

1 6oz can tomato paste

11/2 cups water (start with 1, add to desired consistency & taste)

………………..

Roast peeled carrots per instructions above, 450 degrees, drizzled with olive oil and sprinkled with salt and pepper.  20 minutes or until soft and brown/caramelized at the bottom.  Mash with a fork.  Set aside

Heat olive oil in a pan.  Heat olive oil in a pan.  Add your onions and garlic.  Let cook for 4-5 minutes until softened and transparent.  Add all spices, salt and pepper.  Stir.  Add carrots & tomato paste.  Stir. Add crushed tomatoes, stir.  Add water, a little at a time, until desired consistency. Simmer for 2-4 hours, or put into a crock pot and cook on low for 6-8 hours.

………………..

Stay tuned for how to make this recipe in bulk and freeze into pucks!  You will LOVE having portion size spaghetti sauce ready to use at all times.  I use about 5 frozen pucks when making spaghetti for the family.  It is

sooo yummy and I’m convinced this recipe gets even better after freezing!


Healthy Eating/ RECIPES/ Sweets

Healthy Snack Ideas For Kids

We are snackers here in this home.  We have an afternoon snack and a before bed time snack.

I thought I would share a list of snacks that we have come to rely on.

~apples dipped in peanut butter or almond butter
~a bowl of frozen fruit, slightly thawed
~yogurt/honey/granola
~wheat thins and cheese slices
~pretzel rods
~carrots
~hard boiled eggs
~edamame
~homemade granola bars
~dry cereal (Cheerios or Shredded Wheat)
~homemade popcorn
~smoothies
~homemade popcicles
~clementines
~frozen grapes
~cheese tacos (tortilla with cheese, heated)
~vanilla wafers

Sweet Treats
~whole wheat brownies
~fudgy buttons
~chocolate chip cookies
~bryers ice cream
~peanut butter cookies
~fruit leather

Drinks/ RECIPES

School Lunch Smoothies


I am constantly trying to figure out how to get fruits and veggies into my kiddos in ways that they get excited about.  School Lunch Smoothies are a great way to do just that!  My girls get so excited about these, and like them so much that I make lots of extras for them to grab a quick after- school snack from the freezer.


{my favorite, reasonably priced blender-Oster 6 cup, glass blender}


I linked some smoothie recipes below, but honestly, I just throw in whatever frozen fruit we have in our freezer.  I always include banana or peach, each give a nice thick base for the smoothie.  I try to add greens whenever possible, a couple big handfuls will do.  Usually it is spinach, as it is the most mild tasting green.  These smoothies had one frozen banana, about a cup each of frozen blueberries, pineapple & strawberries, and spinach.

I then add almond milk and blend until desired consistency.  I never measure.  I just add milk until I see a cortex in the middle, as in the picture below.  That is when you know you have a great smoothie consistency.  Sometimes I add protein powder (love this one by Plant Fusion), sometimes I add chia, sometimes I add hemp seed or oats.  Or not.  Smoothies are very forgiving.


The above smoothie is a pretty safe purple color. I usually don’t send my go-to green smoothie to school with my girls.  We drink it at home as an afternoon snack instead.  My girls don’t really enjoy the attention they get at school when drinking green, kids have quite the reactions to green smoothies!  Despite the color, my girls love how they taste.  Click Here for our Everyday Green Smoothie recipe.


{Ball Plastic Containers}

I only use plastic containers for our lunch boxes. (Click here to see what lunch box and containers we use.)  Everything else I store in glass ball jars.  These plastic containers from Ball are really, REALLY convenient and the perfect size.  The have screw on lids to prevent spilling, and the cups stack into each other so nicely, which is great for the freezer.


They thaw just enough by lunch time into the perfect cold smoothie consistency.  Make sure to pack a straw!


{Ziplock Smoothie Packets for the Freezer}


These are awesome timesavers.  If all your smoothie cups are full of frozen smoothie, just divide the fruit into baggies and they will be ready for you when you are!


{My Smoothie Boards at Pinterest}

I’ve started a smoothie Pinterest board for awesome smoothie inspiration!  How about you? Do you have any favorites to share?
Top