

There is so much that I love about this little project of Homemade Natural Lip Balm!
~It is easy
~It is natural
~Can be made with no artificial ingredients, colors, preservatives
~It really works!
~It feels great on the lips
~It can be made all organic if you so desire
~It made my girls think I was mom of the year!
The recipe is very simple:
Homemade Natural Lip Balm
click on ingredients to purchase from Amazon –*affiliate links
3 tablespoons Coconut Oil
3 tablespoon Shea Butter
3 tablespoons Cocoa Butter
3 tablespoons Beeswax
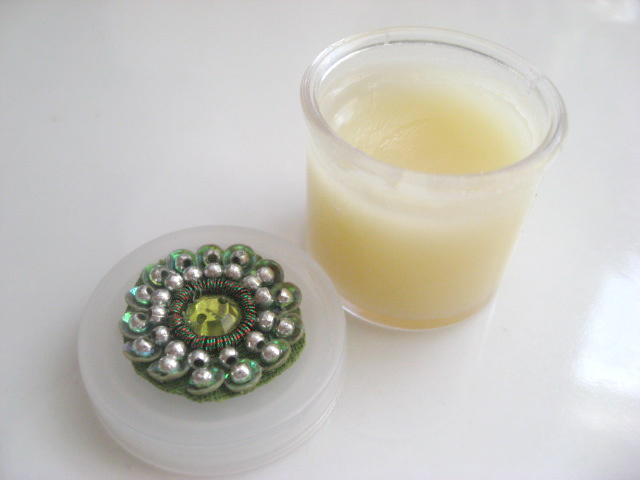
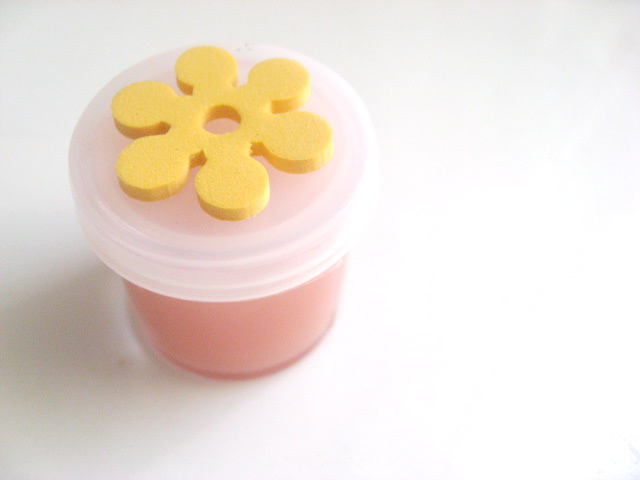
~If you want color, add a bit of your favorite lipstick to the mix.
~If you want flavor, add a bit of candy flavoring to the mix.
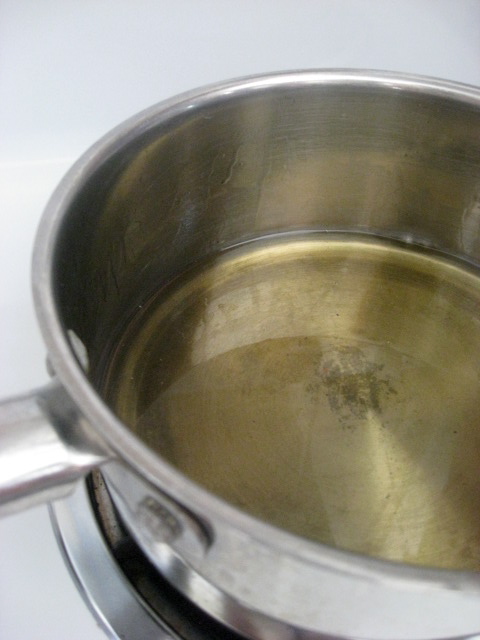
Put all ingredients into a pan. Melt on low. Spoon into containers. Let set. It takes just minutes, depending on the size of your container, to set up.

I found all the ingredients at one of our local health food stores.
I found our containers at Hobby Lobby.
I found the candy flavoring at Walmart, but I am sure they have it at Hobby Lobby, too.

The containers were found in the art supply section of Hobby Lobby. I was super excited to find the little square containers, but super disappointed when we brought them home. I didn’t realize they were stackables, so we only had 4 lids because I bought 2 packages, there were 2 stacks in each package. That was disappointing, since I thought I was getting about 12 containers with 12 lids. Instead, we have a bunch of leftover, empty containers that stack. Grr.

I am SUPER pleased with how it turned out. I can’t stand paying what health food stores charge for natural lip balm, so I love that I can make it myself.

My girls really got into this and kept saying what a fun project it was. Next time, I will order some containers Amazon, like this Lip Balm Container, and I will skip the flavoring/coloring. The cocoa butter/coconut oil gives such a nice scent, and I like the idea of keeping it super natural. Also, by keeping it natural, you can talk the man in your life out of his yucky Chapstick an into this awesome Natural Lip Balm, minus the girly embellishment on top, of course.
This recipe made quite a bit of lip balm. It makes 12 tablespoons, so if each container contains a tablespoon, that is 12 whole containers of lip balm!
I am planning on storing the lip balm we are not using in the refrigerator. I am not sure if that is necessary, but it may help prolong the life of the lip balm since it is all natural ingredients and no preservatives.
We found cute little embellishments for the tops of our containers and used a glue gun to glue them on. You can also use stickers.

This would be a great fun at a little girls birthday party or a dress up party!
Enjoy!
More From New Nostalgia
- 5 Reasons To Drink Lemon Water In The Morning
- 26 Tips and Tricks To Simplify Life
- The Best Recipe I’ve Ever Messed Up +Chewy Granola Bars
- Ziplock Freezer Smoothie Packs
- Homemade Cheese-Its
- My Daughter’s Homemade Laundry Detergent Science Project
- Coconut Lime Sugar Scrub & A Shaving Technique For Soft Silky Legs
- Hulling Strawberries With A Straw


Anonymous
October 26, 2016 at 5:49 amThanks for sharing your idea☺
Katie Benson
August 14, 2016 at 2:46 pmI tried it and it works! I didn’t have some of the ingredients but it turned out really well thanks for sharing your creation with the world.
AmyNewNostalgia
August 15, 2016 at 1:33 pmSo glad you liked it! I need to make another batch. Love this lip balm.
Julie Clark
March 21, 2016 at 9:05 amDo you think this recipe would work in a lipstick tube container or is it not stiff enough for that?
AmyNewNostalgia
March 21, 2016 at 6:45 pmnope…not stiff enough.
Natural Living
September 14, 2015 at 8:43 pmHey Amy we feature you here: http://www.naturalandhealthyliving.com/top-10-homemade-lip-balm-recipes/
Let us know what you think!
krystal
April 26, 2015 at 11:57 pmI’m allergic to cocoa butter, is there any thing I can replace it with?
how to link google plus and facebook
August 27, 2014 at 9:11 pmThis is really interesting, You’re a very skilled blogger.
I’ve joined your feed and look forward to seeking more of
your excellent post. Also, I’ve shared your web site in my social networks!
New Nostalgia – The Best Recipe I’ve Ever Messed Up
July 25, 2014 at 1:45 am[…] Homemade Natural Lip Balm […]
La
June 27, 2014 at 6:30 pmHow long would this last?
Would it go off?
AmyNewNostalgia
July 1, 2014 at 10:09 amI’ve had mine for over a year and it has not gone bad. I’ve been pleasantly surprised!
New Nostalgia – 8 Steps To Rescue A Room + Cleaning My Girls Room On Spring Break
May 13, 2014 at 2:27 pm[…] Natural Homemade Lip Balm […]
Anonymous
December 25, 2013 at 3:26 amThank you so much for your recipe! I’m making little organic lip gloss pots for Christmas happies. 🙂 This stuff smells and feels fantastic!
time2livelife
December 11, 2013 at 5:53 amYou can buy a 3 pack of little jars at Target for about $1! 🙂
Bailey Londagin
September 18, 2013 at 11:28 pmI would be adding some peppermint oil to this for a Burt’s Bees-type balm. Leave the cheap floral attaches and bead crap off the containers please.
Charlene Santos
May 23, 2013 at 12:49 amHi! I save my Altoids tin containers because I knew somehow they would come in reuseable! Reuse, repurpose, recycle! I’m glad I have something natural for my family to use! I would use this balm also as a cuticle balm with tea tree oil and peppermint oil or lemon oil. Even 100% argon oil! Fabulous!
Stephanie Hunt
April 6, 2013 at 2:31 pmI have a favorite lip balm that has a pink shimmer to it. How would you do that?
Anonymous
February 10, 2013 at 11:28 pmAmy did you use shea butter and cocoa butter creams or natural? I have found both but are pricey so I would liek to be ure before I purchase hte items. I have found all of the other items at reasonable prices. Thanks
Anonymous
February 5, 2013 at 7:26 pmWhere can I buy beeswax? Can’t find anywhere.
Patricia
August 30, 2015 at 8:12 amYou can buy beeswax at Bulk Apothecary.
Ashlymay
January 16, 2013 at 6:12 pmI thought of an idea for your stackable square containers. You could make a tower of three or how ever many you want of different shades and scents and put the decorative lid on the top and once the top container is empty put it underneath the tower and use it’s lid to cover the next lip balm in the tower. Just an idea, it would make use of the multiple containers you have without lids to cover them.
Anonymous
December 29, 2012 at 4:51 amcan you put this lip balm into the tubes that you screw up from the bottom or is to soft
Anonymous
February 18, 2015 at 12:42 pmI make mine in containers that do that. I buy them through Amazon.
Anonymous
December 24, 2012 at 3:17 amLove the recipe…I will try…..my girls will love the proyecto.
Leslie Borody
December 3, 2012 at 11:09 amWhat about using lansinoh instead of coconut oil? I used to use it on it’s own but im not sure of it will mix well with the other ingredients.
Miriam
November 25, 2012 at 10:25 pmInstead of candy flavoring, you can just use essential oils! We made some lip balm for my Mom and my MIL and used peppermint oil, it was so yummy!
Anonymous
November 23, 2012 at 5:29 pmCan i use vasaline shea butter or does it have to be raw shea butter
Amy Bowman
November 30, 2012 at 3:41 pmI would use only raw to keep the consistency right.
adeline
November 22, 2012 at 5:13 amWhere did you get the shea butter and cocoa butter?
Amy Bowman
November 30, 2012 at 3:41 pmin the ingredient list above the ingredient is linked to where you can get them. Or you can go to your local health food store…that is where I got mine.
Anonymous
November 14, 2012 at 1:03 pmI have some metal tins that I want to put this in. It has a sliding top. Is the lip balm hard enough to put in my tins
Amy Bowman
November 30, 2012 at 3:40 pmYes, I think it would be great!
Whoopsie Daisy Doodle
October 28, 2012 at 4:53 amI know this might be a silly question but how long do you heat it? Until it boils?
Amy Bowman
November 30, 2012 at 3:40 pmjust until it melts
Whoopsie Daisy Doodle
October 28, 2012 at 4:49 amI know this might be a silly question but how long do you heat it? Until it boils?
Anonymous
October 8, 2012 at 10:02 pmThis is so cool! Thanks for posting… Anyone have any suggestions on an acrylic fingernail friendly container? LOL
Wendy A
November 18, 2012 at 4:57 amA flat rectangular type container would be good for long nails.
The Knitting Divas
December 9, 2012 at 5:40 amWalmart carries plastic small (less than an ounce) jars3/$1 in their travel size section. Easy screw off tops.
saba rehman
September 24, 2012 at 11:14 amThis comment has been removed by a blog administrator.
Anonymous
September 7, 2012 at 5:18 amyou said you might put leftover in refrig. I think if you add a little grape seed oil to your recipe, it will help it last longer.
rebecca marie
May 4, 2012 at 6:51 pmoooh, duh… someone already said that 🙂 i was just excited!! see? lipgloss = exciting!!
rebecca marie
May 4, 2012 at 6:51 pmfor the stackable ones… put a teeny bit of different flavor in each one… a little girl would LOOOOVE stackable lip gloss!!!
(i’m 38 and i would like it)
Anonymous
April 30, 2012 at 11:13 pmI would like to do this as well but I can’t find beeswax anywhere except michaels and it is a big block for 30.00. (I’m in canada)
Anonymous
October 22, 2012 at 1:07 amTry a local bee farm, they usually produce their own beeswax. Or a health food store or the internet? 🙂
Anonymous
April 13, 2012 at 6:16 ami WANT TO MAKE THIS BUT AM ALERGIC TO COCONUT OIL, CAN I USE SOMETHING ELSE TO REPLACE THAT?
Stacy
March 21, 2012 at 9:32 pmYou could use different types of essential oils instead of candy flavorings in these.
Amy Bowman
November 30, 2012 at 3:38 pmGreat idea!
Dreena M. Tischler
March 20, 2012 at 9:41 pmYou can use shortening instead of coconut oil. Rosemary essential oil makes for a yummy combo. Cocoa powder can be used for both flavor and to color it tan.
Amy Bowman
March 19, 2012 at 5:10 pmYes, I could have used the stacks, but I had a bunch of little girls over from the neighborhood that needed to take their own little pot with a lid home. 🙂 It all worked out in the end. The stacks would be great for doing different shades and flavors!
Flowers
March 19, 2012 at 3:37 pmOh my gosh..these look amazing! I would be ovet the moon to receive a homemade gift like this! I have been trying to think of some little gift idea for the guests on my friends hen party so I will definitely give this a go. Thank you!
Anonymous
March 19, 2012 at 2:38 pmThis is soooo awesome. I’m compiling DIY things like this for Christmas presents!!!!! This is so perfect!
As far as the stacking containers, why not use the extra ones and stack the lip balms. The container on top acts as a lid. You could even do 3 different colors and or flavors. I’ve seen things like it on the market too.
Amy Bowman
March 19, 2012 at 1:05 pmhmm, not sure if it would work without the coconut oil. Maybe google search for more homemade lip balm recipes to find one without? Too bad for the allergy..:(
Anonymous
March 19, 2012 at 1:01 pmLove this idea! I am wondering if you think it can be made without the coconut oil. My husband is allergic. Thanks!
The Knitting Divas
December 9, 2012 at 5:37 amSubstitute Mango butter. If you use olive oil you may need a little more beeswax since its a soft (liquid) oil. One of the lighter ones will have less scent. Dee Yadasoaps
DestinationsHoliday
March 17, 2012 at 6:23 pmFabulous idea. Thanks so much for the recipe. I’ll definitely try this!!!
Rachel
March 16, 2012 at 2:44 pmDid you find the coconut oil had an overpowering scent at all? I love using coconut oil but I really hate the smell for some reason.
Anonymous
March 16, 2012 at 3:24 pmIf you use regular coconut oil it has no scent or flavor at all. Virgin, and extra virgin have a coconut taste and smell and are healthier for you.
Anonymous
March 16, 2012 at 6:13 pmYou can make different flavors in the extras and screw them all together so you have a choice. Just put the lid on the top one.
Anonymous
July 17, 2012 at 11:21 pmThat is exactly what I was going to say! 🙂
Jennifer
March 16, 2012 at 5:45 pmHow much did this cost you all together? So excited to try this!! Thanks for sharing 🙂
Sade Lancaster
November 10, 2012 at 6:25 pmdepends on where you get your product or if you already have it. Can get expensive if these items are not in your pantry and you cant get smaller quantities at your local health food store. I’d try online to get your supplies.
karen gerstenberger
March 16, 2012 at 5:41 pmThat looks like a great combination craft, art and cooking project – what fun, and a useful product. Maybe a good Christmas or birthday gift project for the future. Thanks for sharing!
Amy Bowman
March 16, 2012 at 2:55 pm@Rachel–I didn’t think it was overpowering at all. I noticed the cocoa butter scent more.
Rachel
March 16, 2012 at 3:15 pmOh ok, thats good. Thanks!
Kristin
March 16, 2012 at 2:13 pmLove these little cuties! Will be giving this a whirl!